1. Introduction and Overview
The GROWNEER HydroEasy1.0 Hydroponics Growing System Kit is designed for beginner-friendly indoor gardening, allowing cultivation of vegetables, fruits, and herbs. This system features a solid wood design and full-spectrum LED lights to support maximum plant growth. It provides an efficient and clean method for growing fresh produce year-round without the need for traditional soil gardening.

Image: The GROWNEER HydroEasy1.0 system showcasing its two-tier design with vibrant green lettuce on the upper tier and red tomatoes on the lower tier, illustrating its capacity for diverse plant growth.
2. Product Components
The HydroEasy1.0 system includes the following main components:
- Main Frame: Solid wood structure with integrated LED light panels.
- Water Tanks: Dual-layer design with four independent zones for water and nutrient supply.
- Smart Silent Pumps: Integrated within the water tanks for automatic water circulation and oxygenation.
- Full-Spectrum LED Grow Lights: Embedded in the upper panels to simulate natural sunlight for optimal plant growth.
- Planting Baskets: Designed to hold seeds and growing media.
- Control Panel: Buttons for setting light duration modes.
- Basic Accessories: Includes items necessary for initial planting, as detailed in the planting manual.
3. Setup Instructions
Follow these steps for the initial setup of your HydroEasy1.0 system:
- Assembly: Assemble the main frame according to the included planting manual. The design is intended for simple and quick assembly, with components clicking into place.
- Prepare Planting Baskets: Place your soaked seeds into the provided planting baskets. Ensure the seeds are properly positioned for germination.
- Add Water: Fill the water tanks with sufficient water. It is recommended to use distilled or filtered water to prevent mineral buildup.
- Add Nutrients: Add the appropriate plant nutrients to the water as per the instructions provided with your chosen nutrient solution.
- Insert Baskets: Carefully place the prepared planting baskets into the designated slots on the system.
- Select Planting Mode: Plug in the system and select your desired planting mode using the control panel. Refer to the "Operating Instructions" section for details on light modes.
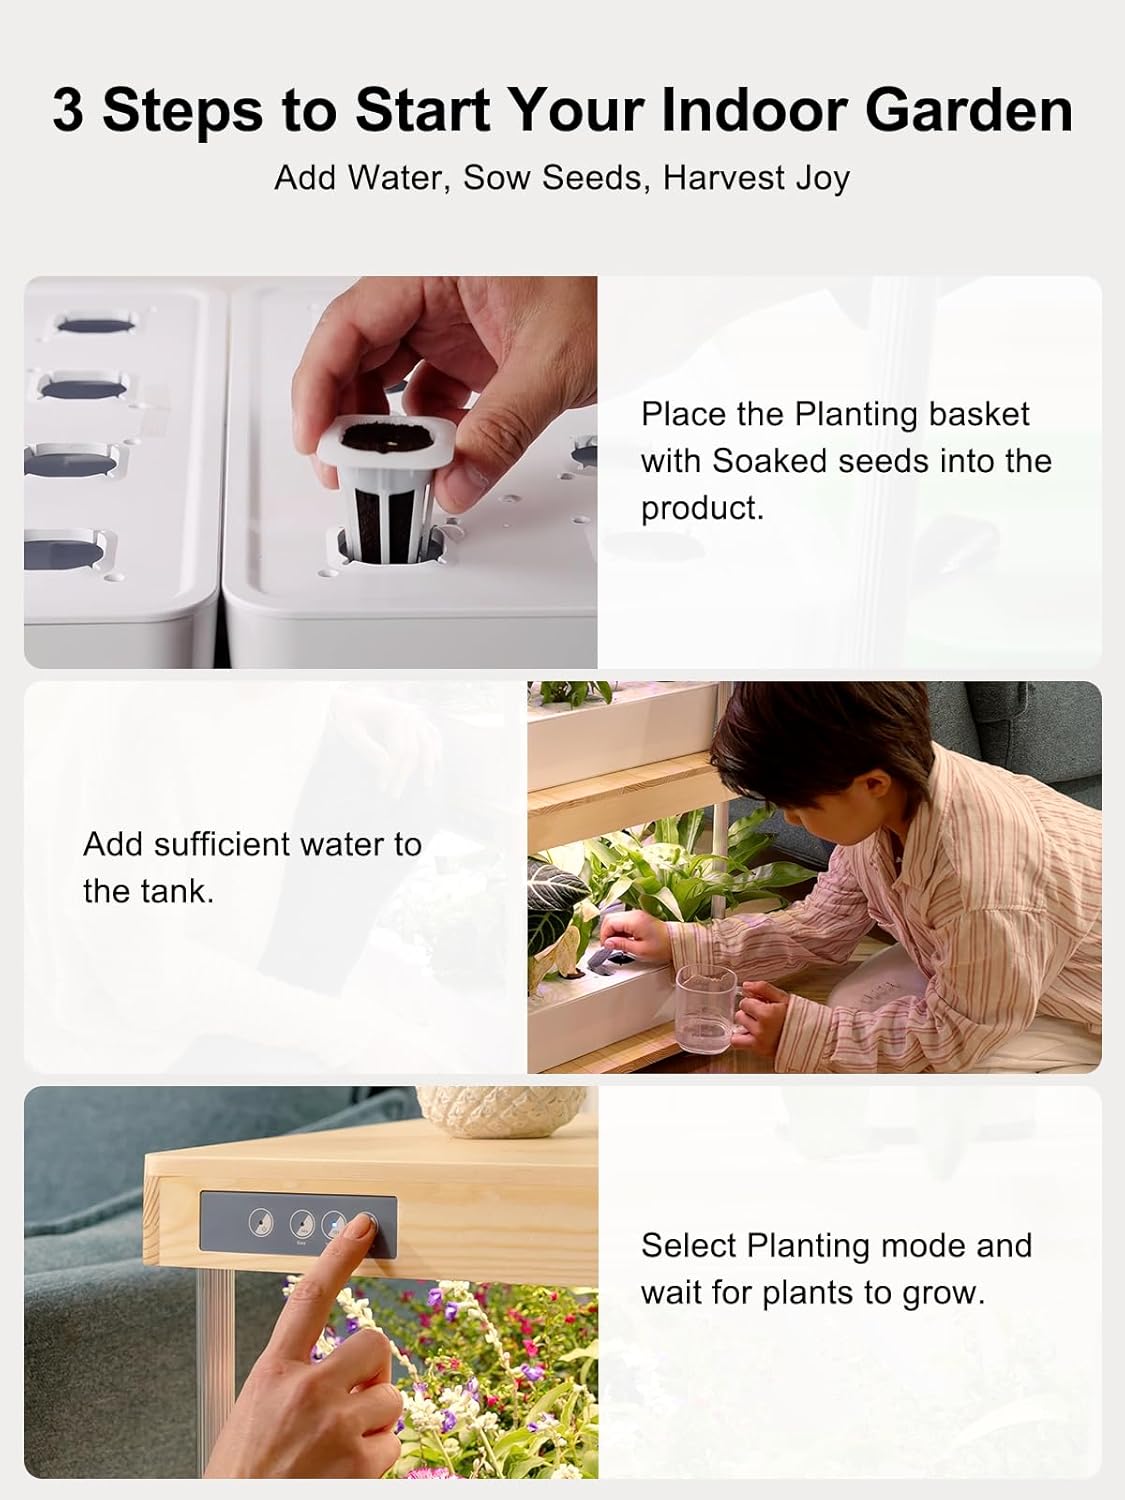
Image: Visual guide demonstrating the three primary steps for starting your indoor garden: inserting a planting basket with seeds, adding water to the reservoir, and pressing a button on the control panel to select a planting mode.
4. Operating Instructions
4.1 Light Duration Options
The HydroEasy1.0 offers three distinct light duration options to cater to different plant growth stages and user needs:
- 12h (Vacation Mode): Provides 12 hours of light per day. Suitable for maintaining plants when you are away or for plants requiring less intense light.
- 14h (Easy Mode): Provides 14 hours of light per day. Ideal for the germination stage and general growth of most plants.
- 16h (Enhanced Mode): Provides 16 hours of light per day. This extended duration is designed to boost growth and can increase average yield by up to 50%, making it suitable for plants requiring maximum light for fruiting or flowering.
To switch between modes, use the one-click switch buttons on the control panel located on the top frame.

Image: Illustration of the three light modes: Easy Mode (14H light) for lettuce, Vacation Mode (12H light) for tomatoes, and Enhanced Mode (16H light) for sunflowers, demonstrating how different light cycles support various plant types.
4.2 Water Circulation System
The HydroEasy1.0 features a dual-layer, 4-zone independent circulation design. Smart, silent pumps facilitate automatic water circulation, which serves several critical functions:
- Oxygenation: Boosts oxygen levels in the water, which is vital for healthy root development and nutrient absorption.
- Nutrient Distribution: Ensures even distribution of nutrients to all plant roots across the four independent zones.
- Tailored Supply: Each independent zone can receive tailored water and nutrient supplies, allowing for diverse plant needs to be met simultaneously.

Image: A detailed view of the hydroponic system's water tanks, highlighting the water circulation and the bright full-spectrum LED lights above, indicating efficient plant care.
5. Maintenance
5.1 Cleaning the System
Regular cleaning is essential for the longevity and optimal performance of your HydroEasy1.0 system. The design facilitates easy cleaning:
- Smaller Tanks: The individual smaller water tanks are designed for easier removal and water changes.
- Detachable Pump: The water pumps are detachable, allowing for thorough cleaning to remove any clogs and maintain efficient circulation.
- Cleaning Procedure: Periodically empty the tanks, rinse them with clean water, and gently clean any residue. For stubborn buildup, a mild, non-toxic cleaning solution suitable for hydroponic systems can be used, followed by thorough rinsing.

Image: A visual guide demonstrating the ease of cleaning the system, showing a hand removing a plant from its slot, pouring water from a tank into a sink, and detaching the pump for cleaning.
5.2 Water and Nutrient Management
Monitor water levels regularly and replenish as needed. The frequency of water and nutrient changes depends on the plants' growth stage and consumption rate. As a general guideline, it is recommended to change the entire water and nutrient solution every 1-2 weeks to ensure plants receive fresh nutrients and to prevent algae growth. Always follow the specific instructions of your chosen hydroponic nutrient solution for optimal results.
6. Troubleshooting
This section addresses common issues you might encounter with your hydroponics system:
| Problem | Possible Cause | Solution |
|---|---|---|
| Algae Growth in Water Tanks | Excessive light exposure to water, high nutrient levels, or infrequent water changes. | Ensure planting holes are covered to block light. Perform regular water changes (every 1-2 weeks). Clean tanks thoroughly during water changes. |
| Plants Not Growing / Stunted Growth | Insufficient light, incorrect nutrient balance, pH imbalance, or lack of oxygen in water. | Verify light mode is appropriate (e.g., 16h Enhanced Mode for faster growth). Check nutrient solution concentration and pH levels. Ensure water pumps are functioning for proper oxygenation. |
| Pump Not Circulating Water | Pump is clogged, disconnected, or malfunctioning. | Check power connection. Detach and clean the pump to remove any debris. Ensure water level is sufficient for the pump to operate. If issues persist, contact customer support. |
| Root System Overgrowth | Plants maturing and requiring more space than available in the current system. | For larger plants like some vegetables, consider transplanting to a larger hydroponic system or a traditional soil setup if the roots become too dense for the HydroEasy1.0's capacity. |
7. Specifications
Key specifications for the GROWNEER HydroEasy1.0 Hydroponics Growing System Kit:
- Model Number: HydroEasy1.0
- Product Dimensions: 18.5 inches (L) x 14.5 inches (W) x 29 inches (H)
- Item Weight: 24.4 pounds
- Planting Capacity: 32 Pods
- Light Type: Full-Spectrum LED
- Light Modes: 12h, 14h, 16h duration options
- Water Circulation: Dual-layer, 4-zone independent circulation with smart, silent pumps
- Manufacturer: GROWNEER

Image: A visual representation of the HydroEasy1.0 system's dimensions, showing its length (18.5"), width (14.5"), and height (29"), along with the 9" clearance between the two growing tiers.
8. Warranty and Support
GROWNEER is committed to providing excellent customer service and support for your HydroEasy1.0 system.
- Standard Warranty: The product includes a 1-year warranty from the date of purchase.
- GROWCARE+ Service Plan: You can extend your warranty to 2 years by joining the GROWCARE+ Service Plan. This plan also provides expert support, 5x24 hours online consultation, and essential plant growth tips and reminders.
- Customer Support: For any questions, technical assistance, or warranty claims, please contact GROWNEER customer service.
Contact Information:
- Phone: 1 (855) 626-9888
- Online Consultation: Available 5x24 hours (details typically found on the GROWNEER website or within the GROWCARE+ plan documentation).


