
1. Introduction
The O'SKOOL Pressure Panel Clamps are designed to simplify and improve the panel glue-up process for various woodworking projects. These clamps provide exceptional four-way pressure, ensuring that wood panels remain flat and aligned during gluing, which significantly reduces warping and misalignments. This manual provides essential information for the safe and effective use of your O'SKOOL Panel Clamps.
2. Safety Information
Always prioritize safety when working with tools. Read and understand all instructions before operating the clamps. Keep hands clear of moving parts and pinch points. Wear appropriate personal protective equipment, such as safety glasses, during woodworking operations. Ensure your work surface is stable and clear of obstructions.
3. Package Contents
Your O'SKOOL Pressure Panel Clamps package includes the following components:
- (2) Set of clamp rails
- (2) Driving Clamp Assembly
- (2) Passive Clamp Assembly
- (4) Mounting Brackets
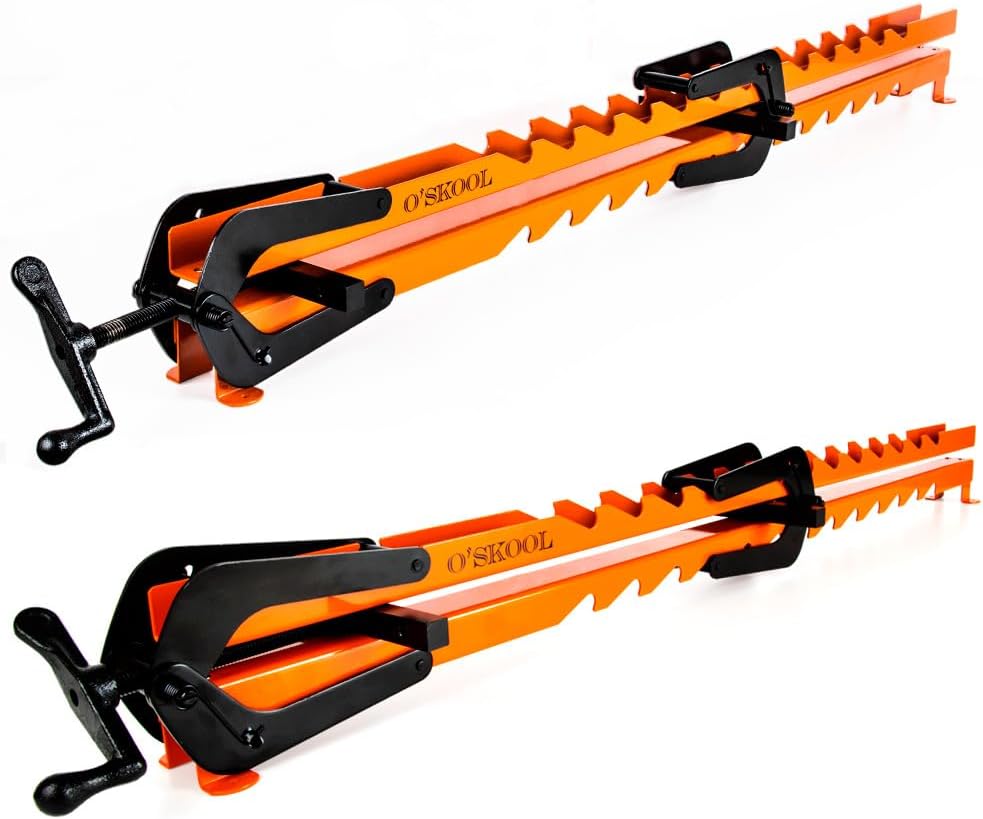
Image: The O'SKOOL Pressure Panel Clamps as they appear in the package.
4. Setup
Before using the clamps, ensure all components are present and in good condition. The clamps are designed for straightforward assembly and use.
- Assemble the Clamps: Attach the driving clamp assembly and passive clamp assembly to the clamp rails. The serrated design of the rails allows for easy adjustment of the passive clamp.
- Prepare Your Work Area: Ensure a clean, flat, and stable surface for your panel glue-up.
- Mounting Brackets: The included mounting brackets can be used to store the clamps vertically on a wall, saving valuable workspace. Secure the brackets to a sturdy surface using appropriate fasteners (not included).

Image: A close-up view of the driving clamp assembly and serrated rail.
5. Operating Instructions
The O'SKOOL Panel Clamps are designed for efficient and precise panel glue-ups.
- Prepare Wood Panels: Ensure the edges of your wood panels are clean, flat, and ready for gluing. Apply an even layer of wood glue to the mating surfaces of the panels.
- Position Clamps: Place the O'SKOOL Panel Clamps on your work surface, parallel to each other, with the serrated rails facing upwards.
- Arrange Panels: Carefully arrange your glued wood panels between the two clamps. Ensure the panels are roughly centered and aligned.
- Adjust Passive Clamp: Slide the passive clamp assembly along the serrated rail until it is snug against one side of your wood panel assembly.
- Apply Pressure: Use the handle on the driving clamp assembly to tighten the clamp. As you tighten, the unique four-way pressure system will apply force both horizontally (to join the panels) and vertically (to keep the panels flat and prevent bowing). Continue tightening until sufficient pressure is applied, ensuring glue squeeze-out along the joint.
- Curing Time: Allow the glue to cure according to the manufacturer's instructions before removing the clamps.

Image: Two O'SKOOL Panel Clamps securing a wood panel during glue-up, demonstrating the four-way pressure.
Video Demonstration
Video: Official O'SKOOL video demonstrating the features and proper use of the Pressure Panel Clamps for panel glue-up.
6. Maintenance
Regular maintenance ensures the longevity and optimal performance of your O'SKOOL Pressure Panel Clamps.
- Cleaning: After each use, wipe down the clamps to remove any glue residue, sawdust, or debris. A damp cloth can be used, followed by a dry cloth.
- Lubrication: Periodically apply a light lubricant to the screw mechanism of the driving clamp assembly to ensure smooth operation.
- Inspection: Regularly inspect the clamps for any signs of wear, damage, or loose components. Tighten any loose screws or bolts.
- Storage: Store the clamps in a dry environment to prevent rust. Utilize the mounting brackets for convenient and space-saving storage.
7. Troubleshooting
If you encounter issues with your O'SKOOL Pressure Panel Clamps, consider the following common solutions:
- Panels Not Flat: Ensure the clamps are positioned correctly and tightened evenly. Check that the wood panels themselves are flat before gluing.
- Insufficient Pressure: Verify that the driving clamp is fully engaged and tightened. Ensure the passive clamp is adjusted snugly against the panels.
- Difficulty Adjusting Clamps: Clean any debris from the serrated rails and lubricate the screw mechanism if necessary.
For persistent issues, please refer to the support information in Section 9.
8. Specifications
| Feature | Specification |
|---|---|
| Manufacturer | O'SKOOL |
| Model Number | CAV013 |
| Item Weight | 24.7 pounds |
| Package Dimensions | 41 x 10 x 7 inches |
| Material | Alloy Steel |
| Color | Orange |
| Style | Panel Clamp |
| Item Package Quantity | 1 (Set of 2 clamps) |
| Clamp Rail Dimensions | 1.6" wide x 1.15" high x 40.5" long |
| Clamping Capacity (Width) | Up to 36" wide |
| Clamping Capacity (Thickness) | 3/4" to 3" thick |
9. Warranty and Support
O'SKOOL products are manufactured to high-quality standards. For warranty information, product support, or to inquire about replacement parts, please contact O'SKOOL customer service through their official website or the retailer where the product was purchased. Please have your model number (CAV013) and purchase date available when contacting support.