
Prichor RC-71T
Prichor RC-71T Thermostatic Ceiling Fan Remote Control User Manual
Model: RC-71T
For Hampton Bay Home Decorators Collection
Introduction
Thank you for choosing the Prichor RC-71T Thermostatic Ceiling Fan Remote Control. This remote is designed to provide convenient control over your Hampton Bay Home Decorators Collection ceiling fan, offering multi-speed settings, light dimming, timing functions, and a comfortable breeze feature. This manual will guide you through the setup, operation, and maintenance of your new remote control.

Image: The Prichor RC-71T remote control shown in different home environments, highlighting its versatility.
Safety Information
- Ensure the ceiling fan's power is turned off at the circuit breaker before any installation or maintenance.
- This remote is designed for 3-speed AC fans. It is not compatible with DC fans.
- The remote requires 2 AAA batteries (not included). Do not mix old and new batteries or different types of batteries.
- Light dimming function is compatible with incandescent bulbs and some dimmable LED lamps. Most LED/CFL lights are non-dimmable and will only function as ON/OFF.
- Keep the remote away from water and excessive heat.
Package Contents
- 1 x Prichor RC-71T Remote Control
- 1 x Wall Mount Holder
- 2 x Screws
- User Manual (this document)

Image: Contents of the Prichor RC-71T package, including the remote, wall mount, screws, and user manual.
Product Overview
The Prichor RC-71T remote control features an intuitive layout with dedicated buttons for fan speed, light control, timing, and special functions. It includes an LCD display for temperature and settings.
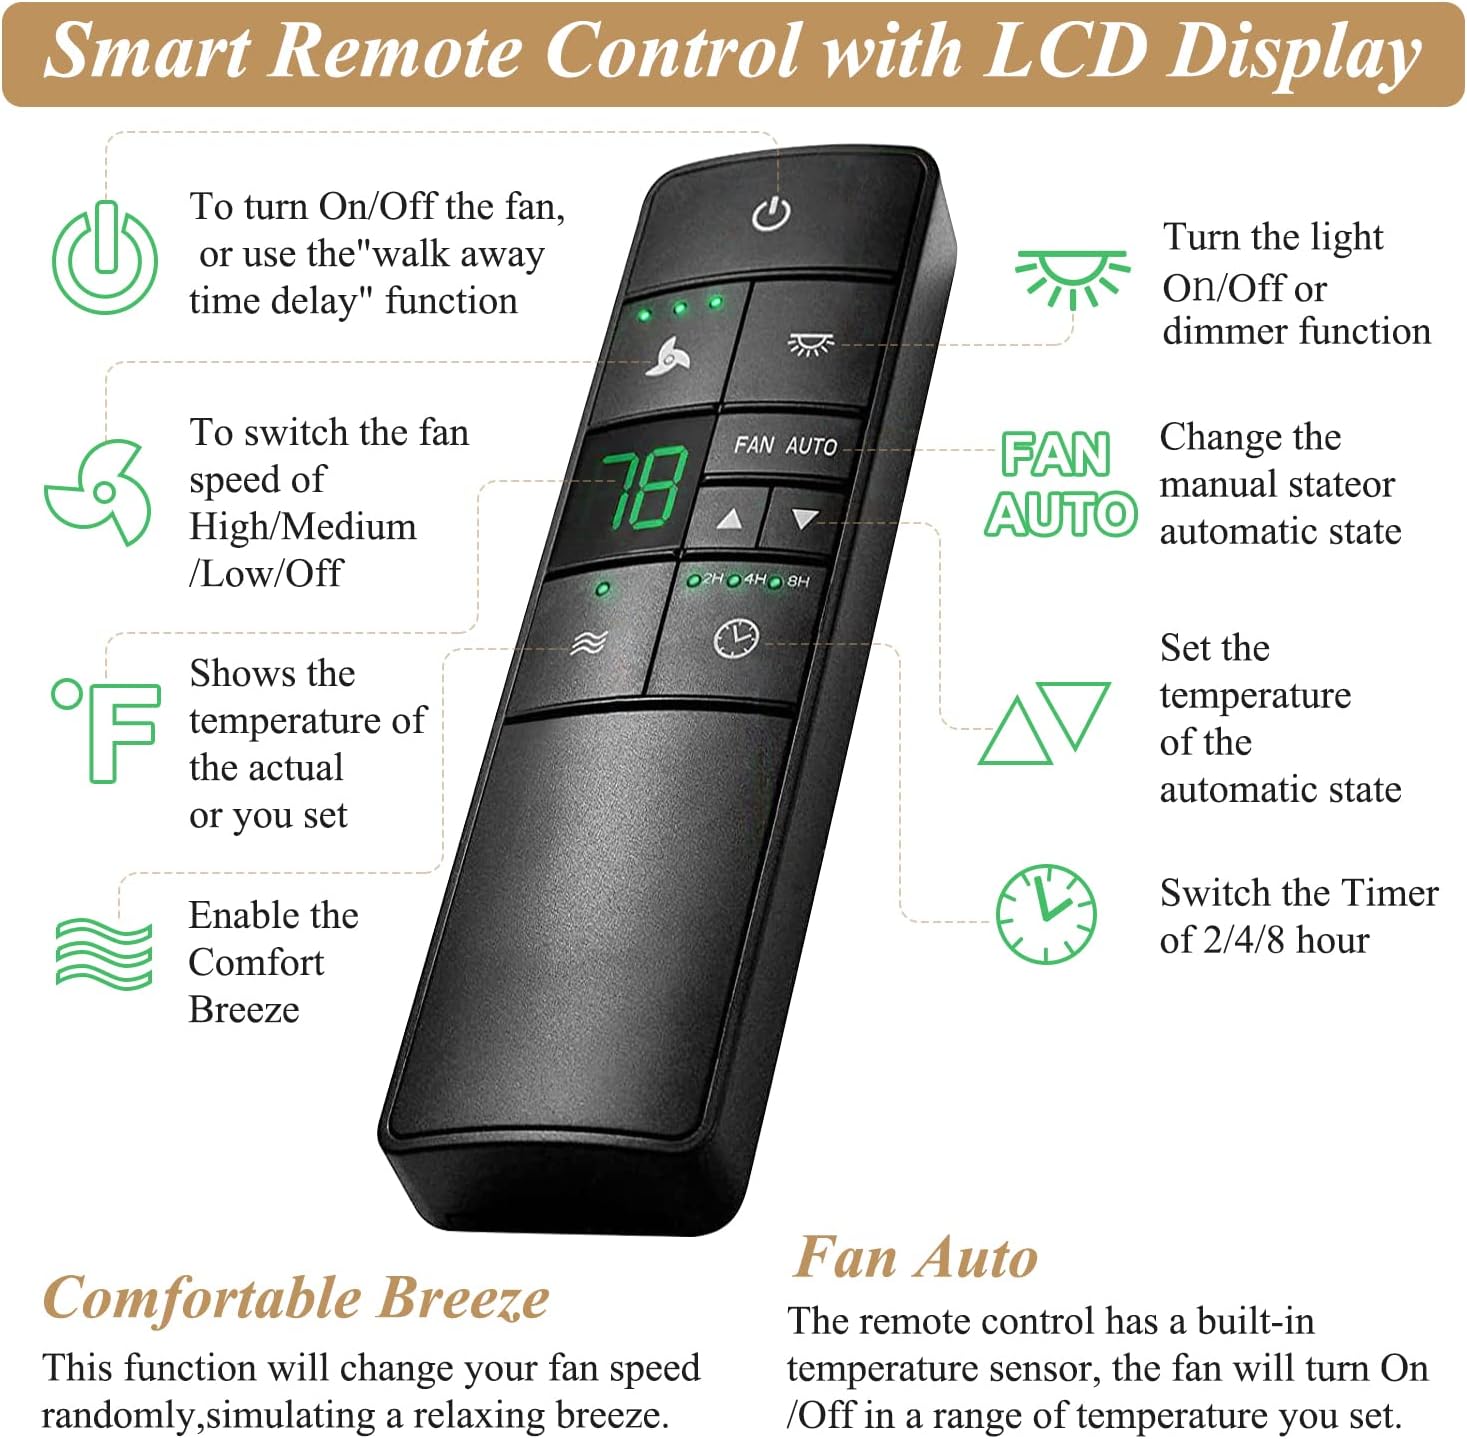
Image: A detailed diagram illustrating the functions of each button on the Prichor RC-71T remote control, including power, fan speed, light, fan auto, temperature adjustment, comfort breeze, and timer settings.
Button Functions:
- Power Button (⏻): Turns the fan ON/OFF, or activates the 'walk away time delay' function.
- Fan Speed Button (🍄): Cycles through High, Medium, Low, and Off fan speeds.
- Light Button (💡): Turns the light ON/OFF or adjusts brightness (dimmer function).
- FAN AUTO Button: Changes the fan from manual to automatic thermostatic state.
- Temperature Adjustment Buttons (▲ / ▼): Sets the desired temperature for automatic fan operation.
- Comfort Breeze Button (≈): Activates the comfortable breeze mode, which randomly alternates fan speed.
- Timer Button (🕓): Sets the fan and light timer for 2, 4, or 8 hours.
Setup
Proper setup of the DIP switches is crucial for the remote to communicate with your ceiling fan's receiver. The remote and receiver must have identical DIP switch settings.
1. Battery Installation:
Open the battery compartment on the back of the remote and insert 2 AAA batteries, ensuring correct polarity. Close the compartment.
2. DIP Switch Setting:
The DIP switches are small switches located inside the battery compartment of both the remote and the fan's receiver. There are 16 possible frequency combinations to prevent interference.
Scenario A: You have the original remote control.
If you have your original remote, match the DIP switch settings of your new Prichor remote to those of your old remote. The DIP switches are typically found inside the battery compartment.

Image: Visual guide showing how to match the DIP switch settings from an old remote to a new one. The switches are located inside the battery compartment.
Scenario B: You have lost your original remote control.
If your original remote is lost, you will need to access the receiver unit inside the fan's canopy (the part that attaches to the ceiling). Check the DIP switch settings on the receiver. Then, match the DIP switch settings on your new Prichor remote to those on the receiver.
If you cannot access the receiver, you will need to try all 16 possible DIP switch combinations on the new remote until it pairs with your fan. This process may require patience.

Image: The Prichor RC-71T remote control along with its wall mount and screws, illustrating the complete product.
Scenario C: Your original remote has no DIP switches.
If your original remote does not have DIP switches, it indicates that its frequency is different from the Prichor RC-71T remote. In this case, the remote alone will not be compatible. You will need to purchase a compatible receiver unit that includes DIP switches and install it in your fan's canopy. Ensure the new receiver's DIP switches are set to match your new Prichor remote.
Setup Video Guide:
For a visual guide on setting up your remote, including DIP switch configuration, please watch the official product video below:
Video: Official Prichor guide on setting up the ceiling fan remote control, including instructions for matching DIP switches.
Operating Instructions
Fan Control:
- Press the Power Button (⏻) to turn the fan ON/OFF.
- Press the Fan Speed Button (🍄) repeatedly to cycle through High, Medium, Low, and Off speeds.
- Comfort Breeze: Press the Comfort Breeze Button (≈) to activate a mode that randomly alternates fan speed, simulating a natural breeze.
- Thermostatic Feature (FAN AUTO): Press the FAN AUTO Button to enable the thermostatic control. The fan will automatically adjust its speed based on the room temperature and your set temperature. Use the Temperature Adjustment Buttons (▲ / ▼) to set your desired temperature.

Image: The remote control displaying its LCD screen, timing function, and comfort breeze feature, alongside icons for fan and light control.
Light Control:
- Press the Light Button (💡) to turn the light ON/OFF.
- Hold the Light Button to dim or brighten the light. Release when the desired brightness is reached.
- Walk Away Time Delay: Press the Power Button (⏻) to activate the walk away time delay. The light will remain on for 30 seconds before turning off, allowing you to leave the room safely.
Timing Settings:
- Press the Timer Button (🕓) repeatedly to set the fan and light to turn off automatically after 2, 4, or 8 hours. The selected time will be indicated on the remote's display.
Maintenance
- Battery Replacement: Replace batteries when the remote's display becomes dim or the remote's response is slow. Always use 2 new AAA batteries.
- Cleaning: Wipe the remote with a soft, dry cloth. Do not use abrasive cleaners or immerse the remote in water.
Troubleshooting
| Problem | Possible Cause | Solution |
|---|---|---|
| Remote does not control the fan/light. | Incorrect DIP switch settings. | Verify that the DIP switch settings on the remote match those on the fan's receiver. Refer to the 'Setup' section. |
| Remote has no power or is unresponsive. | Dead or incorrectly installed batteries. | Replace batteries with 2 new AAA batteries, ensuring correct polarity. |
| Light dimming function does not work. | Non-dimmable light bulbs. | Ensure you are using incandescent bulbs or dimmable LED/CFL lamps. Most LED/CFL are non-dimmable. |
| Fan only has 3 speeds, but remote shows 6 speeds. | Remote is designed for 3-speed AC fans. | This remote is specifically for 3-speed AC fans. If your fan is a 6-speed DC fan, this remote is not compatible. |
| Interference with other devices. | DIP switch settings are too common. | Change the DIP switch settings on both the remote and the receiver to a different combination. There are 16 unique combinations available. |
Specifications
- Model: RC-71T
- Product Dimensions: 5.9 x 1.77 x 0.59 inches
- Item Weight: 3.2 ounces
- Batteries: 2 AAA batteries (not included)
- Compatibility: Hampton Bay Home Decorators Collection 3-speed AC ceiling fans
- Special Features: Digital Display, Timer (2/4/8 hours), Light Dimmer, Thermostatic Control, 3-speed fan control, Comfortable Breeze function.
- Connectivity Technology: Radio Frequency

Image: A visual representation of the remote's compatibility with various lamp types, including Halogen & Incandescent, Dimmable CFL, and Dimmable LED.
Warranty & Support
For warranty information or technical support, please refer to the contact details provided with your purchase or visit the official Prichor website. Keep your purchase receipt for warranty claims.
Ask a question about this manual
Ask about setup, troubleshooting, compatibility, parts, safety, or missing instructions. Manuals+ will review the question and use this page’s manual context to help answer it.