
Yoidesu Yoidesuav12iq6wt4-13
Yoidesu Cordless Phone with Answering Machine (Model Yoidesuav12iq6wt4-13)
User Instruction Manual
Introduction
This manual provides comprehensive instructions for the setup, operation, and maintenance of your Yoidesu Cordless Phone with Answering Machine, Model Yoidesuav12iq6wt4-13. Please read this manual carefully before using your new phone system to ensure proper functionality and to familiarize yourself with all its features.
Product Overview
The Yoidesu Cordless Phone system combines a corded base unit with a cordless handset, offering flexibility and advanced communication features for home and office environments. Key features include:
- Integrated Digital Answering Machine with up to 60 minutes recording time.
- 28dB Volume Boost (AMP key) for enhanced call clarity.
- Photo Dialing for quick access to frequently called numbers.
- Expandable system supporting up to five handsets per base unit.
- Smart Call Blocker with manual and automatic modes.
- Large 2-inch screen, large text, and oversized keypad for improved visibility.
- Bilingual Caller ID and multi-language support for system menus.

Figure 1: Yoidesu Cordless Phone System (Corded Base and Cordless Handset)
This image displays the complete Yoidesu Cordless Phone system, featuring the main corded base unit with its large keypad and display, alongside the cordless handset resting in its charging cradle. Both units are black.
Package Contents
Verify that all items are present in the package:
- 1 x Landline Phone (Corded Base Unit)
- 1 x Cordless Phone (Handset)
- 1 x Base (Charging Cradle for Cordless Handset)
- 1 x Handset (for Corded Base Unit)
- 1 x Straight Line (Telephone Line Cord)
- 1 x Curved Line (Coiled Handset Cord for Corded Base)
- 2 x Adapter (Power Adapters)
- 2 x Battery (AAA Batteries for Cordless Handset)
- 1 x User Manual (This Document)

Figure 2: Complete Package Contents
This image shows all the items included in the Yoidesu Cordless Phone package, neatly arranged. It features the corded base unit, the cordless handset, its charging base, two power adapters, two AAA batteries, a coiled cord for the corded handset, and a telephone line cord.
Setup
- Connect the Corded Base Unit:
- Connect one end of the straight telephone line cord to the "LINE" jack on the back of the corded base unit.
- Connect the other end of the telephone line cord to your wall telephone jack.
- Connect one power adapter to the "DC IN" jack on the back of the corded base unit.
- Plug the power adapter into a standard electrical outlet.
- Connect the coiled handset cord to the corded handset and to the "HANDSET" jack on the side of the corded base unit.

Figure 3: Corded Base Unit Connections
This image shows the rear of the corded base unit, highlighting the connection ports for the telephone line and the power adapter. Wall-mounting slots are also visible.
- Install Batteries in Cordless Handset:
- Open the battery compartment cover on the back of the cordless handset.
- Insert the two AAA rechargeable batteries, observing the correct polarity (+ and -).
- Close the battery compartment cover.
- Connect the Cordless Handset Charging Cradle:
- Connect the second power adapter to the "DC IN" jack on the back of the cordless handset charging cradle.
- Plug the power adapter into a standard electrical outlet.
- Place the cordless handset into the charging cradle. The display should indicate charging. Allow the handset to charge for at least 12-16 hours before initial use.

Figure 4: Cordless Handset Charging Cradle Connection
This image displays the rear of the cordless handset charging cradle, clearly showing the power input port where the second adapter connects.
Operating Instructions
Basic Call Functions
- Making a Call: Lift the handset (corded or cordless) or press the TALK button on the cordless handset. Dial the desired number.
- Receiving a Call: Lift the handset or press the TALK button when the phone rings.
- Ending a Call: Place the handset back on the cradle or press the END button on the cordless handset.
- Redial: Press the REDIAL button to call the last dialed number.
- Volume Boost: During a call, press the AMP or BOOST button (on the corded base) to increase the earpiece volume by 28dB.
Answering Machine (TAM)
The integrated answering machine can record up to 60 minutes of messages. It supports call recording and displays caller ID during message playback.
- Activating/Deactivating: Refer to the on-screen menu for activation and deactivation.
- Playing Messages: Press the PLAY button on the corded base unit.
- Recording Outgoing Message (OGM): You can record two custom outgoing messages. Follow the menu prompts to record.
- Remote Access: The answering machine supports remote access to messages. Consult the full manual for details on setting up and using this feature.
Photo Dialing
The corded base unit features four dedicated photo dialing buttons (M1-M4) for quick access to frequently called numbers.
- Setting Up Photo Dial:
- Press and hold the desired photo dial button (M1, M2, M3, or M4) until the display prompts for a number.
- Enter the phone number you wish to store.
- Press the photo dial button again to save.
- Insert a small photo of the contact into the designated slot above the button.
- Using Photo Dial: Simply press the photo dial button (M1-M4) to automatically dial the stored number.
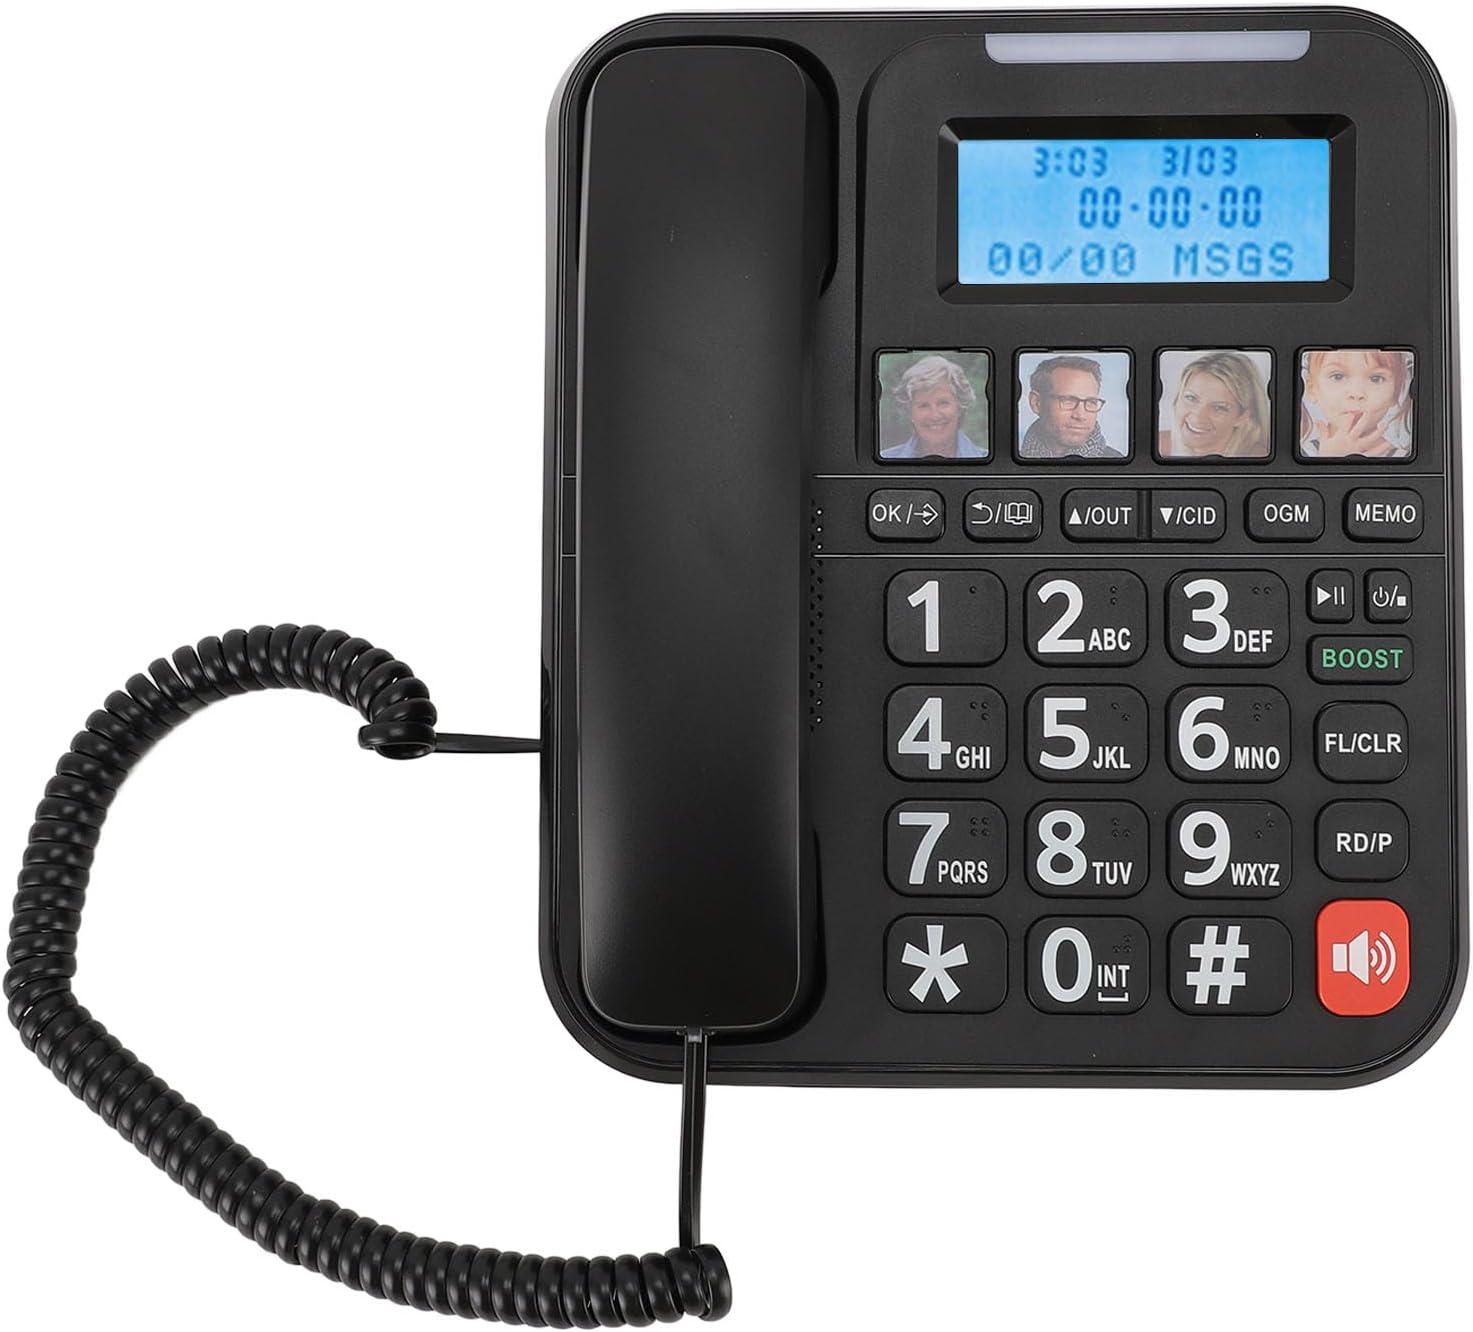
Figure 5: Corded Base Unit with Photo Dialing
This image provides a detailed view of the corded base unit, emphasizing the four photo dialing buttons (M1-M4) located above the large, easy-to-read keypad and the digital display.
Smart Call Blocker and Caller ID
- Caller ID: The display shows the caller's number (if available) for incoming calls. The system supports bilingual caller ID.
- Call Block:
- Manual Blocking: During or after a call, access the call history and select the number to block. Follow the on-screen prompts.
- Automatic Blocking: Configure the system to only allow calls from numbers saved in your phonebook. Refer to the menu settings for this feature.
- Call History: The cordless handset stores up to 30 incoming call numbers, and the base unit stores up to 29. 10 outgoing call numbers are also stored.
Phonebook
Store up to 50 phonebook entries. Each entry can include a name and number.
- Adding an Entry: Navigate to the phonebook menu, select "Add New Entry," and input the name and number.
- Searching/Dialing: Access the phonebook, scroll through entries, and press the TALK button to dial.
Expandable System
The system is expandable, allowing you to register up to five cordless handsets to one base unit. Each handset can also connect to up to four base units.
- Registering a New Handset: Follow the instructions provided with the additional handset for registration. This typically involves placing the handset in the charging cradle and initiating a registration process from the base unit.
- Internal Calls: Make calls between registered handsets and the base unit.
- Call Transfer: Transfer external calls between handsets.
- 3-Way Calling: Supports conference calls involving the landline, a sub-phone (handset), and a third-party phone.

Figure 6: Cordless Handset
This image provides a detailed view of the cordless handset, featuring its clear digital display, large buttons, and ergonomic design.
Language Settings
- Corded Base Unit: Supports 8 languages (Spanish, English, French, German, Italian, Portuguese, Turkish, Russian).
- Cordless Handset: Supports 16 languages (Portuguese, Spanish, English, French, German, Italian, Dutch, Hungarian, Greek, Polish, Danish, Norwegian, Swedish, Turkish, Russian, Ukrainian).
- Navigate through the system menu to select your preferred language.
Ringtone and Volume
- Ringtone Options: Choose from 10 ringtone options.
- Adjustable Volume: Adjust the volume for ringtones, hands-free calls, and earpiece.
- Distinct Ringtones: Set different ringtones for different incoming calls (requires specific contact settings).
- The maximum adjustable ringtone volume is 90dB.
Alarm Clock
The phone system includes an alarm clock function. Access the menu to set and manage alarms.
Maintenance
- Cleaning: Use a soft, damp cloth to clean the phone's surfaces. Avoid abrasive cleaners or solvents.
- Battery Care: For optimal battery life, ensure the cordless handset is placed in its charging cradle when not in use. Replace batteries when they no longer hold a charge effectively.
- Environment: Keep the phone away from excessive heat, direct sunlight, and moisture.
Troubleshooting
| Problem | Possible Solution |
|---|---|
| No dial tone. |
|
| Cordless handset not charging. |
|
| Cannot hear caller / Caller cannot hear me. |
|
| Answering machine not recording messages. |
|
Specifications
- Model Number: Yoidesuav12iq6wt4-13
- Display: 3-line dot display
- Volume Boost: 28dB (AMP key)
- Answering Machine Recording Time: Up to 60 minutes
- Phonebook Capacity: 50 entries
- Incoming Call Log: 30 (handset), 29 (base unit)
- Outgoing Call Log: 10 entries
- Ringtone Options: 10
- Max Ringtone Volume: 90dB
- Handset Batteries: 2 x AAA (400mAh each)
- Package Dimensions: 12.99 x 9.06 x 3.94 inches
- Item Weight: 2.84 pounds
- Manufacturer: Yoidesu
Warranty and Support
For warranty information and technical support, please refer to the documentation included with your purchase or contact Yoidesu customer service. Contact details are typically available on the manufacturer's official website or through your retailer.
No official product videos were provided by the seller for this model in the available data.
Ask a question about this manual
Ask about setup, troubleshooting, compatibility, parts, safety, or missing instructions. Manuals+ will review the question and use this page’s manual context to help answer it.