
Affver A4
Affver A4 4K Dash Cam Front and Rear User Manual
Model: A4
1. Introduction
This manual provides comprehensive instructions for the installation, operation, and maintenance of your Affver A4 4K Dash Cam. Designed for optimal road safety and evidence recording, this dual dash camera system offers high-resolution video capture, advanced connectivity, and intelligent parking monitoring features. Please read this manual thoroughly before using the device to ensure proper functionality and longevity.

Image: Overview of the Affver A4 4K Dash Cam system, including the front camera, rear camera, GPS module, and a smartphone displaying the companion app with map and video feed.
2. Package Contents
Please verify that all items listed below are included in your package:
- Affver A4 Dual Dash Cam (Front Unit)
- 64GB MicroSD Card (Pre-installed or included separately)
- Rear Camera
- Rear Camera Extending Cable
- 11.5ft Type-C Car Charger
- Car Wiring Trim Tool
- Cable Hiding Clips
- Adhesive Pad
- Electrostatic Films
- User Manual
- Registration Card

Image: Visual representation of all components included in the Affver A4 Dash Cam package, such as the main dash cam, rear camera, cables, tools, and documentation.
3. Setup and Installation
Follow these steps for proper installation of your dash cam system:
- Prepare the MicroSD Card: Before first use, it is essential to format the included 64GB MicroSD card within the dash cam. This ensures optimal performance and compatibility.
- Mount the Front Dash Cam:
Clean the windshield area where the dash cam will be mounted. Apply the electrostatic film first, then attach the adhesive pad to the dash cam mount, and finally secure it to the electrostatic film on the windshield. Ensure the camera has a clear view of the road ahead. The low-profile design of the A4 dash camera ensures clear driving visibility while minimally affecting your vehicle's interior.

Image: The Affver A4 dash cam discreetly mounted on a car's windshield, highlighting its compact and hidden profile.
- Install the Rear Camera:
Mount the rear camera on the rear windshield, ensuring a clear view. Connect the rear camera to the main dash cam using the provided extending cable. Make sure the connection is secure.
- Power Connection:
Connect the 11.5ft Type-C car charger to the dash cam and plug it into your vehicle's cigarette lighter port. The charger also features an extra USB port, allowing you to charge other devices simultaneously.
- Cable Management:
Use the included car wiring trim tool and cable hiding clips to neatly route and secure the power cable and rear camera cable along the vehicle's interior trim. This ensures a clean installation and prevents obstruction of your view.

Image: An overhead diagram illustrating the simple wiring and installation process of the dash cam system within a car's interior.
- Optional Hardwire Kit for Parking Mode:
To enable the 24-hour parking monitoring feature, a dedicated Type-C hardwire kit is required and sold separately (ASIN: B0DCNSYCF9). Connect this kit according to its instructions to provide continuous power to the dash cam when the vehicle is off.
4. Operating Instructions
4.1 Dual Channel Recording
The Affver A4 dash cam records simultaneously from both the front and rear cameras. The front camera captures video in stunning 4K UHD (2160P) resolution with a 160-degree wide-angle view, while the rear camera records in 1080P resolution with a 155-degree wide-angle. This provides comprehensive coverage for accident disputes and insurance claims.

Image: Illustration of the dual-channel recording capability, displaying separate views from the 4K front camera and the 1080P rear camera.

Image: Detailed comparison showing the 4K UHD 2160P 30fps front camera and 1080P FHD 25fps rear camera, along with their respective 160° and 155° wide-angle coverages.
4.2 Enhanced 5GHz WiFi with APP
The dash cam features built-in 5GHz WiFi, allowing for faster video download speeds (up to 8MB/s) to your smartphone via the free companion app. This significantly reduces transfer times compared to 2.4GHz WiFi. The app enables you to preview, download, edit, and share your recorded videos directly from your phone.

Image: Visual representation of the dash cam's 5GHz WiFi connectivity with a smartphone, illustrating faster download speeds compared to 2.4GHz.

Image: A car interior perspective demonstrating the dash cam's 5G WiFi capability, allowing for quick preview, download, edit, and sharing of videos via a smartphone app.
4.3 Built-in GPS Tracking
The integrated GPS module precisely logs your driving speed, route, and real-time latitude and longitude. This data can be viewed on maps via the 5GHz WiFi using the companion app or our dedicated Windows and Mac GPS Player, providing valuable evidence in case of an incident.

Image: The dash cam displaying GPS data, including speed and route, on its screen and a smartphone app, with a car driving on a scenic road.

Image: A laptop and smartphone screen showing the GPS tracking interface, with map data and video playback from the dash cam, illustrating real-time location and speed logging.
4.4 3.59-Inch IPS Screen & Low Profile Design
The large 3.59-inch IPS screen provides a clear and intuitive interface for menu navigation and real-time viewing. Its low-profile and hidden design ensures minimal obstruction of your driving visibility.

Image: A collage demonstrating the small and flexible design of the dash cam, highlighting its adjustable front camera, 360° rotatable rear camera, easy removable mount, and 3.59-inch IPS screen.
4.5 Seamless Loop Recording & G-sensor
Loop Recording: The dash cam automatically overwrites the oldest video files when the memory card reaches its capacity, ensuring continuous recording without manual intervention. The included 64GB card provides ample storage, and the system supports up to 256GB cards (not included).
G-sensor (Gravity Sensor): In the event of a sudden collision or impact, the built-in 3-axis gravity sensor automatically detects the event and locks the current video file, protecting it from being overwritten by loop recording. This ensures critical footage is preserved.

Image: Visual explanation of the Gravity Sensor locking video during collisions, seamless loop recording overwriting old files, and the convenience of the included 64GB memory card.
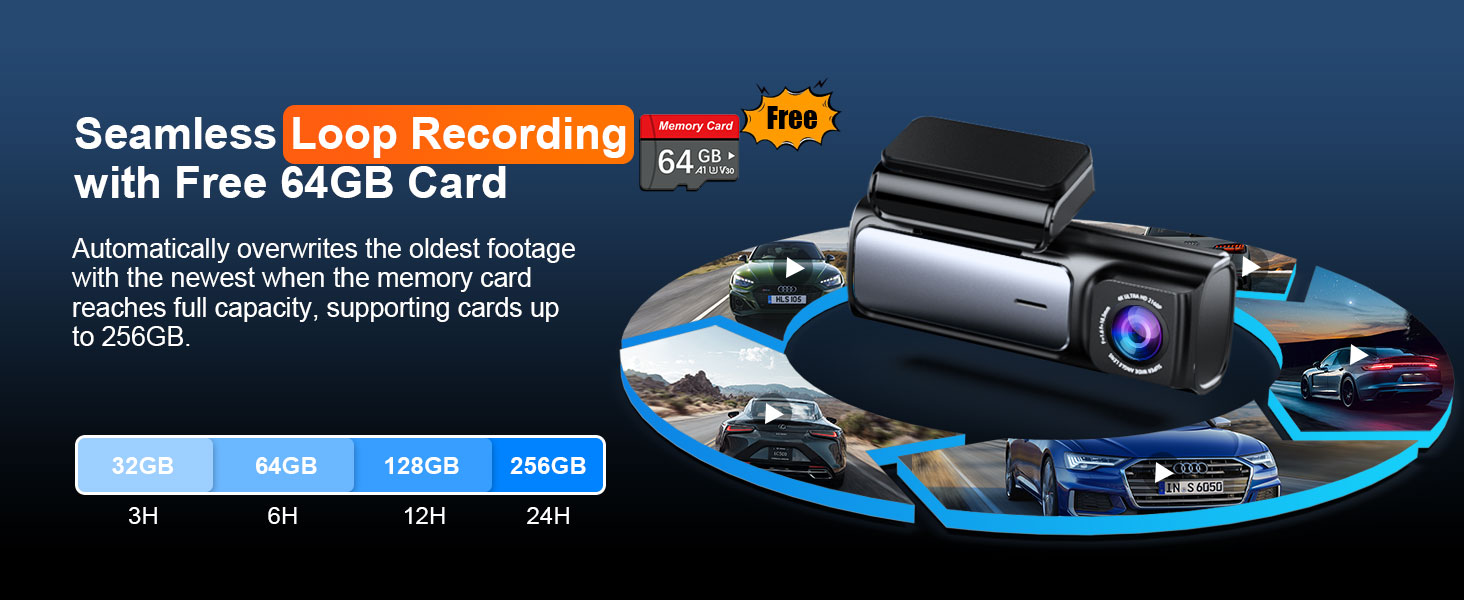
Image: A visual depicting the G-Sensor Collision Detection feature, where the dash cam automatically locks important footage during impacts to prevent overwriting.
4.6 One-Press Lock
During recording, you can manually press the 'M' button on the dash cam to instantly lock the current video file. This prevents it from being deleted by the loop recording cycle, allowing you to save important moments on demand.

Image: A hand pressing the 'M' button on the dash cam, illustrating the one-press lock feature to secure current video recordings from being overwritten.
4.7 24-Hour Parking Monitor
When connected to the optional hardwire kit (ASIN: B0DCNSYCF9), the A4 dash cam provides continuous surveillance even when your car is parked and turned off. It offers two modes:
- Collision Detection: The camera activates upon impact, records for one minute, and saves the footage as an emergency file.
- Time-Lapse Recording: When enabled, the camera records at 1FPS (frames per second), conserving memory card space while maintaining video quality for extended monitoring periods.

Image: The 24-hour parking monitor feature, depicting anti-theft protection and continuous recording when the car is parked, with a hardwire kit shown as required.

Image: An illustration of the 24H Parking Monitor's collision detection, showing the camera activating and locking footage upon impact in a parked car scenario.

Image: A visual representation of the 24H Parking Monitor's Time-Lapse feature, where the camera records at 1FPS to conserve memory while providing continuous surveillance.
4.8 Super Night Vision
Equipped with an ultra-large F1.6 aperture and a 6-layer lens, the A4 dash cam significantly boosts light intake by 60%. Enhanced by WDR (Wide Dynamic Range) technology, it automatically adjusts exposure in extremely dark settings, delivering clear, high-quality videos both day and night.

Image: The dash cam's Super Night Vision capability, showing a car driving at night with enhanced clarity due to F1.6 aperture, WDR, and 6-glass lens technology.

Image: A night scene demonstrating the dash cam's superior night vision, capturing sharp and detailed videos even in low-light conditions, with a clear view of a license plate.
4.9 Non-distracting Screensaver
The dash cam offers three optional screen display modes when the camera is working, allowing you to choose the level of screen visibility that suits your preference and minimizes distraction:
- Screen always on
- Screen Saver on after 1 min
- Screen off after 1 min

Image: A visual representation of the three non-distracting screensaver options for the dash cam display: screen always on, screen saver after 1 minute, and screen off after 1 minute.
4.10 Official Product Video
Video: An official product overview video from Affver, showcasing the 4K Dash Cam Front and Rear, including its 64GB card, 5G WiFi, and GPS features. This video provides a concise demonstration of the product's key functionalities and benefits.
5. Maintenance
- Regular Cleaning: Gently wipe the camera lenses with a soft, lint-free cloth to ensure clear recordings. Avoid using abrasive cleaners.
- MicroSD Card Management: Periodically back up important footage from your MicroSD card to a computer or cloud storage. While loop recording manages space, regular formatting (e.g., once a month) can help maintain card performance and prevent data corruption.
- Firmware Updates: Check the official Affver website or app for any available firmware updates. Keeping your dash cam's firmware up-to-date can improve performance and add new features.
- Temperature Considerations: Avoid exposing the dash cam to extreme temperatures for prolonged periods, as this can affect battery life and electronic components.
6. Troubleshooting
- Q: What should I keep in mind when using the dash cam for the first time?
- A: Please format the SD card before using the dash cam for the first time. Additionally, keep the A4 dash cam connected to the provided cigarette lighter charger for daily use, as it doesn't have a built-in battery. If your car lacks a cigarette lighter port, contact us for a compatible USB Type-C cable.
- Q: How do I activate the parking monitoring feature? Is a separate hardwire kit necessary?
- A: To activate the 24-hour parking monitoring feature on this dash cam, you'll need a Type-C hardwire kit (not included with the camera). You can find the recommended kit on Amazon by searching for B0DCNSYCF9.
- Q: Rear camera doesn't display? Or shows a black image?
- A: Make sure the rear camera cable is connected correctly and fully plugged into the rear camera input port. Many people think they've plugged it all the way to the bottom, but they don't. Please push it harder again.
- Q: Forgot the password?
- A: To connect the camera using the Peztio app, ensure that the camera's WiFi hotspot is enabled. The A4's WiFi hotspot name and default password are provided below:
WiFi Name: Peztio-A4_****
Default Password: 12345678
7. Specifications
| Feature | Detail |
|---|---|
| Model Name | A4 4K Dash Cam Front and Rear |
| Brand | Affver |
| Video Capture Resolution | Dual Channel 4K 30fps Front + 1080P 25fps Rear |
| Screen Size | 3.59'' IPS Screen |
| Connectivity Technology | Wi-Fi (5Ghz built-in) |
| GPS | Built-in GPS |
| Included Memory Card | 64GB (supports up to 256GB max) |
| Special Features | Loop recording, Voice recording, Accident lock (G-sensor), 24 hours parking monitor, Super night vision, Discreet and hidden design |
| Mounting Type | Windshield Mount |
| Item Weight | 1.08 pounds |
| Product Dimensions | 1 x 1 x 1 inches |
| Batteries | 1 Lithium Polymer battery required (included) |
| Manufacturer | Affver |
| Country of Origin | China |
8. Warranty and Support
Affver is committed to providing high-quality products and excellent customer service. Your A4 dash cam comes with a reliable warranty and dedicated support.
- Warranty: Enjoy peace of mind with a 24-month warranty on your Affver A4 dash cam.
- Return Policy: 30 Days Return Policy.
- Support: For any installation, usage questions, or technical assistance, please contact our dedicated technical support and after-sales team.
Customer Support Email: support@affver.com
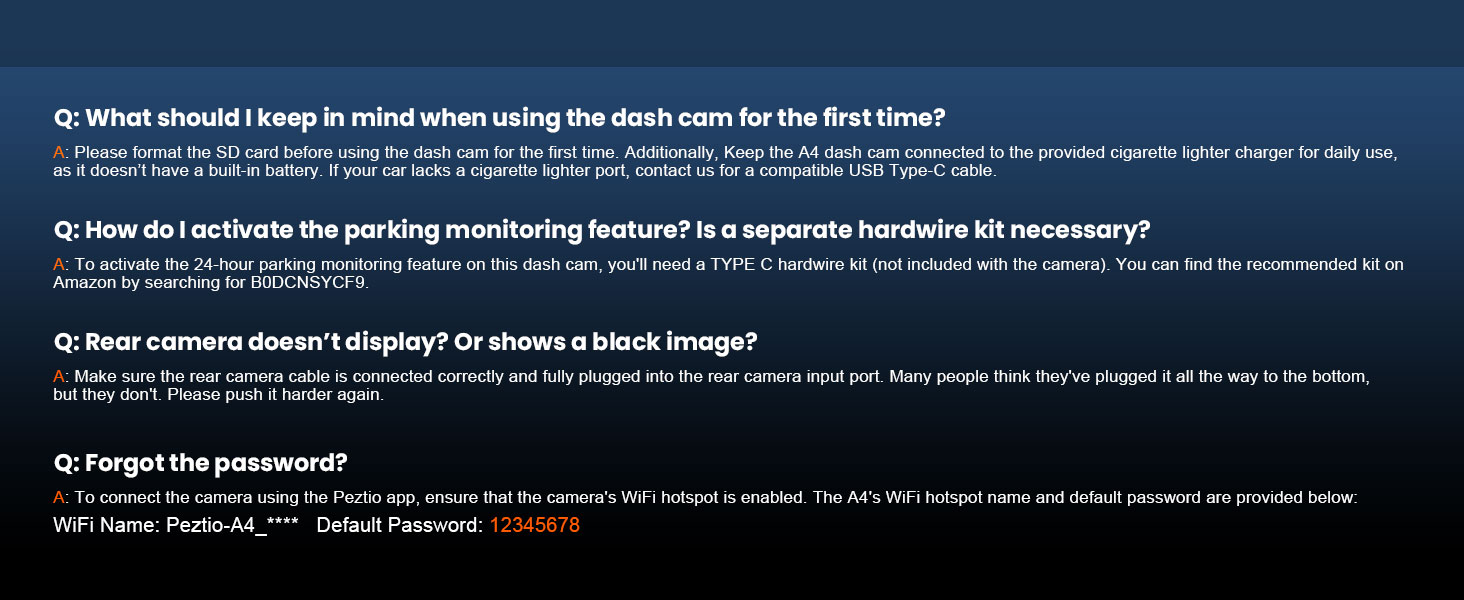
Image: Information regarding warranty, return policy, and customer support contact details for Affver products.
Ask a question about this manual
Ask about setup, troubleshooting, compatibility, parts, safety, or missing instructions. Manuals+ will review the question and use this page’s manual context to help answer it.