
FOLAI TH
FOLAI Stud Finder Wall Scanner Model TH User Manual
Model: TH | Brand: FOLAI
1. Introduction
The FOLAI Stud Finder Wall Scanner Model TH is an advanced electronic device designed to accurately detect various objects hidden behind walls, floors, and ceilings. This 5-in-1 scanner helps locate wood studs, metal pipes, steel bars, and live AC wires, ensuring safety and precision for your projects. Please read this manual thoroughly before use to ensure proper operation and to maximize the device's capabilities.

Image: The FOLAI Stud Finder Wall Scanner, showing its ergonomic design and the included 9V battery.
2. Product Features
- 5-in-1 Scanning Modes: Detects wood, metal, and live AC wires.
- High Accuracy: Utilizes advanced sensor technology for precise detection.
- HD LCD Display: Clear visual indication of detected objects, edges, and center.
- Audio Alarm: Provides audible alerts upon detection.
- WireWarning Detection: Alerts to live, unshielded AC wires in all scanning modes.
- Automatic Calibration: Simplifies setup and ensures reliable readings.

Image: Illustration of the internal microprocessor and the various materials the scanner can detect, including metal pipes, AC wires, wooden beams, and rebars.
3. Setup and Battery Installation
- Open Battery Compartment: Locate the battery compartment cover on the back of the device. Slide or unclip the cover to open it.
- Insert Battery: Insert one 9V alkaline battery, ensuring the positive (+) and negative (-) terminals align correctly with the markings inside the compartment. A 9V battery is included with your device.
- Close Battery Compartment: Replace the battery compartment cover until it clicks securely into place.
The device is now ready for initial use. It is recommended to perform a quick calibration before each scanning session.
4. Operating Instructions
4.1 General Operation Steps
- Power On: Press the power button (usually marked with a power symbol or "U/MODE") to turn on the device.
- Select Mode: Use the mode button (often the same as the power button, or a separate one) to cycle through the available scanning modes until the desired mode is displayed on the LCD screen.
- Calibration: Place the device flat against the wall surface where you intend to scan. Press and hold the "Scan" button (typically on the side) until you hear a short beep sound, indicating successful calibration. Ensure there are no objects or your hand under the scanner during calibration.
- Scan: While holding the "Scan" button, slowly and steadily slide the device horizontally across the surface. Maintain full contact with the wall.
- Detection: The LCD display will show indicators (e.g., arrows, bars, "EDGE", "CENTER") as it approaches and detects an object. An audio alarm will also sound.
- Marking: Once the center of an object is indicated, mark its position with a pencil. For best accuracy, scan the area from both left and right directions and mark the center point where the readings converge.
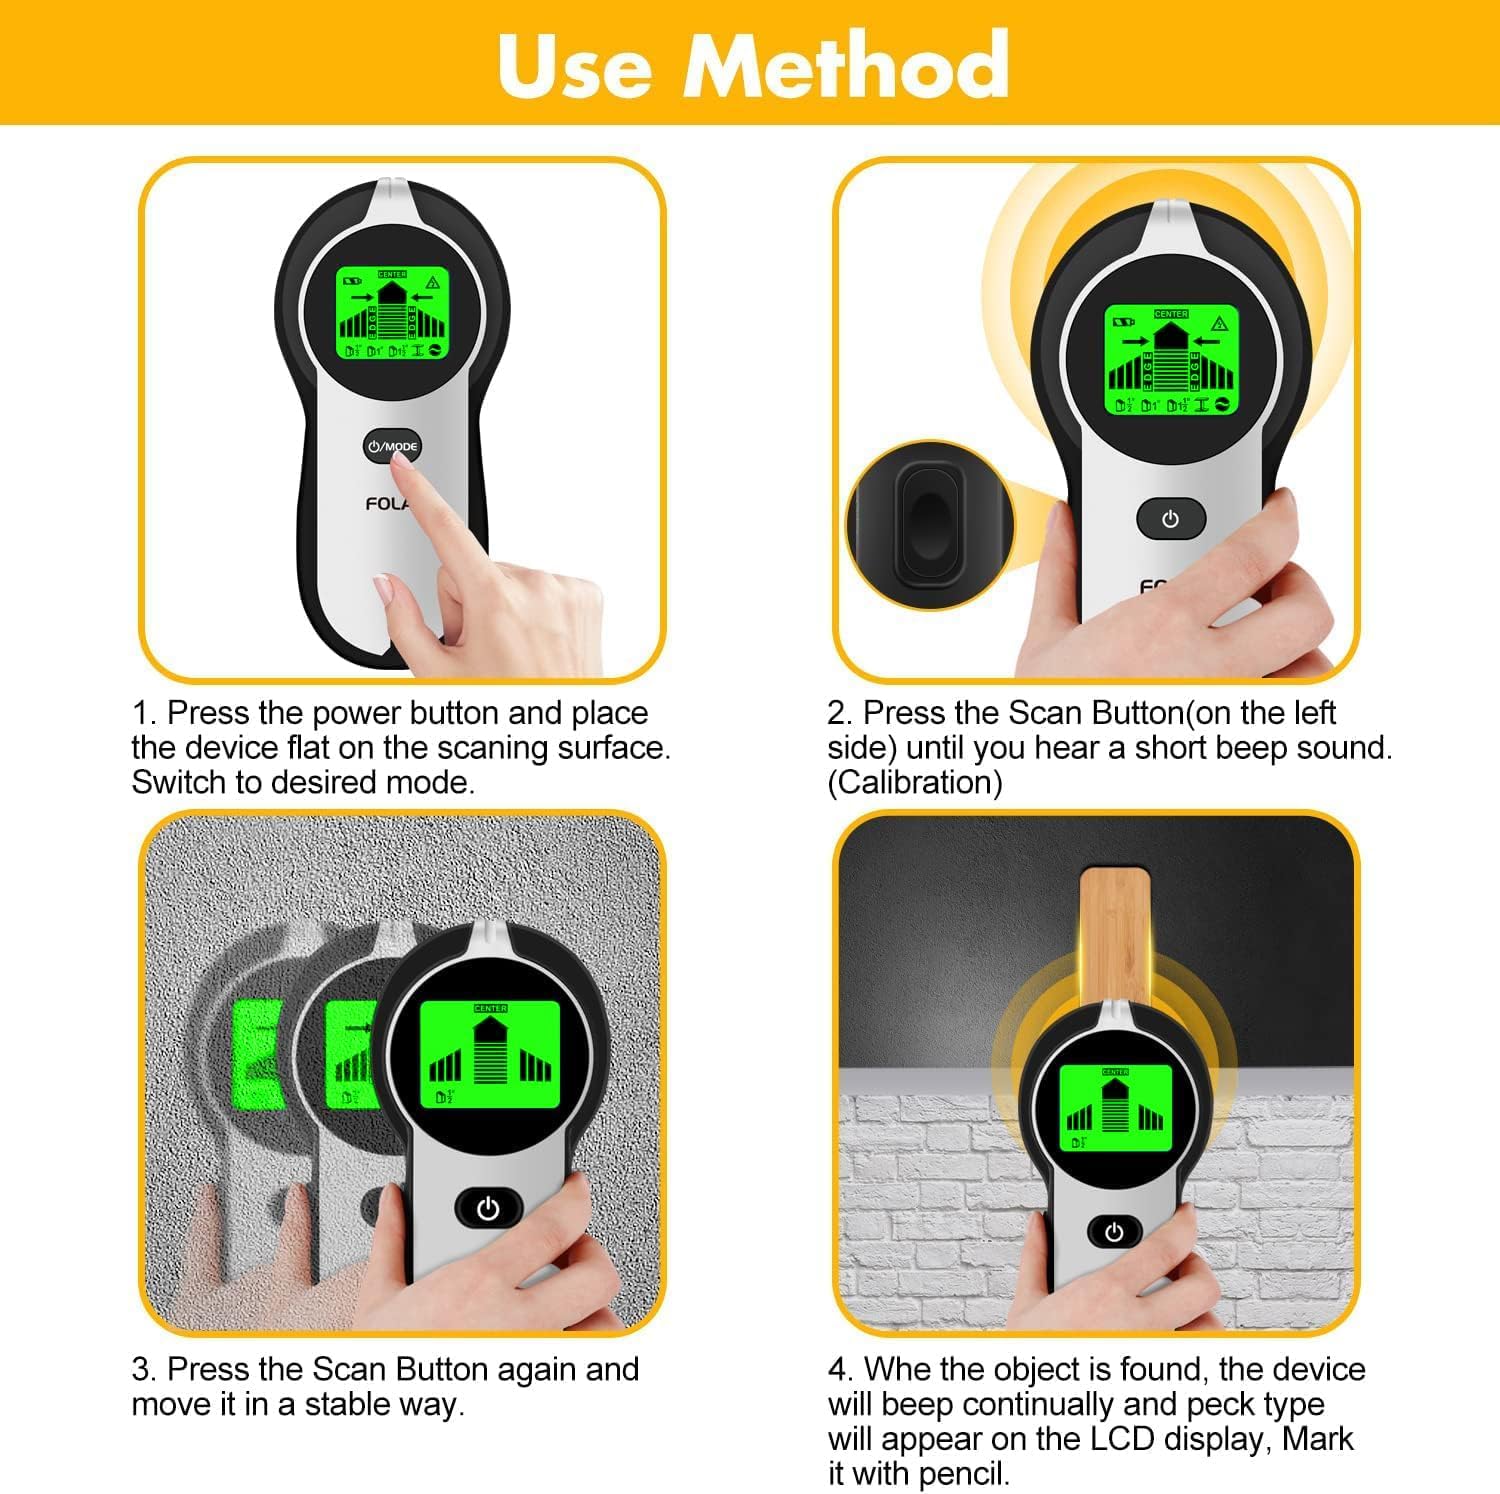
Image: A visual guide demonstrating the four-step process for using the stud finder, from powering on and calibrating to scanning and marking detected objects.
4.2 Scanning Modes and Depths
The FOLAI Stud Finder offers five distinct scanning modes to accommodate various materials and depths:
- Stud Scan (0.5 inch / 12mm): Detects wood studs through a single layer of drywall up to 0.5 inches (12mm) thick.
- Stud Scan (1 inch / 25mm): Detects wood studs through a single layer of drywall up to 1 inch (25mm) thick.
- Deep Stud Scan (1.5 inches / 38mm): Designed for thicker walls, detecting wood studs through up to two layers of drywall, 1.5 inches (38mm) deep.
- Metal Scan (2.36 inches / 60mm): Locates metal objects such as pipes, rebar, and metal studs up to 2.36 inches (60mm) deep.
- AC Scan (2 inches / 51mm): Detects live, unshielded AC electrical wires up to 2 inches (51mm) deep.

Image: A visual representation of the five scanning modes, detailing the maximum detection depths for wood studs (0.5", 1", 1.5"), metal (2.36"), and live AC wires (2").
4.3 WireWarning Indicator
The WireWarning feature is always active in StudScan, DeepScan, and MetalScan modes. It alerts you to the presence of live, unshielded electrical AC wires up to 2 inches (51mm) deep, helping to prevent accidental drilling or cutting into electrical lines. If a live wire is detected, the AC warning icon will appear on the display, and an audio alarm will sound.
Important: While WireWarning is a safety feature, it is always recommended to switch to AC Scan mode to precisely locate and confirm the center of any detected live AC wires before proceeding with any work.

Image: A user operating the stud finder, highlighting its ability to detect various hidden elements like studs, beams, metal, and AC wires, thereby enhancing safety during drilling tasks.
4.4 LCD Display and Audio Alarm
The large HD LCD display provides clear visual feedback:
- Signal Strength Bars: Indicate proximity to the detected object. More bars mean closer proximity.
- Edge Indicators: Arrows or "EDGE" text appear when the device detects the edge of a stud or object.
- Center Indicator: "CENTER" text and a distinct icon appear when the device is directly over the center of a stud or object.
- Battery Indicator: Shows the current battery level.
- Mode Indicator: Displays the currently selected scanning mode.
- AC Warning Icon: Appears when live AC wires are detected.
The audio alarm will beep continuously and change pitch as the device approaches and locates the center of an object, providing an additional cue for detection.

Image: A side-by-side view of the LCD display, demonstrating how it indicates the edge of a stud and then precisely pinpoints its center with clear visual cues.
5. Maintenance and Care
- Battery Replacement: Replace the 9V battery when the low battery indicator appears on the LCD screen to ensure accurate readings. Always use a fresh alkaline 9V battery.
- Cleaning: Wipe the device with a soft, dry cloth. Do not use abrasive cleaners, solvents, or immerse the device in water.
- Storage: Store the stud finder in a cool, dry place, away from direct sunlight and extreme temperatures. If storing for extended periods, remove the battery to prevent leakage.
- Avoid Drops: Handle the device with care to prevent damage from drops or impacts.
6. Troubleshooting
| Problem | Possible Cause | Solution |
|---|---|---|
| Inaccurate readings or false positives. |
|
|
| Device does not turn on. |
|
|
| No detection in Stud Scan mode. |
|
|
| AC WireWarning constantly active. |
|
|
7. Specifications
| Feature | Detail |
|---|---|
| Model Number | TH |
| Brand | FOLAI |
| Stud Scan Depth | 0.5 in (12mm), 1 in (25mm), 1.5 in (38mm) |
| Metal Scan Depth | Up to 2.36 in (60mm) |
| AC Wire Detection Depth | Up to 2 in (51mm) |
| Power Source | 1 x 9V Alkaline Battery (included) |
| Item Weight | 7.8 ounces |
| Package Dimensions | 6.97 x 3.46 x 1.73 inches |
| Display | HD LCD with Audio Alarm |
8. Warranty and Support
FOLAI is committed to providing high-quality products. This product comes with a standard manufacturer's warranty. For specific warranty details, technical support, or any questions regarding the operation of your Stud Finder Wall Scanner Model TH, please contact FOLAI customer service through the retailer's platform or the contact information provided with your purchase.
Please retain your proof of purchase for warranty claims.
Ask a question about this manual
Ask about setup, troubleshooting, compatibility, parts, safety, or missing instructions. Manuals+ will review the question and use this page’s manual context to help answer it.