
1. Introduction
This manual provides detailed instructions for the safe and efficient operation of your AKEYDIY Upgraded 8 in 1 Heat Press Machine. This versatile machine is designed for various heat transfer applications, including custom designs on T-shirts, caps, ceramic plates, mugs, and other flat items. Please read this manual thoroughly before initial use to ensure proper setup, operation, and maintenance.

Figure 1: AKEYDIY Upgraded 8 in 1 Heat Press Machine with included accessories.
2. Product Features
- 12x15 Heat Press: Features an advanced aluminum alloy heating plate with a non-stick Teflon-coated surface, ensuring heat resistance, easy cleaning, and effective prevention of scorching. Includes two heat resistance mats (thickened silicone pad & sponge pad) for optimal transfer material fitness.
- Precise Control Box: Equipped with digital controls for efficient operation. Offers three switchable modes and allows presetting of temperature and time to avoid repetitive settings. Includes a counting function for tracking printed items and an automatic shut-off feature for overheating protection.
- 360° Swing Away Design: The fully rotated 360° swing-away design allows the heating element to be safely moved aside, reducing the risk of accidental contact. A strong suction cup base enhances stability. The top pressure knob provides direct and even pressure for quality transfers.
- Dual Tube Heating: Operates within a temperature range of 0-210℃ (32-410℉). The dual heating tube design minimizes temperature differences across the platen to only 5 degrees, ensuring more uniform heating and improved printing effects compared to single-tube designs.
- Wide Range of Use: Compatible with various items such as T-shirts, caps, ceramic plates, hats, ceramic tiles, mugs, coasters, mouse pads, jigsaw puzzles, lettering, and other flat items. Suitable for ceramics, glasses, and textiles including cotton, flax, chemical fiber, and nylon.
- 8 in 1 Press Combo: Includes a 12'' x 15'' T-shirt press, 5'' and 6'' plate presses, 9OZ & 11OZ mug presses, an aluminum bottle press pad, a 12OZ latte mug press, and a 5.5'' x 3'' cap press to meet diverse transfer demands.

Figure 2: Illustration of the upgraded dual-tube heating system for uniform heat distribution.

Figure 3: The 360-degree swing-away design for enhanced safety and convenience.
3. Components and Assembly
Your AKEYDIY 8 in 1 Heat Press Machine comes with several interchangeable components to facilitate various heat transfer tasks. Familiarize yourself with the main parts and accessories before assembly and operation.

Figure 4: Key components of the heat press machine, including the rubber handle, pressure knob, control box, overload protector, power switch, upper heat insulation cover, silicone pad, base, and butterfly nut.

Figure 5: Complete set of accessories, including mug press, lengthened heating pads, heat tape, sublimation paper, and cap heating pad.
To attach different heating pads (e.g., mug, plate, cap), ensure the machine is powered off and cooled. Carefully remove the current platen by loosening any securing nuts or screws. Align the new heating pad with the mounting points and secure it firmly. For electrical attachments like the mug press, connect the control connection line to the designated port on the control box.
4. Setup and Initial Operation
Before operating the heat press, ensure it is placed on a stable, heat-resistant surface. Connect the power cord to a grounded outlet. The control box allows for precise temperature and time settings.
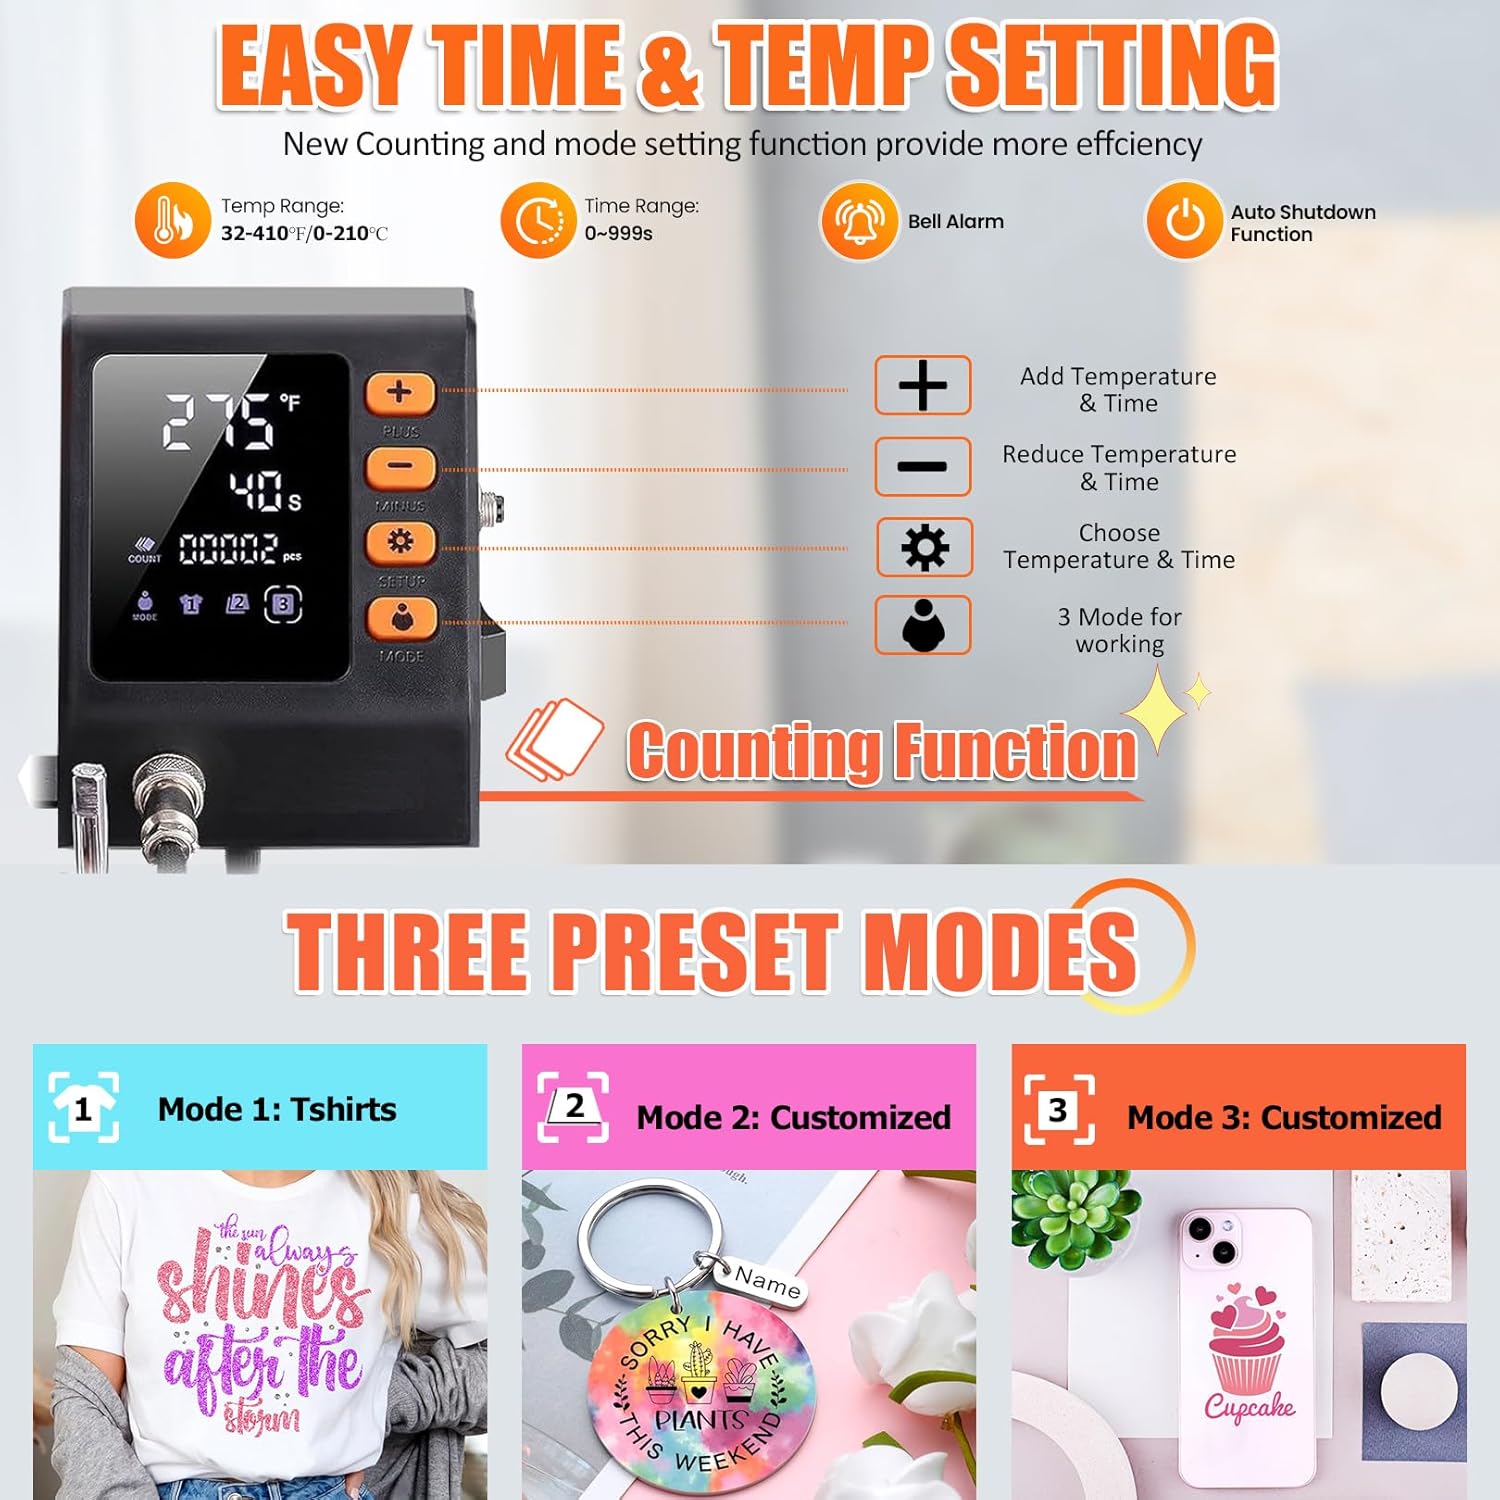
Figure 6: Digital control panel for setting temperature, time, and selecting modes.
Setting Temperature and Time:
- Press the 'MODE' button once to set the initial temperature. Use the '+' and '-' buttons to adjust the temperature (e.g., 200°C / 390°F for T-shirts).
- Press the 'MODE' button twice to set the time. Use the '+' and '-' buttons to adjust the time (e.g., 60 seconds for T-shirts).
- Press the 'MODE' button a third time to confirm and finish the settings. The machine will begin heating to the set temperature.
The machine also features three preset modes for common applications, allowing for quick selection without manual input of temperature and time.
5. Operating Instructions
Always ensure the machine is properly set up and pre-heated before beginning any transfer. Wear heat-resistant gloves when handling hot components or materials.
Video 1: Operation Manual of Upgraded 8 in 1 Heat Press Machine. This video demonstrates the heat transfer process for various items.
5.1. T-Shirt Heat Transfer
For T-shirt transfers, use the 12'' x 15'' flat platen. Recommended settings: 200°C (390°F) for 60 seconds (for sublimation paper) or 170°C (338°F) for 25 seconds (for PU Flex Film).
- Prepare your T-shirt and printed design.
- Place the T-shirt smoothly onto the bottom platen.
- Position your design on the T-shirt, securing it with heat-resistant tape if necessary.
- Swing the heating element over the T-shirt.
- Press down the handle firmly to apply pressure. The machine will begin counting down.
- Once the countdown ends and the alarm sounds, release the handle and swing the heating element away.
- Carefully remove the transfer paper from the T-shirt. (Refer to Video 1, 0:17 for sublimation, 0:53 for PU Flex Film).
5.2. Mug Heat Transfer
Attach the appropriate mug heating pad. Recommended settings: 180°C (360°F) for 180 seconds.
- Connect the mug heating pad to the control box.
- Prepare your blank mug and printed design.
- Wrap the design around the mug, securing it with heat-resistant tape.
- Insert the mug into the mug press.
- Close the mug press handle to apply pressure. The machine will begin counting down.
- Once the countdown ends, open the mug press and carefully remove the hot mug.
- Peel off the transfer paper to reveal the finished design. (Refer to Video 1, 1:18).
5.3. Plate Heat Transfer
Attach the appropriate plate heating pad. Recommended settings: 200°C (390°F) for 420 seconds.
- Pre-heat the plate mold for 10 minutes before placing the plate.
- Prepare your blank plate and printed design.
- Place the design onto the plate, securing it with heat-resistant tape.
- Carefully place the plate onto the bottom platen with the design facing up.
- Swing the heating element over the plate.
- Press down the handle firmly. The machine will begin counting down.
- Once the countdown ends, release the handle and swing the heating element away.
- Wearing heat-resistant gloves, carefully remove the hot plate and peel off the transfer paper. (Refer to Video 1, 1:56).
5.4. Cap Heat Transfer
Attach the cap heating pad. Recommended settings: 200°C (390°F) for 40 seconds.
- Attach the cap heating pad to the machine.
- Prepare your blank cap and printed design.
- Position the design on the cap, securing it with heat-resistant tape.
- Place the cap onto the cap platen.
- Press down the handle firmly. The machine will begin counting down.
- Once the countdown ends, release the handle.
- Carefully remove the cap and peel off the transfer paper. (Refer to Video 1, 2:52).
6. Maintenance
- Cleaning: Regularly wipe down the Teflon-coated heating element with a soft, damp cloth when the machine is cool. Avoid abrasive cleaners or sharp objects that could damage the non-stick surface.
- Storage: Store the heat press in a dry, dust-free environment when not in use. Keep all accessories organized to prevent loss or damage.
- Inspection: Periodically check all connections, screws, and moving parts for tightness and wear. Ensure the power cord is free from damage.
7. Troubleshooting
If you encounter issues with your heat press machine, consider the following common problems and solutions:
- Uneven Heating: Ensure the dual heating tubes are functioning correctly. Verify the pressure is evenly distributed across the platen using the pressure knob.
- Poor Transfer Quality: Check that the correct temperature and time settings are used for your specific material and transfer paper. Ensure adequate pressure is applied.
- Machine Not Powering On: Verify the power cord is securely plugged into both the machine and a working electrical outlet. Check the power switch and any overload protectors.
- Alarm Sounds Continuously: This may indicate overheating. Allow the machine to cool down. If the issue persists, consult the manufacturer's support.
For persistent issues not covered here, please contact AKEYDIY customer support.
8. Specifications
| Attribute | Value |
|---|---|
| Recommended Uses For Product | T-Shirt, Hat, Mug, Cap |
| Upper Temperature Rating | 410 Degrees Fahrenheit (210°C) |
| Lower Temperature Rating | 32 Degrees Fahrenheit (0°C) |
| Voltage | 110 Volts |
| Wattage | 800 watts |
| Manufacturer | AKEYDIY |
| Product Dimensions | 12 x 15 x 20 inches (30.5 x 38.1 x 50.8 cm) |
| Item Weight | 50.9 pounds (23.1 kg) |
| Material | Aluminum, Plastic, Stainless Steel |
| Color | Orange |
| Item Model Number | SM009 |
9. Warranty and Support
For warranty information, product support, or any inquiries not covered in this manual, please contact AKEYDIY customer service directly. Keep your purchase receipt and product model number (SM009) readily available for faster assistance.
