
1. Introduction
Thank you for purchasing the LONPOO Mini Hi-Fi Amplifier AMP-615B. This 2-channel stereo amplifier is designed to provide high-quality audio amplification for your passive speakers, offering versatile connectivity options including Bluetooth 5.3, Optical, Coaxial, USB, and AUX inputs. This manual provides detailed instructions for setup, operation, and maintenance to ensure optimal performance and longevity of your device.
2. Safety Instructions
- Power Source: Ensure the amplifier is connected to a power supply within the specified voltage range (AC 100-240V ~ 50/60Hz).
- Ventilation: Do not block ventilation openings. Ensure adequate airflow around the unit to prevent overheating.
- Moisture: Keep the amplifier away from water, moisture, and high humidity environments. Do not operate with wet hands.
- Heat: Avoid placing the unit near heat sources such as radiators, heat registers, stoves, or other heat-producing appliances.
- Cleaning: Disconnect the power cord before cleaning. Use a dry, soft cloth. Do not use liquid cleaners or aerosol cleaners.
- Servicing: Do not attempt to service this product yourself. Refer all servicing to qualified service personnel.
- Placement: Place the unit on a stable, flat surface to prevent it from falling.
3. Package Contents
Carefully unpack the box and ensure all items listed below are present and in good condition. If any item is missing or damaged, please contact your retailer.

The package includes the LONPOO Mini Hi-Fi Amplifier, a remote control for convenient operation, an AC power cord, an optical cable for digital audio, and a quick start guide.
- 1x LONPOO Mini Hi-Fi Amplifier (AMP-615B)
- 1x Remote Control
- 1x AC Power Cord
- 1x Optical Cable
- 1x User Manual (Quick Start Guide)
4. Product Overview
4.1 Front Panel

The front panel features Treble and Bass controls, a multi-function knob for volume and input selection, AUX IN, USB input, IR receiver, and an indicator light.
- TREBLE Control: Adjusts high-frequency audio levels.
- BASS Control: Adjusts low-frequency audio levels.
- Multi-Function Knob (VOLUME +/- / MODE / POWER ON/OFF):
- Rotate: Adjusts volume.
- Short Press: Cycles through input modes (Bluetooth, AUX, USB, Coaxial, Optical).
- Long Press: Powers the unit On/Off.
- AUX IN (3.5mm): Audio input for devices with a 3.5mm audio jack.
- USB Input: For playing audio files from a USB flash drive (supports MP3, WAV formats).
- IR (Infrared) Receiver: Receives signals from the remote control.
- Indicator Light: Displays the current status/input mode:
- Red: Standby (Power Off)
- Blue: Bluetooth Input
- Green: AUX Input
- Yellow: Coaxial Input
- Light Blue: Optical Input
4.2 Rear Panel
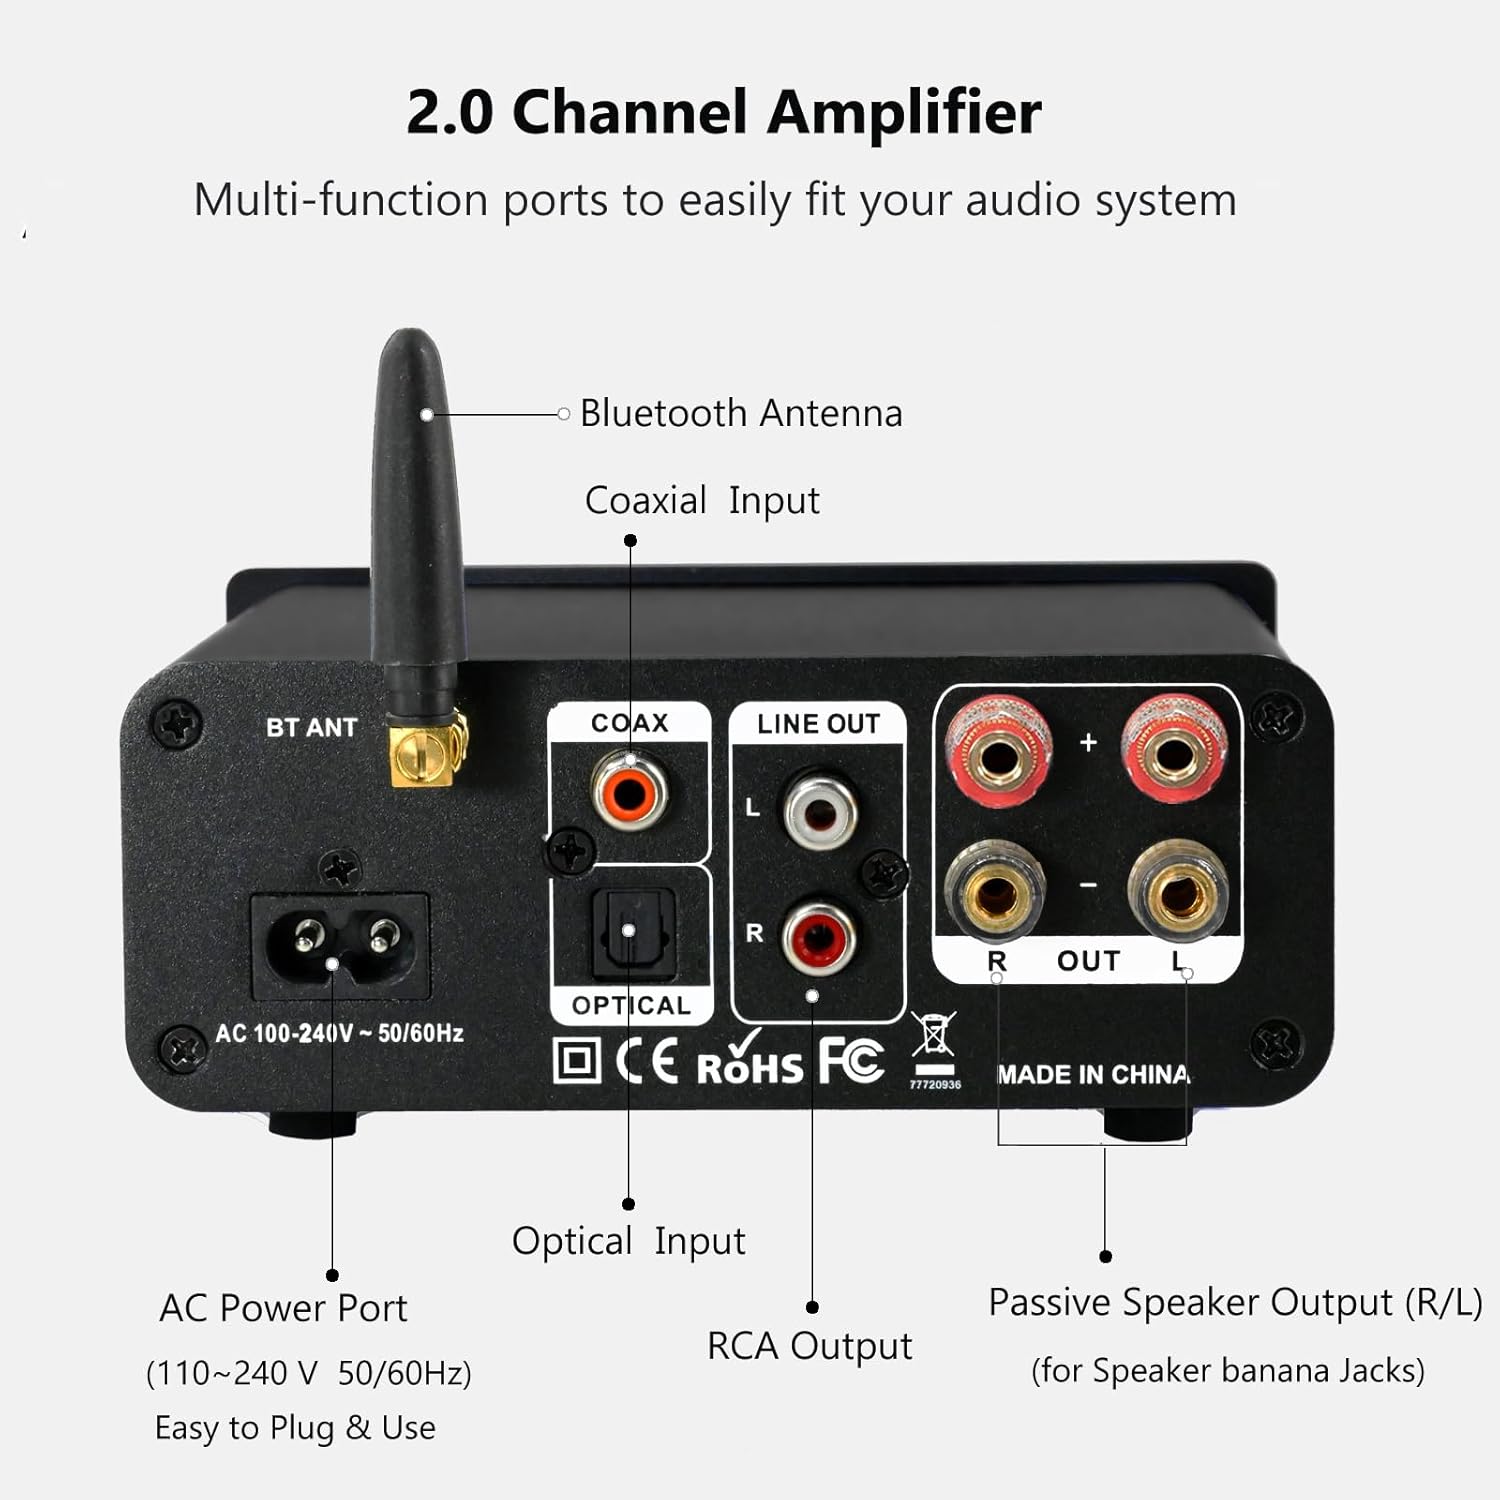
The rear panel provides connections for the Bluetooth antenna, Coaxial and Optical inputs, RCA Line Out, passive speaker outputs, and the AC power port.
- BT ANT (Bluetooth Antenna): Connect the included Bluetooth antenna for optimal wireless range and stability.
- COAX (Coaxial Input): Digital audio input for devices with a coaxial output.
- OPTICAL (Optical Input): Digital audio input for devices with an optical (Toslink) output.
- LINE OUT (RCA L/R): Analog audio output for connecting to powered speakers or a subwoofer.
- PASSIVE SPEAKER OUTPUT (R/L): Connect passive speakers using banana plugs or bare speaker wire.
- AC POWER PORT: Connect the supplied AC power cord (100-240V ~ 50/60Hz).
5. Setup
5.1 Connecting Speakers

The LONPOO Mini Hi-Fi Amplifier seamlessly integrates with your home audio setup, providing clear sound to passive bookshelf speakers.
- Passive Speakers: Connect your passive bookshelf speakers to the PASSIVE SPEAKER OUTPUT (R/L) terminals on the rear panel. Ensure correct polarity (+ to + and - to -) for each speaker. You can use banana plugs or strip the speaker wire ends and insert them into the terminals.
- Powered Speakers/Subwoofer: If you wish to connect powered speakers or a subwoofer, use an RCA cable to connect them to the LINE OUT (RCA L/R) ports on the rear panel.
5.2 Connecting Audio Sources
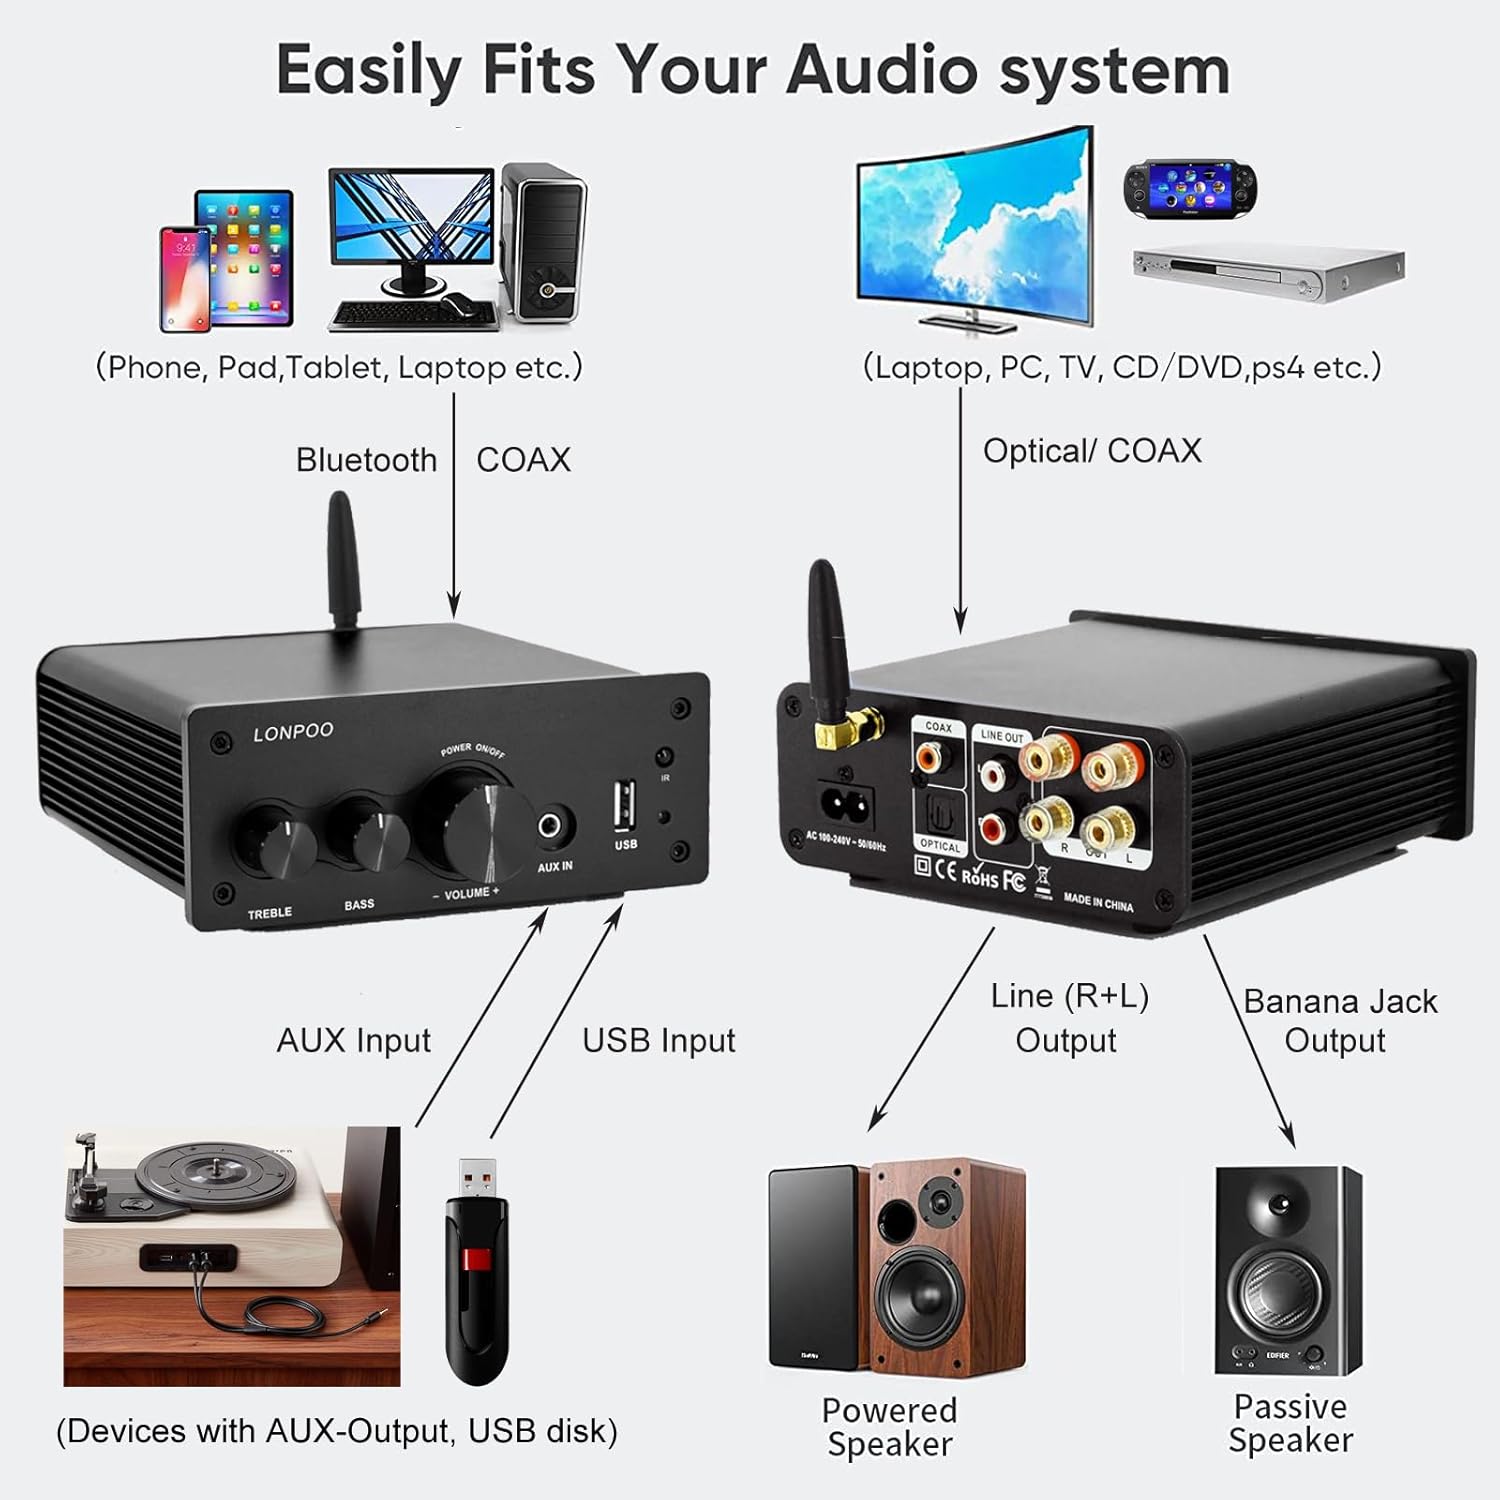
This diagram illustrates how the amplifier connects to a wide range of audio sources and output devices, including phones, PCs, TVs, CD players, powered speakers, and passive speakers.
- Bluetooth: Ensure the Bluetooth antenna is connected to the BT ANT port.
- AUX Input: Connect your smartphone, tablet, or other audio device using a 3.5mm audio cable to the AUX IN port on the front panel.
- USB Input: Insert a USB flash drive containing MP3 or WAV audio files into the USB Input port on the front panel.
- Optical Input: Connect your TV, CD player, or game console with an optical output to the OPTICAL port on the rear panel using the provided optical cable.
- Coaxial Input: Connect your TV, DVD player, or other audio source with a coaxial output to the COAX port on the rear panel.
5.3 Power Connection
Connect the supplied AC power cord to the AC POWER PORT on the rear panel of the amplifier, then plug the other end into a wall outlet.
6. Operating Instructions
6.1 Power On/Off
To power on the amplifier, long press the Multi-Function Knob on the front panel. The indicator light will illuminate. To power off, long press the knob again.
6.2 Input Selection
To select an audio input source, short press the Multi-Function Knob. Each short press will cycle through the available inputs: Bluetooth, AUX, USB, Coaxial, and Optical. The Indicator Light will change color to reflect the active input mode (refer to Section 4.1 for color codes).
6.3 Volume Adjustment
Rotate the Multi-Function Knob clockwise to increase the volume and counter-clockwise to decrease it.
6.4 Tone Control
Use the TREBLE and BASS knobs on the front panel to adjust the high and low frequencies of the audio output according to your preference.
6.5 Bluetooth Pairing

Connect your smartphone or other Bluetooth-enabled devices wirelessly to the amplifier for convenient audio streaming.
- Ensure the Bluetooth antenna is securely connected.
- Power on the amplifier and select the Bluetooth input mode (the indicator light will turn blue).
- On your Bluetooth-enabled device (e.g., smartphone, tablet), search for available Bluetooth devices.
- Select "LONPOO AMP-615" from the list to pair.
- Once paired, the amplifier will play a confirmation sound, and you can stream audio wirelessly.
6.6 USB Playback

The amplifier supports direct audio input via 3.5mm AUX and USB, allowing for plug-and-play functionality with various devices.
Insert a USB flash drive into the USB Input port. The amplifier will automatically detect and begin playing supported audio files (MP3, WAV). Use the remote control for playback functions like play/pause, next/previous track.
6.7 Remote Control
The included remote control allows for convenient operation of the amplifier from a distance. Functions include:
- Power On/Off
- Volume Up/Down
- Mute
- Input Source Selection (BT, AUX, USB, COAX, OPT)
- USB Playback Controls (Play/Pause, Next/Previous Track)
7. Troubleshooting
If you encounter any issues with your LONPOO Mini Hi-Fi Amplifier, please refer to the following troubleshooting guide:
| Problem | Possible Cause | Solution |
|---|---|---|
| No sound output |
|
|
| Poor sound quality (distortion, low volume) |
|
|
| Bluetooth connection issues |
|
|
| Optical/Coaxial audio dropouts or no sound |
|
|
| Humming or buzzing noise |
|
|
8. Specifications
| Model Number | AMP-615 |
| Output Power | 100W + 100W (200W total) |
| Channels | 2.0 Stereo |
| Bluetooth Version | 5.3 |
| Inputs | Bluetooth, Optical, Coaxial, USB, 3.5mm AUX |
| Outputs | RCA Line Out (L/R), Passive Speaker Output (Banana Jack compatible) |
| Power Supply | AC 100-240V ~ 50/60Hz |
| Dimensions (W x H x D) | 132 mm x 55 mm x 140 mm (approx. 5.19 x 2.16 x 5.51 inches) |
| Weight | 1.09 kg (approx. 2.4 lbs) |
| Included Components | Hi-Fi Amplifier, AC Cable, Remote Control, Optical Cable |
9. Maintenance
- Cleaning: Disconnect the power before cleaning. Use a soft, dry cloth to wipe the exterior of the amplifier. Do not use abrasive cleaners or solvents.
- Storage: If storing the amplifier for an extended period, disconnect it from the power supply and store it in a cool, dry place.
- Cable Management: Ensure all cables are neatly organized and not under tension to prevent damage.
10. Warranty and Support
This product comes with a standard manufacturer's warranty. For specific warranty details, please refer to the documentation provided with your purchase or contact your retailer. For technical support, troubleshooting assistance, or inquiries regarding spare parts, please contact LONPOO customer service or your authorized dealer. Information regarding spare parts availability is currently unavailable.
