
1. Safety Information
Please read and understand all safety instructions before operating the LCR Meter. Failure to follow these instructions may result in injury or damage to the instrument.
- Electric Shock Hazard: To avoid electric shock, ensure the power cord's protective grounding conductor is properly connected to ground.
- Internal Components: This device contains no operator-serviceable parts inside. Refer all servicing to qualified personnel.
- Fire Protection: For continued fire protection, use only the specified line fuse.
- Operating Environment: Operate the instrument within the specified temperature and humidity ranges to ensure proper function and safety.
2. Product Overview
The LILLIPUT OWON LCR2020 is a high-precision LCR meter designed for accurate measurement of inductance, capacitance, and resistance. It features a 3.5-inch color LCD, a basic accuracy of 0.05%, and a measuring speed of up to 40 times per second. The instrument supports a test frequency range of 10Hz to 20kHz.
Front Panel Components
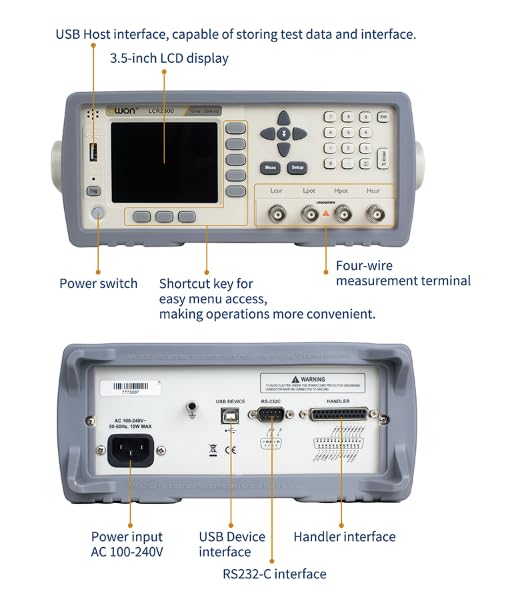
Image Description: This image displays the front panel of the LCR2020 meter. Key labeled components include the USB Host interface for data storage, the 3.5-inch LCD display, the power switch, shortcut keys for menu access, and the four-wire measurement terminals (Lcur, Lpot, Hpot, Hcur).
Rear Panel Connections
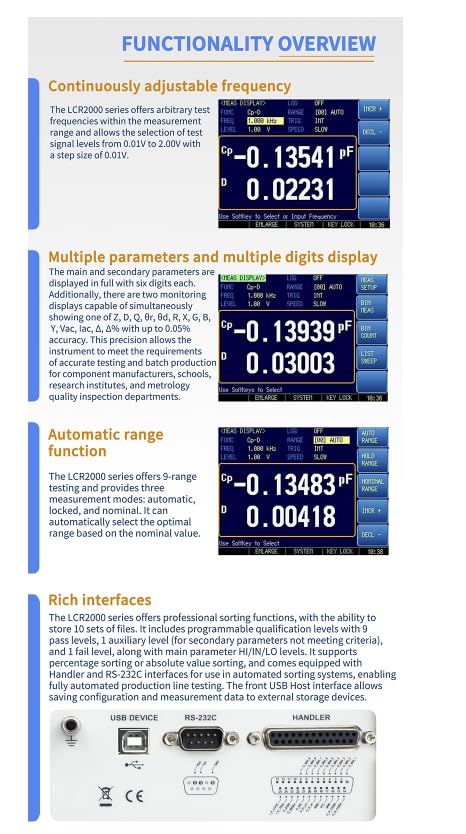
Image Description: This image shows the rear panel of the LCR2020 meter. Labeled ports include the AC 100-240V power input, USB Device interface, RS232-C interface, and Handler interface for external control and automation.
3. Setup
Follow these steps to set up your LCR2020 LCR Meter for initial operation.
- Power Connection: Connect the provided power cord to the AC power input on the rear panel of the instrument. Ensure the other end is securely plugged into a grounded power outlet (AC 100-240V, 50-60Hz).
- Test Fixture/Leads Connection: Connect the appropriate test fixture (e.g., T10 Test Fixture, F10 SMD Test Clips) or test leads to the four-wire measurement terminals (Lcur, Lpot, Hpot, Hcur) on the front panel. Ensure connections are firm to maintain measurement accuracy.
- Initial Power On: Press the power switch on the front panel to turn on the instrument. The 3.5-inch color LCD will illuminate, displaying the startup sequence.
- Interface Connections (Optional): If using external control or data logging, connect the USB Host, USB Device, RS-232C, or Handler interfaces as required.
4. Operating Instructions
This section details the primary functions and operational procedures for the LCR2020 LCR Meter.

Image Description: This composite image illustrates key functionalities: continuously adjustable test frequency, multiple parameter display with high precision, automatic range selection, and a depiction of the rich interface options (USB Device, RS-232C, Handler).
4.1 Basic Measurement
- Selecting Measurement Parameters: Use the navigation keys and 'Setup' button to select the desired measurement parameters (e.g., L, C, R, Z, D, Q).
- Connecting the DUT: Connect the Device Under Test (DUT) to the appropriate test terminals using the test leads or fixture.
- Initiating Measurement: Press the 'Meas' button to start a measurement. The results will be displayed on the LCD.
4.2 Test Frequency Adjustment
The LCR2020 allows for continuous adjustment of test frequencies within its 10Hz to 20kHz range. Use the menu options to set the desired frequency with a step size of 0.01V for signal levels from 0.01V to 2.00V.
4.3 Range Selection
The instrument offers 9-range testing with automatic, locked, and nominal modes. In nominal mode, the instrument automatically selects the optimal range based on the nominal value provided.
4.4 DCR Measurement and DC Bias
The LCR2020 supports Direct Current Resistance (DCR) measurement. It also provides an internal D.C. bias voltage of ±2.5V for specific testing requirements.
4.5 Interface Usage
- USB Host: For storing test data. Connect a USB flash drive to the front panel USB Host port.
- USB Device / RS-232C / Handler: These interfaces on the rear panel allow for remote control and data communication with a computer or external automation systems. The instrument supports SCPI and ModbusRTU communication protocols.
5. Maintenance
Proper maintenance ensures the longevity and accuracy of your LCR2020 LCR Meter.
- Cleaning: Use a soft, dry cloth to clean the exterior of the instrument. Do not use abrasive cleaners or solvents.
- Storage: When not in use, store the instrument in a clean, dry environment away from direct sunlight and extreme temperatures.
- Calibration: Regular calibration by qualified personnel is recommended to maintain the instrument's specified accuracy.
6. Troubleshooting
This section provides solutions to common issues you might encounter.
- Instrument Does Not Power On:
- Check if the power cord is securely connected to both the instrument and a live power outlet.
- Verify the power outlet is functioning correctly.
- Ensure the correct fuse is installed and not blown.
- Inaccurate Measurements:
- Ensure test leads and fixtures are properly connected and not damaged.
- Perform an OPEN/SHORT correction before measurement.
- Verify the correct test frequency and measurement range are selected.
- Check for external interference or environmental factors affecting the measurement.
- Communication Issues (USB/RS-232C/Handler):
- Ensure the correct cable is used and securely connected.
- Verify communication settings (baud rate, parity, etc.) on both the instrument and the connected device.
- Check if the correct drivers are installed on the computer.
If the issue persists after following these steps, contact customer support or refer to the warranty information.
7. Specifications
Detailed technical specifications for the LCR2020 LCR Meter.

Image Description: This table provides comprehensive specifications for the LCR2000 series, including the LCR2020 model. It details test functions (Cs-Rs, Cp-D, etc.), monitor parameters (Z, D, Q, etc.), test frequency ranges (10Hz~20kHz for LCR2020), basic accuracy (0.05%), measurement speed (40 times/s), display range for various parameters, output impedance, ranging modes, DC bias, correction function, beep feature, memory, trigger mode, interface types, and display size.
| Parameter | Value |
|---|---|
| Model | LCR2020 |
| Test Frequency | 10Hz~20kHz |
| Basic Accuracy | 0.05% |
| Measuring Speed | Up to 40 times per second |
| Display | 3.5-inch Color LCD |
| Ranging | Auto, Hold, Nominal (9 ranges) |
| DCR Measurement | Supported |
| Internal D.C. Bias Voltage | ±2.5V |
| Interfaces | RS-232C, Handler, USB Host / Device |
| Communication Protocol | SCPI, ModbusRTU |
| Power Source | Corded Electric (AC 100-240V, 50-60Hz) |
| Item Weight | 5 Pounds |
8. Included Accessories
The following accessories are typically included with your LCR2020 LCR Meter:

Image Description: This image displays the standard accessories provided with the LCR meter. These include a Power Cord, a Quick Guide, a T10 Test Fixture, Test Leads, a Short-circuit foil, and F10 SMD Test Clips.
- Power Cord
- T10 Test Fixture
- Test Leads
- Short-circuit foil
- F10 SMD Test Clips
9. Warranty and Support
For warranty information and technical support, please refer to the documentation provided with your purchase or visit the official LILLIPUT website. Keep your purchase receipt as proof of purchase for warranty claims.