1. Introduction
This manual provides comprehensive instructions for the UMIDIGI G9A smartphone. Please read this guide thoroughly to understand the device's functions and ensure proper usage. Keep this manual for future reference.

Image 1.1: Front and rear view of the UMIDIGI G9A smartphone, showcasing its design and camera module.
2. Device Setup
2.1 Package Contents
Verify that your package contains the following items:
- UMIDIGI G9A Smartphone
- USB Type-C Cable
- Power Adapter
- SIM Eject Tool
- Protective Case (may vary by region)
- Quick Start Guide
2.2 Inserting SIM and SD Cards
The UMIDIGI G9A supports dual SIM cards and a microSD card for expanded storage. Use the provided SIM eject tool to open the SIM tray.
- Locate the SIM tray on the side of the device.
- Insert the SIM eject tool into the small hole next to the tray and press gently until the tray pops out.
- Place your Nano-SIM card(s) and/or microSD card into the designated slots on the tray. Ensure the gold contacts face downwards.
- Carefully reinsert the tray into the phone until it clicks into place.
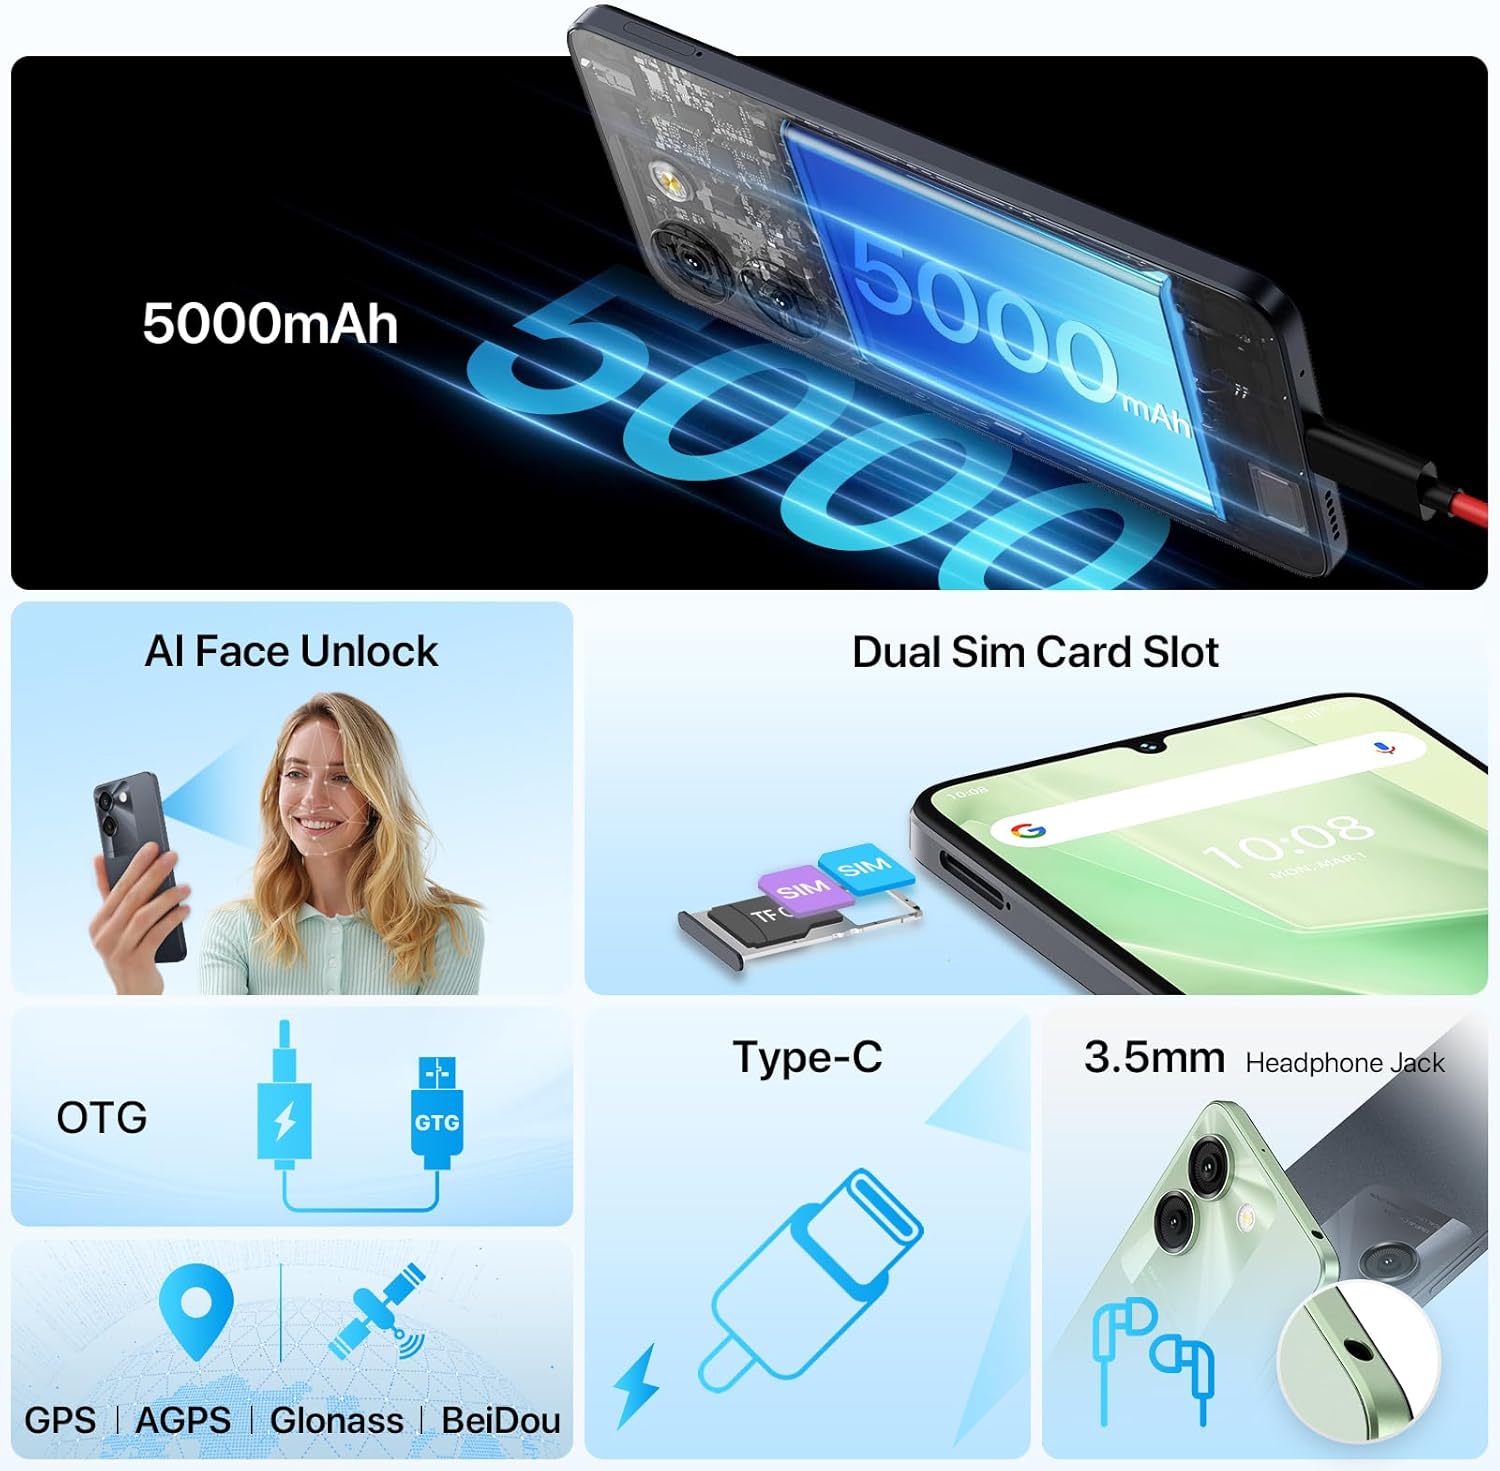
Image 2.1: Illustration of the dual SIM card slot, Type-C charging port, 3.5mm headphone jack, and the AI Face Unlock functionality of the UMIDIGI G9A.
2.3 Initial Power On and Basic Setup
- Press and hold the Power button until the UMIDIGI logo appears.
- Follow the on-screen prompts to select your language, connect to a Wi-Fi network, and set up your Google account.
- Configure security features such as AI Face Unlock or a PIN/pattern/password.
3. Operating Your Device
3.1 Display and Navigation
The UMIDIGI G9A features a 6.75-inch HD Eye-care Display with a resolution of 1600x720 and a 20:9 aspect ratio. Navigate the interface using touch gestures.

Image 3.1: Details of the UMIDIGI G9A's 6.75-inch HD Eye-care Display, highlighting its resolution and aspect ratio.
3.2 Android 14 (Go Edition)
Your UMIDIGI G9A runs on Android 14 (Go Edition), optimized for smooth performance on entry-level devices. It offers a user-friendly interface and access to a wide range of applications via the Google Play Store.

Image 3.2: Various screens demonstrating the Android 14 (Go Edition) user interface on the UMIDIGI G9A, including home screen, notifications, and app drawer.
3.3 Camera Functions
The device is equipped with a dual rear camera system and a front camera:
- Rear Camera: 13MP Ultra-Clear AI Camera + 2MP Depth Camera
- Front Camera: 8MP
Open the Camera app to switch between modes (Photo, Video, Portrait, etc.), adjust settings, and capture images or videos.

Image 3.3: Overview of the UMIDIGI G9A's dual camera system, detailing the 13MP main, 2MP depth, and 8MP front cameras, alongside example photographs.
3.4 Storage and Memory
The UMIDIGI G9A comes with 4GB of RAM (expandable with 4GB virtual RAM for a total of 8GB) and 64GB of internal storage (ROM). Storage can be expanded up to 1TB using a microSD card.

Image 3.4: Visual representation of the UMIDIGI G9A's 8GB RAM (4GB physical + 4GB extended) and 64GB ROM, with support for up to 1TB expansion.
3.5 Security Features
Unlock your device securely using AI Face Unlock or traditional methods like PIN, pattern, or password. Configure these options in the Security settings.
3.6 Battery Management
The UMIDIGI G9A is powered by a 5000mAh battery. To optimize battery life:
- Adjust screen brightness.
- Close unused applications.
- Enable battery saver mode when needed.
- Charge the device using the provided charger and cable.
3.7 Connectivity
The device supports 4G cellular networks, Wi-Fi, Bluetooth, and GPS (AGPS, Glonass, BeiDou). It features a USB Type-C port for charging and data transfer, and a 3.5mm headphone jack for audio.
4. Maintenance
4.1 Cleaning Your Device
Use a soft, lint-free cloth to clean the screen and body of your phone. Avoid using harsh chemicals or abrasive materials.
4.2 Software Updates
Regularly check for software updates to ensure your device has the latest features and security patches. Go to Settings > System > System update to check for updates.
4.3 Battery Care
To prolong battery lifespan, avoid exposing the device to extreme temperatures. Do not fully discharge the battery frequently, and avoid overcharging for extended periods.
5. Troubleshooting
| Problem | Solution |
|---|---|
| Device does not turn on | Ensure the battery is charged. Connect the charger and wait a few minutes before attempting to power on. If unresponsive, press and hold the Power button for 10-15 seconds to force a restart. |
| Cannot connect to Wi-Fi | Check if Wi-Fi is enabled in Settings. Restart your router and the phone. Forget the network and reconnect. |
| Poor cellular signal | Ensure your SIM card is correctly inserted. Check network settings and ensure mobile data is enabled. Move to an area with better network coverage. |
| Apps are crashing or freezing | Clear the cache of the problematic app (Settings > Apps > [App Name] > Storage & cache > Clear cache). Restart the device. If the issue persists, consider reinstalling the app. |
| Device is slow | Close unused background apps. Clear unnecessary files and cache. Consider performing a factory reset as a last resort (backup your data first). |
6. Specifications
| Feature | Detail |
|---|---|
| Model Name | G9A |
| Operating System | Android 14 (Go Edition) |
| Display Size | 6.75 Inches HD Eye-care Display |
| Resolution | 1600x720 |
| RAM | 4GB (expandable to 8GB with virtual RAM) |
| Internal Storage (ROM) | 64GB |
| Expandable Storage | Up to 1TB via microSD card |
| Rear Camera | 13MP Ultra-Clear AI Camera + 2MP Depth Camera |
| Front Camera | 8MP |
| Battery Capacity | 5000mAh |
| Cellular Technology | 4G |
| Wireless Connectivity | Wi-Fi, Bluetooth |
| Navigation | GPS, AGPS, Glonass, BeiDou |
| Ports | USB Type-C, 3.5mm Headphone Jack |
| Security | AI Face Unlock |
| Item Weight | 14.1 ounces |
| Dimensions | 7.09 x 3.5 x 1.73 inches (Package) |
7. Warranty and Support
UMIDIGI products are covered by a limited warranty. For specific warranty terms and conditions, please refer to the warranty card included in your product package or visit the official UMIDIGI website.
For technical support, troubleshooting assistance, or service inquiries, please contact UMIDIGI customer support through their official website or the contact information provided in your product documentation.
Official UMIDIGI Website: www.umidigi.com


