1. Introduction
The FEELWORLD F7 Plus is a 7-inch high-brightness touchscreen field monitor designed for DSLR cameras and camcorders. It offers a 1200nit daylight-viewable display with a 1920 x 1200 resolution, a 160° viewing angle, and a 1200:1 contrast ratio, ensuring detailed image clarity for professional photography and videography.
This monitor integrates advanced features such as HDR monitoring, 3D LUT support, and a comprehensive suite of auxiliary functions including waveform, vector graph, and histogram. It supports 4K 60Hz HDMI input and output, making it a versatile tool for various production environments.

Image: FEELWORLD F7 Plus 7-Inch DSLR Camera Field Monitor with included accessories like battery, bag, and sunshade.
2. What's in the Box

Image: Diagram showing all items included in the FEELWORLD F7 Plus package.
- 1 × FEELWORLD F7 Plus Monitor
- 1 × Standard HDMI Cable
- 1 × Micro HDMI Cable
- 1 × Mini Hot Shoe Mount + Hex Wrench
- 1 × Disassemble Wrench
- 1 × Manual
- 1 × F750 Battery
- 1 × Carry Bag
3. Product Features
3.1 High Brightness Display
The F7 Plus features a 7-inch IPS display with a resolution of 1920 x 1200, a 1200:1 contrast ratio, and a wide 160° viewing angle. With 1200 nits of brightness, the screen is daylight viewable, providing clear visuals even in bright outdoor conditions.

Image: FEELWORLD F7 Plus 7-inch IPS Large Display highlighting 1200 Nits Brightness, 1920x1200 Resolution, 1200:1 Contrast, REC-709 Color Calibration, and 160° Wide View Angle.

Image: Comparison of the F7 Plus 1200nit display with another 450nit monitor, demonstrating superior visibility in daylight.
3.2 External Install and Power Design
The monitor features an NP-F external power supply kit on the back, allowing you to mount and power external devices such as wireless video transmitters or LED lights directly from the monitor, simplifying your setup and reducing cable clutter.
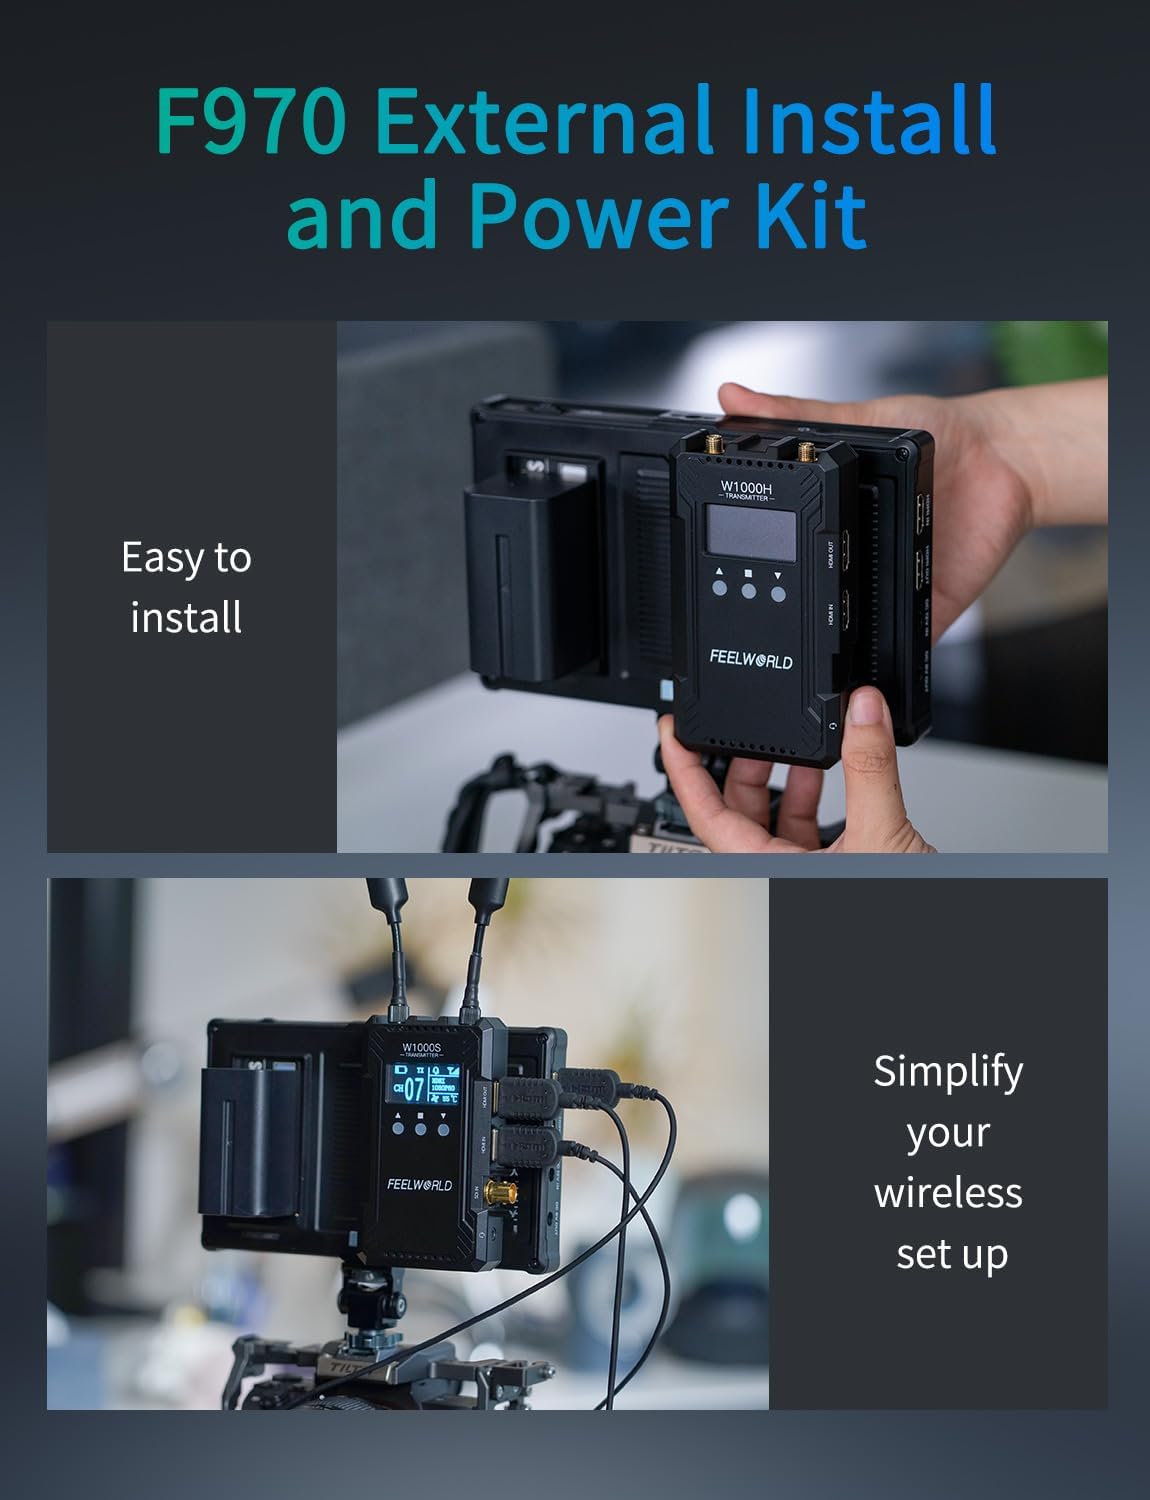
Image: Demonstration of the F970 External Install and Power Kit, showing easy installation and simplified wireless setup.
3.3 HDR Monitoring & 3D LUT
Benefit from HDR (High Dynamic Range) monitoring for enhanced clarity and detail. The F7 Plus supports loading up to 32 custom 3D LUT files via an SD card, ensuring accurate color representation from capture to post-production.

Image: Visual explanation of HDR Monitoring and 3D LUTs, showing how they enhance image quality and color accuracy.
3.4 4K HDMI Loop In & Out
The monitor features HDMI input and output ports, supporting signals up to 4096x2160/60p and 3840x2160/60p. This allows for seamless connection to various cameras and camcorders, as well as looping out the signal to other displays or recorders.

Image: Illustration of 4K HDMI Loop In & Out functionality, detailing supported resolutions and various HDMI cable types.
3.5 Full Range of Auxiliary Functions
The F7 Plus includes professional monitoring functions such as Waveform, Vector Scope, Histogram, Peaking Filter, False Color, and Zebra Exposure to assist with accurate exposure and focus.
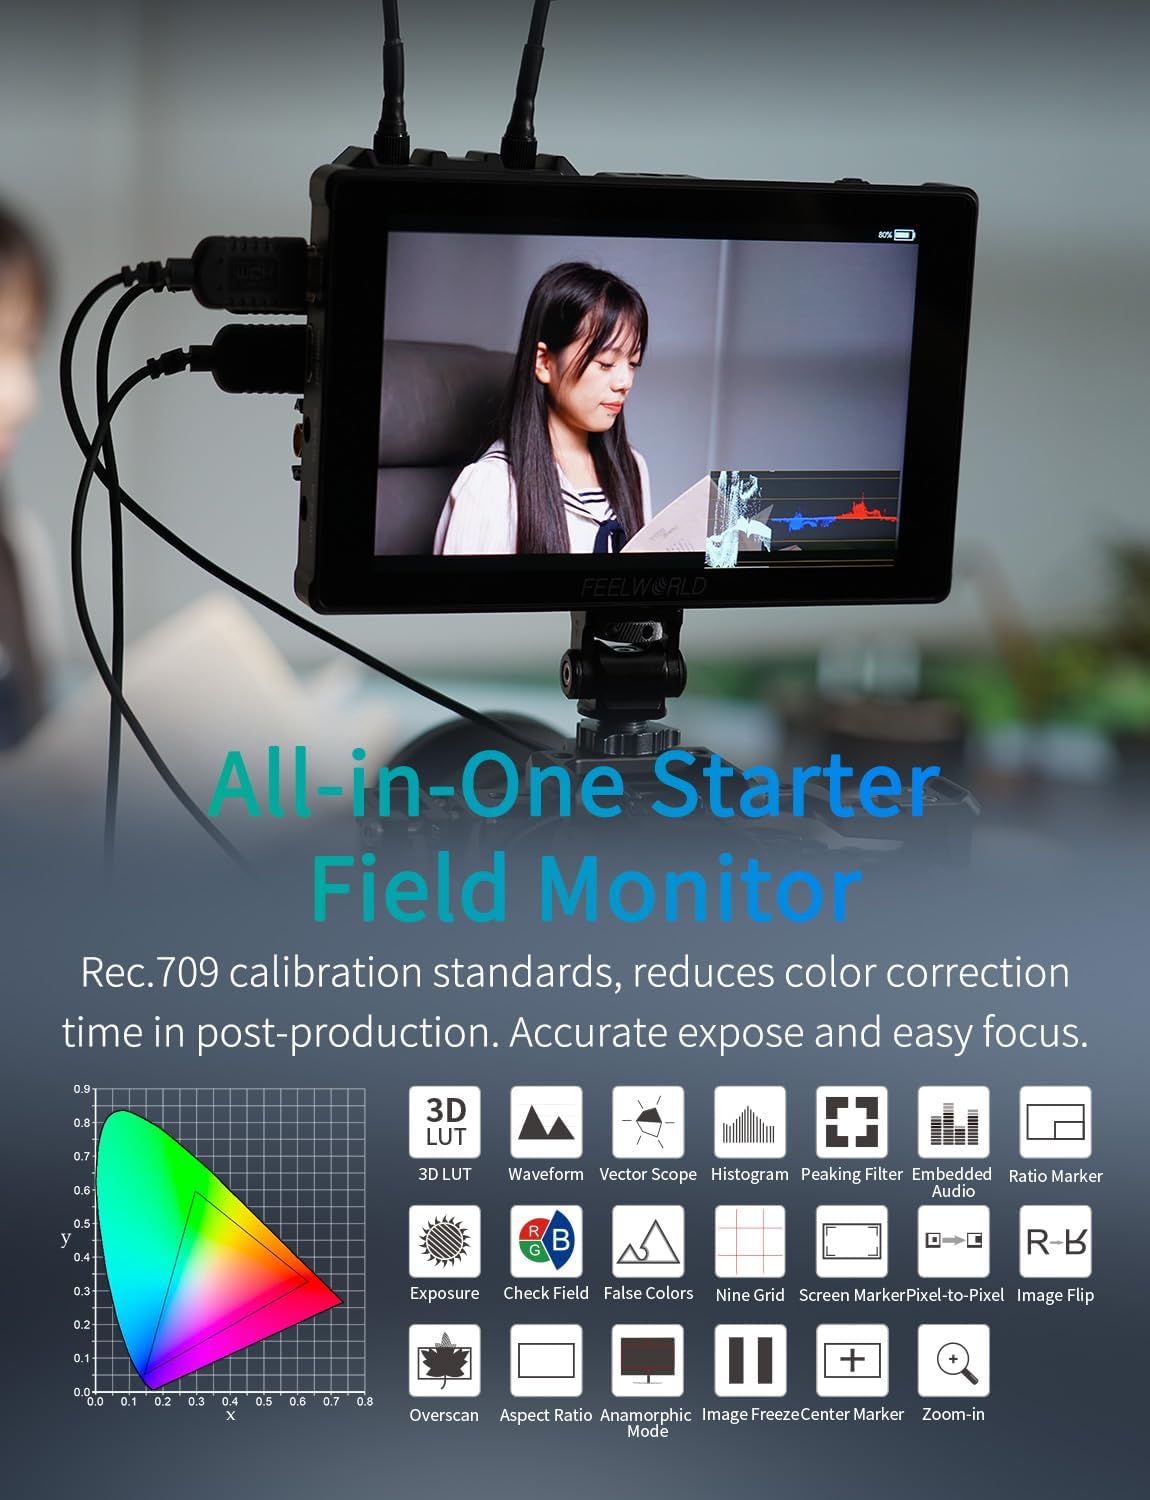
Image: Overview of the F7 Plus's comprehensive monitoring tools, including 3D LUT, Waveform, Vector Scope, Histogram, Peaking Filter, and more.
3.6 Convenient Touchscreen Interface
The intuitive touchscreen allows for easy access and control of all monitor functions and settings, enhancing workflow efficiency.

Image: Demonstration of the touchscreen interface, showing easy access to main menu, exit menu, volume, backlight, and zoom functions.
3.7 Multiple Charging Options
The monitor is compatible with NP-F series batteries (one F750 4400mAh battery is included), offering approximately 2.2 hours of single battery life. It can also be powered via a 12V adapter or a 5V/2A USB-C cable.

Image: Visual guide to multiple charging options for the F7 Plus, including lithium battery (NP-F series), 12V adapter, and 5V/2A USB-C cable.
3.8 Mounting Options
The monitor features 1/4" screw threads on the right, top, and bottom sides, allowing for flexible mounting configurations on cameras, rigs, or tripods.

Image: Illustration of the 1/4" screw threads on the F7 Plus for versatile mounting on various camera setups.
4. Setup Guide
4.1 Battery Installation
- Align the NP-F series battery (e.g., F750) with the battery plate on the back of the monitor.
- Slide the battery into the plate until it clicks securely into place.
4.2 Power Connection
- DC 12V Input: Connect the provided 12V DC power adapter to the 'DC IN 12V' port on the monitor.
- USB Type-C Input: For 5V/2A power, connect a compatible USB-C cable to the '5V IN Type-C' port.
4.3 HDMI Connection
- Identify the correct HDMI cable type for your camera (Standard HDMI, Micro HDMI).
- Connect one end of the HDMI cable to your camera's HDMI output port.
- Connect the other end of the HDMI cable to the 'HDMI IN' port on the FEELWORLD F7 Plus monitor.
- If looping out to another device, connect an HDMI cable from the 'HDMI OUT' port on the monitor to the input of your recording device or secondary display.
4.4 Mounting the Monitor
- Attach the Mini Hot Shoe Mount to one of the 1/4" screw threads on the monitor (top, bottom, or side).
- Slide the hot shoe mount into your camera's hot shoe or a compatible rig. Tighten the locking mechanism to secure the monitor.
4.5 Sunshade Attachment
- Assemble the sunshade frame.
- Attach the sunshade to the monitor, ensuring it covers the screen effectively to reduce glare.

Image: The F7 Plus monitor with sunshade attached, demonstrating its effectiveness in reducing overexposure during outdoor shoots.
5. Operating Instructions
5.1 Power On/Off
Long press the power button located on the top of the monitor to turn it on or off.
5.2 Touchscreen Navigation
The F7 Plus features a convenient touchscreen for intuitive menu navigation. Tap icons to select functions, swipe to navigate menus, and use pinch-to-zoom gestures for image magnification.
5.3 Loading 3D LUTs
The monitor supports loading up to 32 custom LUT files. Ensure your SD card is formatted to FAT32 or NTFS. LUT files must be .cube extension and not exceed 7.9MB. File names should be in English or numbers.
- Insert the SD card correctly into the SD Card Slot.
- Go to the main menu, navigate to 'LUT', then 'LUT Import', and confirm 'Import'.
- To empty imported LUTs, insert an empty SD card, enter the main menu, navigate to 'LUT', then 'LUT Import', and confirm to clear.

Image: Detailed instructions on how to load and manage 3D LUTs on the F7 Plus monitor using an SD card.
5.4 Using Monitoring Tools
- Peaking Focus Assist: Highlights in-focus edges (red, yellow, or green) to help achieve sharp focus. Fine-tune camera focus until the subject's edges are fully highlighted.
- Waveform: Monitors exposure in real-time, showing brightness distribution to fine-tune highlights, midtones, and shadows.
- Histogram: Quickly checks exposure to avoid under or overexposure. Displays brightness distribution from black (left) to white (right).
- Zebra Exposure: Highlights overexposed areas with striped patterns, ensuring proper exposure for various scenes. Set the threshold between 70-100%.
- False Color: Maps exposure levels to different colors on your monitor, displaying precise brightness values for each position on the screen. Useful for tricky lighting conditions.

Image: Explanation of Peaking Focus Assist, showing how it highlights in-focus areas for precise focusing.
Image: Guide to using the Waveform monitor for real-time exposure monitoring and color adjustment.

Image: Explanation of the Histogram, showing how to quickly check and avoid under or overexposure.

Image: Guide to Zebra Exposure, illustrating how it highlights overexposed areas for quick identification.

Image: Explanation of False Color, showing how it maps exposure levels to colors for precise brightness assessment.
5.5 Vertical Video Framing
The monitor offers tools to easily frame vertical videos for social media platforms, ensuring your composition is optimized for different aspect ratios.

Image: The F7 Plus displaying options for easily framing vertical videos for social media, with various aspect ratio guides.
5.6 Anamorphic De-squeeze
Instantly de-squeeze anamorphic footage for accurate preview during professional widescreen filmmaking. Various de-squeeze modes are available (e.g., 1.33X, 1.6X, 2.0X, 2.0X MAG, User customized 1.20X~2.00X).

Image: Comparison of camera image before and after enabling anamorphic de-squeeze on the F7 Plus monitor.
6. Camera Compatibility Settings
- How to turn off HDMI display info / Not full screen? Go to your camera's menu → HDMI Settings / External Display Settings → HDMI Info Display (or Display Info / Overlay Display) → set it to Off or Clean.
- Monitor Turns Black When Recording Starts: When recording starts, some cameras automatically disable the HDMI output to save processing, power or bandwidth. This behavior depends on the camera model and its HDMI output settings. To prevent the external monitor from going black during recording, enable "HDMI output during recording" or "HDMI Info Display: On/Off while recording" in the camera's setup menu (if supported).
- Can the Camera Screen and External Monitor Display Simultaneously? Whether the camera's built-in screen and the external HDMI monitor can display at the same time depends on the model. Many professional or cinema cameras support dual display (simultaneous output), while some mirrorless or DSLR models only allow one active display at a time. Check the menu for options like: "Dual display" / "Simultaneous display" / "Monitor + HDMI output" or "HDMI display priority". If available, enable dual display to view both screens simultaneously.
7. Troubleshooting
- Can't turn on the monitor: Make sure to use the standard 12V 1.5A power adapter to connect the monitor. If power is supplied by battery, please check if the battery is fully charged. Long press the power button to turn on the monitor.
- The monitor display "no signal" / black screen / not support 4K signal format:
- Try another HDMI cable.
- Please try to connect monitor HDMI to your computer; check if the monitor has a signal.
- Change the camera output signal such as 1080p 60 signal format; confirm the monitor input signal whether it supports the camera output signal.
- Turn off the camera's wireless network function (Wi-Fi), which may interfere with transmission.
- The monitor display "Play and Slide show" when you connect the HDMI signal format: It is a setting in your camera. You need to switch on "secondary monitor" in the HDMI output settings and switch off "auto resolution" then you need to pair "monitor resolution" with "record resolution", and it will work.
8. Specifications
| Feature | Description |
|---|---|
| Display Spec | Screen Size 7" IPS |
| Resolution | 1920x1200 pixels |
| Aspect Ratio | 16:10 |
| Brightness | 1200cd/m² |
| Contrast Ratio | 1200:1 |
| Viewing Angle | 80°/80°(L/R) 80°/80°(U/D) |
| Input Voltage | DC7~24V |
| Power Consumption | ≤15W |
| HDMI Input/Output Support Format | 480i/576i/480p/576p, 720p (60/59.94/50), 1080i (60/59.94/50), 1080p (60/59.94/50/30/29.97/25/24/23.98), 3840x2160p (60/50/30/29.97/25/24/23.98), 4096x2160p (60/50/30/29.97/25/24/23.98) |
| Unit Size | 7.3x4.6x0.83 inches (186x117x21mm) |
| Unit Weight | 13.72 oz or 389g |
9. Maintenance
- Keep the monitor clean by wiping with a soft, dry cloth. Avoid abrasive cleaners.
- Protect the screen from scratches and impacts.
- Store the monitor in its carry bag when not in use to prevent dust and damage.
- Avoid exposing the monitor to extreme temperatures or humidity.
10. Warranty and Support
FEELWORLD products typically come with a 1-year warranty. For technical support, troubleshooting, or warranty claims, please contact FEELWORLD Official Store-US customer service. Refer to the official FEELWORLD website for the most up-to-date support information.
11. Official Product Videos
Camera screen too small solution - F7 PLUS Field Monitor
Video: An official video from FEELWORLD demonstrating how the F7 Plus monitor provides a larger and clearer view compared to a camera's built-in screen.
Most important gear for filmmaker FEELWORLD F7 PLUS monitor
Video: An official video from FEELWORLD highlighting the F7 Plus monitor as essential gear for filmmakers, showcasing its features and benefits in a production environment.


