1. Introduction
This user manual provides detailed instructions for the VORGUT PE3013-W 4MP Solar Wireless Security Camera System. It covers essential information regarding product components, setup procedures, operational guidelines, maintenance tips, troubleshooting, and technical specifications. Please read this manual thoroughly before using the product to ensure proper installation and optimal performance.
2. Product Overview
2.1 Included Components
The VORGUT PE3013-W system includes the following items:
- 1x 10-Channel Network Video Recorder (NVR) with pre-installed 500GB HDD
- 2x 4MP (1440p) Wireless Security Cameras
- 2x Solar Panels
- 1x User Manual (Japanese, for reference)
- Mounting accessories (screws, wall plugs)
- Power adapter for NVR
- HDMI cable
- USB mouse

Figure 1: VORGUT PE3013-W Security Camera System with 2 cameras, NVR, and 500GB HDD.
2.2 Key Features
- 4MP (1440p) High-Resolution Video: Captures clear and detailed footage.
- 360° Pan-Tilt-Zoom (PTZ) Functionality: Remotely adjust camera angle (0-90° vertical, 0-355° horizontal) via smartphone app for comprehensive coverage without blind spots.
- Solar Powered & Wireless: Integrated solar panels charge high-performance lithium batteries, eliminating the need for electrical outlets or wiring. Wi-Fi communication removes the need for LAN cables.
- 500GB HDD NVR: Pre-installed hard drive supports 24/7 continuous recording. Older data is automatically overwritten when storage is full.
- Expandable System: The 10-channel NVR can support up to 10 cameras.
- PIR Motion Detection: Detects human movement and sends instant notifications to your mobile app or email.
- Smart Energy Saving Mode: Camera automatically enters sleep mode when no motion is detected, conserving battery life.
- Color Night Vision & Infrared Night Vision: Provides clear surveillance in low-light conditions, with options for full-color or black-and-white infrared viewing.
- Two-Way Audio: Built-in microphone and speaker allow for real-time communication with visitors or to deter intruders.
- Audio and Light Deterrent: When motion is detected, the camera can emit a sound and light to deter potential intruders.
- IP66 Waterproof Rating: Designed for outdoor use, resistant to harsh weather conditions like strong winds and heavy rain.
- Free EseeCloud App: Remote viewing and control available on iOS and Android devices.

Figure 2: Camera with 355° horizontal and 90° vertical rotation capability.

Figure 3: The camera is rated IP66 for outdoor weather resistance.

Figure 4: Comparison of color night vision (spotlight ON) and infrared night vision (spotlight OFF).
3. Setup Instructions
3.1 Initial NVR Setup
- Connect the NVR to a power outlet using the provided power adapter.
- Connect the NVR to a monitor or TV using the HDMI cable.
- Connect the USB mouse to the NVR.
- The NVR will boot up and display the initial setup wizard. Follow the on-screen prompts to select your language (Japanese is available), set the date/time, and configure network settings. You can skip Wi-Fi connection during initial setup if you prefer to use a wired connection or configure it later.
- Set a password for the NVR. This password will be required for mobile app access.
3.2 Camera Installation and Connection
The solar cameras and NVR are pre-paired at the factory for plug-and-play convenience.
- Choose an outdoor location for each camera that receives adequate sunlight for the solar panel. Ensure the location is within Wi-Fi range of the NVR.
- Mount the camera and solar panel securely using the provided mounting accessories. The solar panel can be adjusted 360° to optimize sun exposure.
- Ensure the camera is powered on. The solar panel will charge the internal battery.
- Once the cameras are powered on, they should automatically connect to the NVR and display live footage on the connected monitor.

Figure 5: Camera power options: solar, internal battery, or USB-C (for continuous 24/7 monitoring).
3.3 Mobile App Setup (EseeCloud)
- Download the free "EseeCloud" app from your smartphone's App Store (iOS) or Play Store (Android).
- Open the app and register an account.
- Scan the QR code displayed on the NVR (usually found in the system settings or on the NVR itself) to add your device.
- Enter the NVR password you set during initial setup.
- You can now view live video, control PTZ, and receive notifications from your mobile phone.
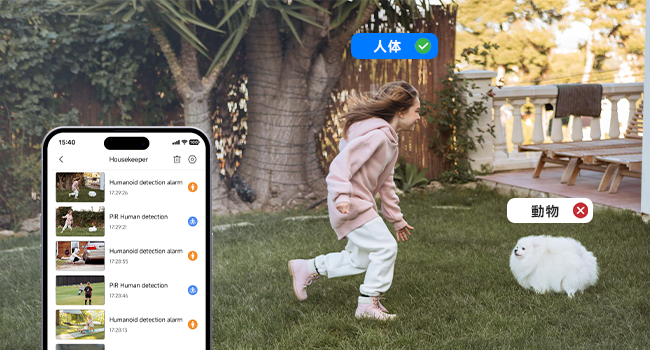
Figure 6: QR codes for downloading the EseeCloud app and adding your device.
Video 1: NVR User Interface Walkthrough. This video demonstrates the initial setup steps and navigation within the NVR system, including language selection, network configuration, and password setting.
4. Operating Instructions
4.1 Live View and PTZ Control
Access live camera feeds through the NVR monitor or the EseeCloud mobile app. Use the app to remotely control the camera's pan (horizontal) and tilt (vertical) movements to adjust the viewing angle as needed.
Video 2: Pan-Tilt Demonstration. This video illustrates the camera's ability to pan horizontally and tilt vertically, showcasing its wide coverage.
4.2 Recording Modes
The system offers diverse recording options:
- Continuous Recording: Records 24 hours a day, 365 days a year, utilizing the 500GB HDD.
- Motion-Triggered Recording: The camera activates and records for a set duration (e.g., 30 seconds) when motion is detected by the PIR sensor.
- Scheduled Recording: Set specific times for the camera to record.
When the recording data capacity is full, older data is automatically overwritten to ensure continuous operation.

Figure 7: Illustration of the three recording modes: 24-hour continuous, power-saving (event-based), and motion-triggered recording.
4.3 Motion Detection and Alerts
The PIR motion detection feature allows you to:
- Receive instant notifications via the mobile app or email when motion is detected.
- Quickly search for specific events in recorded footage.
- Customize detection sensitivity (low, medium, high) and define specific detection areas to minimize false alarms.

Figure 8: Smart detection identifies human figures and sends alerts to your smartphone.

Figure 9: Adjust motion detection sensitivity and define specific areas to monitor.
4.4 Two-Way Audio and Deterrent
The camera features a built-in microphone and speaker for two-way communication. You can speak through the camera via the app. Additionally, an audio alarm and light deterrent can be activated upon motion detection to scare away intruders.

Figure 10: Use two-way audio to communicate with visitors, such as a delivery person.

Figure 11: The camera's light and sound alarm function to deter intruders.
4.5 Remote Viewing and Multi-Device Access
The EseeCloud app allows for remote viewing of live and recorded footage from anywhere. The system also supports viewing on multiple devices, including smartphones, tablets, and PCs.

Figure 12: Access live and recorded footage via the EseeCloud app on various devices.
5. Maintenance
- Solar Panel Cleaning: Regularly clean the solar panels to ensure maximum charging efficiency. Dust and debris can reduce performance.
- Battery Management: The camera's smart energy-saving mode helps optimize battery life. For continuous 24/7 recording, consider using the USB-C power option if a power source is available.
- HDD Management: The 500GB HDD automatically overwrites the oldest data when full. No manual intervention is typically required for continuous recording.
- Firmware Updates: Check the EseeCloud app or VORGUT's official website periodically for firmware updates to ensure optimal performance and security.
6. Troubleshooting
If you encounter issues with your VORGUT PE3013-W system, please refer to the following common solutions:
| Problem | Possible Cause | Solution |
|---|---|---|
| Camera not connecting to NVR | Camera not powered on, out of range, or NVR not powered. | Ensure camera and NVR are powered. Check camera battery level. Move camera closer to NVR. |
| No video display on monitor | HDMI cable loose, monitor input incorrect, NVR not powered. | Check HDMI connection. Select correct input on monitor. Ensure NVR is powered. |
| No mobile app notifications | App notification settings disabled, motion detection off, or network issue. | Enable notifications in EseeCloud app and phone settings. Verify motion detection is active. Check NVR's internet connection. |
| Poor solar charging | Solar panel obstructed or dirty, insufficient sunlight. | Clean solar panel. Adjust panel angle for optimal sun exposure. Relocate camera if necessary. |
| False motion alarms | High sensitivity, detection area too wide, or environmental factors. | Adjust motion detection sensitivity to a lower setting. Define specific detection zones to exclude irrelevant areas (e.g., trees swaying). |
If these steps do not resolve your issue, please contact VORGUT customer support at support@vorgut.online.
7. Specifications
| Feature | Specification |
|---|---|
| Brand | VORGUT |
| Model Number | PE3013-W |
| Video Resolution | 1440p (4MP) |
| Connectivity Technology | Wireless (Wi-Fi) |
| NVR Channels | 10 |
| Storage | 500GB HDD (pre-installed) |
| Waterproof Rating | IP66 |
| Pan/Tilt Range | Pan: 0-355°, Tilt: 0-90° |
| Night Vision Range | Up to 15m |
| Audio | Two-way audio, 3D noise reduction, 360° sound collection (8m range) |
| Power Source | Solar-charged battery, optional USB-C input |
| Compatible Devices | Smartphone (iOS/Android) |
| Product Dimensions | 10 x 10 x 10 cm (camera); 3.17 kg (total package weight) |
| Color | White |
8. Warranty and Support
8.1 5-Year Quality Warranty
All VORGUT PE3013-W products are covered by an industry-leading 5-year quality warranty. If any product issues arise within this 5-year period, a new replacement will be provided free of charge.
8.2 Customer Support
VORGUT offers prompt customer support 24 hours a day, 365 days a year. If you have any questions or require assistance before or during the use of your product, please do not hesitate to contact us.
Contact Email: support@vorgut.online


