1. Important Safety Information
Please read all instructions carefully before using the Inventum Mini Oven. Retain this manual for future reference.
- Always place the appliance on a stable, heat-resistant surface, away from walls and other appliances to ensure proper ventilation.
- Do not touch hot surfaces. Use oven mitts or gloves when handling hot components or food.
- Ensure the power cord is not damaged and is kept away from hot surfaces.
- Do not immerse the appliance, cord, or plug in water or other liquids.
- Close supervision is necessary when any appliance is used by or near children.
- Unplug from outlet when not in use and before cleaning. Allow to cool before putting on or taking off parts.
- Do not operate any appliance with a damaged cord or plug, or after the appliance malfunctions or has been damaged in any manner.
- Do not use accessories or attachments not recommended by the manufacturer, as this may cause injuries.
- Do not place any of the following materials in the oven: paper, cardboard, plastic, or similar flammable materials.
- Exercise extreme caution when removing trays or disposing of hot grease.
2. Product Overview and Components
The Inventum Mini Oven is designed for versatile cooking, including baking, frying, and roasting. Familiarize yourself with its components for optimal use.

Figure 2.1: The Inventum Mini Oven with its door open, displaying chicken pieces, sliced vegetables, and french fries on its internal trays.

Figure 2.2: Front view of the Inventum Mini Oven, showcasing its compact design and the food items arranged on the internal racks.
Included Components:
- Main Unit: The primary oven body with a 12-liter capacity, touch control panel, and viewing window.

Figure 2.3: Side view of the Inventum Mini Oven, highlighting its sleek black and stainless steel exterior.
- Control Panel: Touch-sensitive interface for setting temperature, time, and selecting cooking programs.
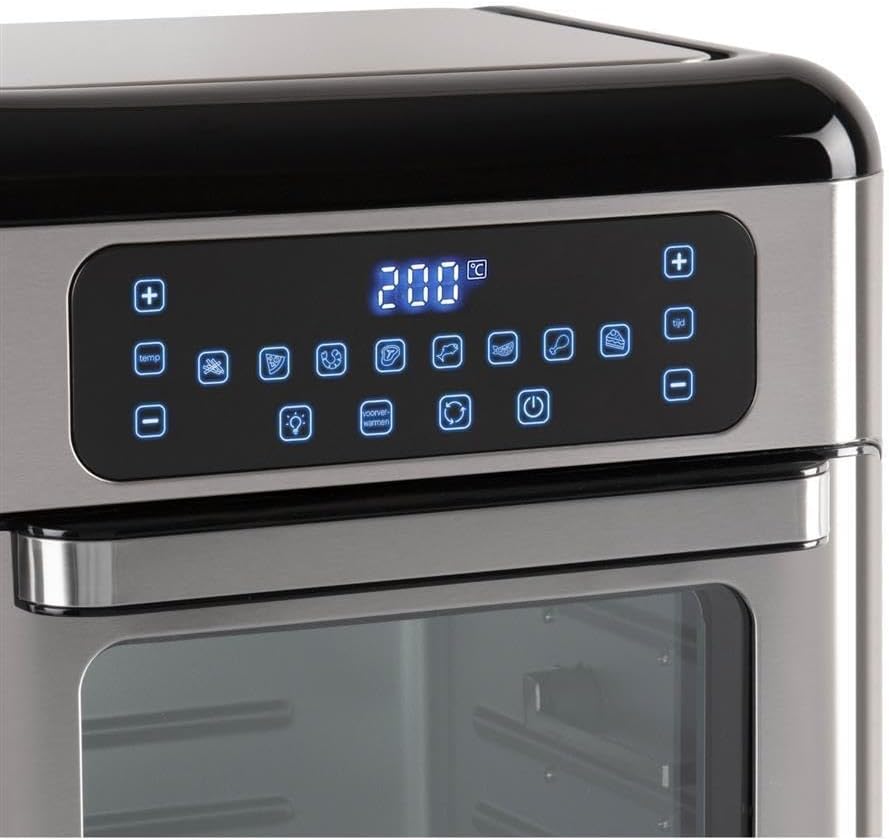
Figure 2.4: Detailed view of the touch control panel with digital display and various function icons.
- Baking Shelves (Perforated Trays): Two perforated trays for air frying and baking, allowing for even heat circulation.

Figure 2.5: Two perforated baking trays, ideal for air frying and ensuring crispy results.
- Crumb Tray (Solid Baking Tray): A solid tray designed to catch crumbs and drips, also suitable for baking.

Figure 2.6: A solid baking tray, which also functions as a crumb tray to collect food debris.
- Rotisserie Basket: A mesh basket for tumbling smaller items like fries or nuts during rotisserie cooking.

Figure 2.7: The rotisserie mesh basket, designed for even cooking of smaller food items.
- Rotisserie Spit and Handle: For roasting whole chickens or larger cuts of meat.

Figure 2.8: The rotisserie spit with forks and the removal handle for safe handling.
- User Manual: This document.
3. Setup and First Use
3.1 Unpacking
- Remove all packaging materials, stickers, and labels from the appliance.
- Check that all listed components are present and undamaged.
3.2 Placement
- Place the mini oven on a flat, stable, and heat-resistant surface.
- Ensure there is at least 10 cm (4 inches) of clear space on all sides of the oven for proper ventilation.
- Do not place the oven near flammable materials or under wall cabinets.
3.3 Cleaning Before First Use
- Wipe the exterior of the oven with a damp cloth.
- Wash all removable accessories (baking shelves, crumb tray, rotisserie basket, spit) in warm, soapy water. Rinse thoroughly and dry completely.
- Insert the crumb tray at the very bottom of the oven.
3.4 Initial Burn-Off
Before cooking food, it is recommended to run the oven empty for approximately 15 minutes to burn off any manufacturing residues.
- Plug the power cord into a grounded electrical outlet.
- Set the temperature to 200°C (390°F) and the timer to 15 minutes.
- A slight odor or smoke may be present during this initial use; this is normal. Ensure the area is well-ventilated.
- After 15 minutes, turn off the oven and unplug it. Allow it to cool completely before proceeding.
4. Operating Instructions
4.1 Control Panel Overview
The Inventum Mini Oven features an intuitive touch control panel. Refer to Figure 2.4 for a visual guide.
- Power Button: Turns the oven on/off.
- Temperature Control (+/-): Adjusts the cooking temperature.
- Time Control (+/-): Adjusts the cooking duration.
- Program Selection: Icons representing 8 pre-set cooking programs (e.g., fries, chicken, fish, steak, cake, pizza, toast, dehydrate).
- Light Button: Turns the internal oven light on/off.
- Convection Fan Button: Activates/deactivates the convection fan for even cooking.
- Rotisserie Button: Activates/deactivates the rotisserie function.
4.2 Basic Operation
- Prepare Food: Place your food on the appropriate accessory (baking shelf, crumb tray, rotisserie basket, or spit).
- Insert Accessory: Carefully slide the accessory with food into the desired rack position inside the oven. Ensure the crumb tray is always at the bottom.
- Close Door: Close the oven door securely.
- Power On: Press the Power button. The display will illuminate.
- Select Program or Manual Settings:
- Pre-set Program: Touch one of the 8 program icons. The oven will automatically set a recommended temperature and time.
- Manual Setting: Use the Temperature (+/-) buttons to set the desired temperature and the Time (+/-) buttons to set the cooking duration.
- Start Cooking: The oven will typically start automatically after a few seconds of setting the time/temperature or selecting a program. Some models may require pressing the Power button again to start.
- Monitor Cooking: Use the internal light button to check on your food without opening the door.
- End of Cooking: The oven will beep when the timer expires and automatically turn off the heating elements.
- Remove Food: Carefully open the oven door. Using oven mitts, remove the cooked food and accessories. Be aware of hot steam.
- Power Off: Press the Power button to turn off the oven completely, then unplug it from the wall outlet.
4.3 Using the Rotisserie Function
The rotisserie function is ideal for even cooking of whole chickens or other roasts using the rotisserie spit, or for items like fries using the rotisserie basket.
- Prepare Food:
- For Spit: Skewer the food (e.g., whole chicken) onto the rotisserie spit, securing it with the forks. Ensure the food is centered and balanced.
- For Basket: Place smaller items like fries or vegetables into the rotisserie basket and secure the lid.
- Insert Rotisserie: Carefully insert the rotisserie spit or basket into the designated rotisserie slots inside the oven. Ensure it is properly seated and can rotate freely.
- Set Cooking Parameters: Set the desired temperature and time using the control panel.
- Activate Rotisserie: Press the Rotisserie button on the control panel. The rotisserie mechanism will begin to rotate.
- Start Cooking: Begin the cooking cycle as described in "4.2 Basic Operation".
- Remove Food: Once cooking is complete, use the rotisserie handle (Figure 2.8) to carefully lift and remove the hot rotisserie assembly from the oven. Place it on a heat-resistant surface before removing the food.
5. Maintenance and Cleaning
Regular cleaning and maintenance will ensure the longevity and optimal performance of your Inventum Mini Oven.
5.1 General Cleaning
- Always unplug the oven and allow it to cool completely before cleaning.
- Do not use abrasive cleaners, scouring pads, or harsh chemicals, as these can damage surfaces.
5.2 Cleaning the Interior
- The oven features a stainless steel interior, which is durable and easy to clean.
- Remove the crumb tray and all other accessories. Wash them in warm, soapy water, rinse, and dry.
- Wipe the interior walls with a damp cloth and a mild detergent. For stubborn stains, a non-abrasive oven cleaner designed for stainless steel can be used, following the product instructions.
- Wipe dry with a clean cloth.
5.3 Cleaning the Exterior
- Wipe the exterior surfaces with a soft, damp cloth.
- For the control panel, use a slightly damp cloth and wipe gently. Do not spray water directly onto the control panel.
- Dry thoroughly.
5.4 Crumb Tray
- The crumb tray should be emptied and cleaned regularly to prevent grease buildup and potential fire hazards.
- Slide out the crumb tray from the bottom of the oven, discard crumbs, and wash as described above.
6. Troubleshooting
If you encounter issues with your Inventum Mini Oven, consult the following table before contacting customer support.
| Problem | Possible Cause | Solution |
|---|---|---|
| Oven does not turn on. | Not plugged in; power outage; faulty outlet. | Ensure the power cord is securely plugged into a working outlet. Check your circuit breaker. |
| Food is not cooking evenly. | Overcrowding; incorrect temperature/time; convection fan off. | Do not overcrowd the oven. Adjust temperature and time as needed. Ensure the convection fan is active for even cooking. Rotate food halfway through cooking. |
| Smoke or burning smell during operation. | Food residue on heating elements; crumb tray not cleaned; excessive grease. | Unplug and allow to cool. Clean the interior and crumb tray thoroughly. Ensure food is not touching heating elements. |
| Rotisserie function not working. | Rotisserie not properly seated; function not activated. | Ensure the rotisserie spit/basket is correctly inserted into the drive slots. Press the Rotisserie button on the control panel to activate. |
| Control panel unresponsive. | Temporary electronic glitch; power issue. | Unplug the oven for 5 minutes, then plug it back in. If the issue persists, contact customer support. |
7. Product Specifications
| Feature | Detail |
|---|---|
| Brand | Inventum |
| Model Name | GF1200HLD |
| Special Feature | Compact Size |
| Control Type | Touch Control |
| Included Components | Baking shelves, crumb tray, user manual |
| Power Source | Electric |
| Power Output | 1500W |
| Capacity | 12 Liters |
| Interior Material | Stainless Steel |
| Item Weight | 2.2 pounds |
| GTIN | 08712876094305 |
8. Warranty and Customer Support
8.1 Warranty Information
Inventum products are manufactured to high-quality standards. For specific warranty details regarding your Inventum Mini Oven (Model GF1200HLD), please refer to the warranty card included with your purchase or visit the official Inventum website. Keep your proof of purchase for warranty claims.
8.2 Customer Support
If you have any questions, require technical assistance, or need to report a problem with your appliance, please contact Inventum customer support. Contact information can typically be found on the official Inventum website or on the product packaging.
When contacting support, please have your product model number (GF1200HLD) and purchase date available.


