
Introduction
This manual provides detailed instructions for the installation, operation, and maintenance of your ASURE 9-Inch Android Car Stereo Radio. This unit is designed for Dodge Journey (2011-2019 low-end models) and Fiat Freemont (2011-2019 low-end models).
Important Compatibility Note: If your vehicle's factory radio came with a high-end NAVI screen (8.4 inches or larger), this system is not compatible, and the A/C controls will not function correctly.
Product Overview
The ASURE 9-Inch Android Car Stereo Radio is an intelligent in-car infotainment and navigation system featuring a 1280x800 touchscreen display, 4-core processor, 2GB RAM, and 32GB ROM. It supports wireless Carplay and Android Auto for seamless smartphone integration.
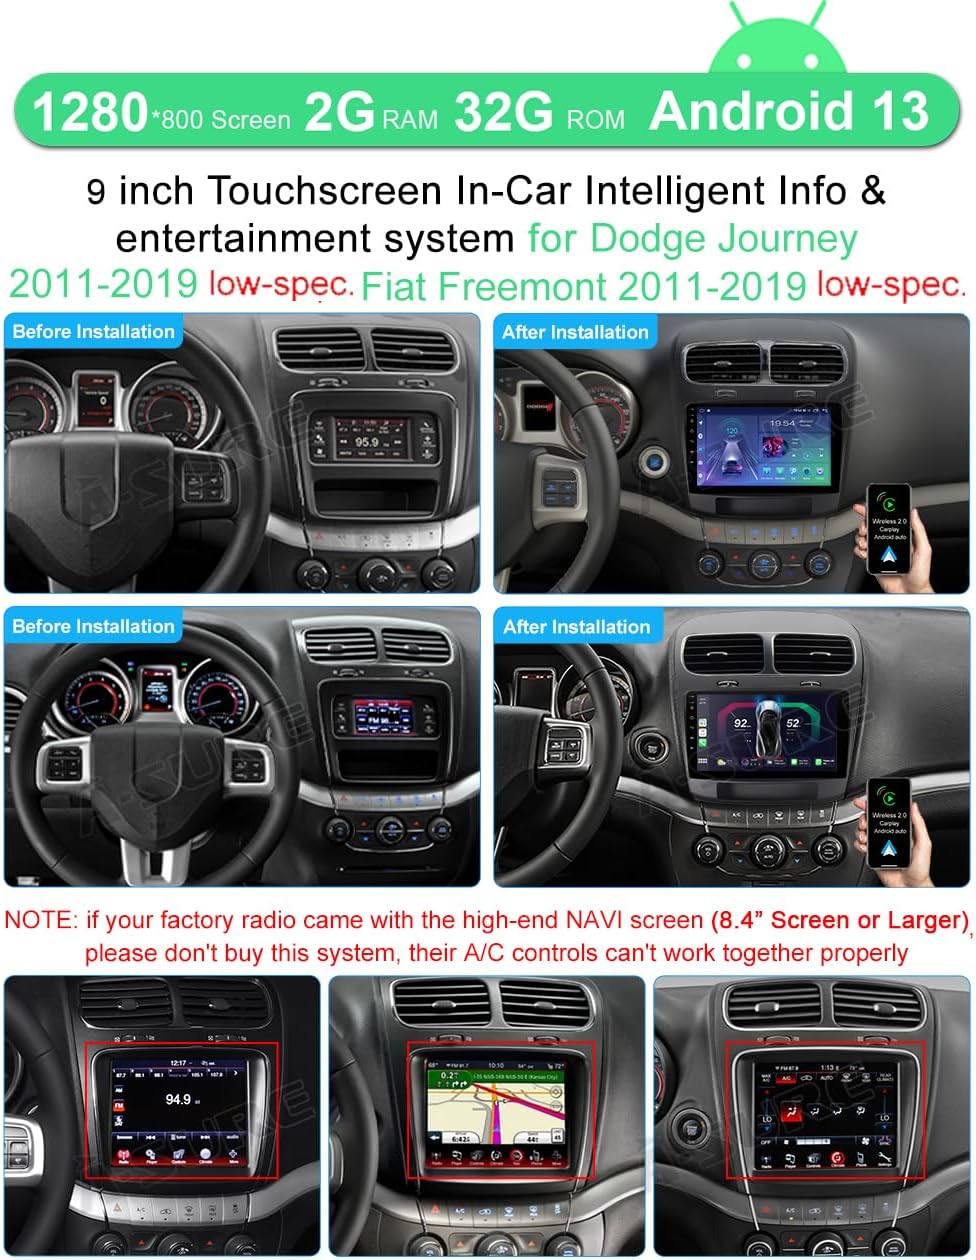
Image: Before and after installation of the ASURE car stereo in a Dodge Journey dashboard, showing the integrated 9-inch display.
Package Contents
Verify that all components are present in your package:
- 1 x 9-Inch Screen Unit
- 1 x Custom Frame for Dodge Journey
- 1 x AUX Adapter
- 1 x Power Plug
- 1 x USB Cable
- 1 x AUX Cable
- 1 x Wi-Fi/Bluetooth Antenna
- 1 x Audio Video Ports Cable
- 1 x GPS Cable
- 1 x Radio Aerial Adapter
- 1 x Microphone
- 1 x CAN-BUS Box (if applicable for your vehicle model)
- 1 x Screwdriver
- 1 x User Manual

Image: A visual representation of the various cables, adapters, and tools included in the product package.
Installation Guide
1. Wiring Connections
Carefully connect all necessary cables as shown in the wiring diagram. Ensure all connections are secure before proceeding with physical installation.
- GPS Antenna: Connect for navigation functionality.
- Camera In: For connecting a rear-view camera.
- USB Cables: For media playback and smartphone connectivity.
- OTG USB Cable: For smartphone connection.
- SUB WOOFER: For external subwoofer connection.
- CVBS IN 1: Composite video input.
- AUX R IN / AUX L IN: Auxiliary audio inputs.
- AUX R OUT / AUX L OUT: Auxiliary audio outputs.
- MIC: External microphone input.
- WiFi Antenna: For wireless network connectivity.
- Bluetooth Antenna: For Bluetooth device pairing.
- 8-Pin Steering Wheel Control Plug: Connect this plug (integrated in the power harness) to the radio's rear 8-Pin socket to enable steering wheel controls.
- CAN-BUS Box: If included, connect the CAN-BUS box. This is crucial for automatic shifting to the rear view interface when reversing and for proper steering wheel control functionality.

Image: Comprehensive diagram illustrating the various connection points on the back of the head unit, including GPS, USB, audio, and power.
2. Physical Installation
- Carefully remove your vehicle's factory radio and the silver unit behind the A/C control panel. The OEM connectors are located behind this silver unit.
- Connect all necessary cables to the new ASURE head unit.
- Place the 9-inch screen unit into the custom frame.
- Secure the screen within the frame using screws.
- Integrate the assembled unit into your car's dashboard. Ensure all wiring is 100% complete before fixing the frame, as adjustments will be difficult afterward.

Image: Visual steps showing the front view of the frame, how to insert the screen, locating OEM connectors, and the final wiring before dashboard integration.
Operating Instructions
1. Initial Setup and Navigation
Upon first power-on, the system will boot to the main interface. You can navigate through applications and settings using the touchscreen.
2. Wireless Carplay and Android Auto
Connect your smartphone wirelessly to access Carplay or Android Auto features. This allows for navigation, music, calls, and messaging directly from the car stereo display.

Image: The car stereo screen displaying the Wireless Carplay interface, showing common applications like Music, Maps, and Messages.

Image: Icons illustrating the wireless connectivity options: Carplay (via Bluetooth), Android Auto (via Bluetooth), and Screen Mirroring (via WiFi).
3. Bluetooth Pairing
To pair your phone via Bluetooth for calls and audio streaming:
- Go to the system settings on the car stereo.
- Select the Bluetooth option.
- On your phone, enable Bluetooth and search for available devices.
- Select the car stereo from the list and confirm pairing.
4. Navigation Features
The unit supports both online navigation (via connected Carplay/Android Auto or built-in apps) and offline navigation using pre-installed or downloaded maps like iGo or Waze.

Image: Examples of navigation interfaces, including online navigation through Carplay and offline navigation through Android Auto.
5. System Settings Overview
The following video demonstrates how to access and adjust various system settings, including screen brightness, CAN-BUS configuration, and touchscreen calibration.
Video: A guide to adjusting various settings on the ASURE car stereo, including speed unit, Bluetooth pairing, screen brightness, CAN-BUS type, and touchscreen calibration.
Maintenance
To ensure the longevity and optimal performance of your ASURE car stereo, follow these maintenance guidelines:
- Screen Cleaning: Use a soft, lint-free cloth to gently wipe the touchscreen. For stubborn smudges, slightly dampen the cloth with a screen-safe cleaner. Avoid harsh chemicals or abrasive materials.
- Software Updates: Periodically check for available software updates to ensure you have the latest features and performance improvements. Refer to the system settings for update options.
- Environmental Care: Avoid exposing the unit to extreme temperatures, direct sunlight for prolonged periods, or excessive moisture.
Troubleshooting
If you encounter issues with your ASURE car stereo, refer to the following common problems and solutions:
- A/C Controls Not Working: This unit is not compatible with Dodge Journey/Fiat Freemont models equipped with a factory 8.4-inch or larger NAVI screen. If your vehicle has this feature, the A/C controls will not integrate properly.
- Steering Wheel Controls Not Functioning: Ensure the 8-Pin Steering Wheel Control Plug is correctly connected. If a CAN-BUS box was included, verify that the correct car model and CAN-BUS type are selected in the factory settings (refer to the 'System Settings Overview' video for guidance).
- Previous/Next or Volume Controls Reversed: In the factory settings, locate the 'Reversal Previous And Next' or 'Reversal Volume' options and adjust them as needed (refer to the 'System Settings Overview' video).
- Screen Too Bright at Night: Access the factory settings, go to 'Backlight current adjustment', and lower the 'Minimum' value. Save and confirm the changes (refer to the 'System Settings Overview' video).
- Rear View Camera Displays Black Screen: Ensure the camera is properly connected. If you have not installed a rear view camera, the screen will remain black when reversing. If you have a camera and it's still black, check connections or contact support for a compatible camera.
- Touchscreen Unresponsive or Inaccurate: The touchscreen may require recalibration. In the factory settings, locate 'Touch Screen Calibration' and follow the on-screen instructions (refer to the 'System Settings Overview' video).
- Bluetooth/Wi-Fi Signal Issues: Ensure the white plug for the Wi-Fi/Bluetooth antenna is securely connected to the main device.
Specifications
| Feature | Specification |
|---|---|
| Screen Size | 9 Inches |
| Display Resolution | 1280x800 |
| Display Type | LCD, Capacitive Touchscreen |
| Operating System | Android 13 |
| Processor | 4-Core |
| RAM | 2GB |
| ROM | 32GB |
| Connectivity | Wireless Carplay, Android Auto, Bluetooth, Wi-Fi |
| Mounting Type | Dashboard Mount |
| Compatible Vehicles | Dodge Journey 2011-2019 (low-end models), Fiat Freemont 2011-2019 (low-end models) |

Image: A visual comparison of screen resolutions, emphasizing the 1280x800 resolution of this unit.

Image: A graphic illustrating the 2GB RAM and 32GB ROM configuration, indicating improved performance.
Warranty and Support
For warranty information, technical support, or to inquire about compatible accessories (such as rear view cameras), please contact ASURE customer service. Refer to the product packaging or the official ASURE website for contact details.