
Introduction
This manual provides detailed instructions for the safe and efficient operation of the PPOZYLPC S-400-24 Switching Power Supply. Designed for various applications requiring a stable 24V DC power source, this unit delivers up to 16.5 Amperes and 400 Watts of power. Please read this manual thoroughly before installation and operation to ensure proper use and to prevent damage or injury.
Safety Information
WARNING: High Voltage! Risk of Electric Shock!
- Installation and maintenance should only be performed by qualified personnel.
- Ensure the power supply is disconnected from the main AC power source before any wiring or maintenance.
- Do not operate the unit in wet or high-humidity environments.
- Ensure proper ventilation to prevent overheating. Do not block ventilation openings.
- Proper grounding is essential for safety. Connect the ground terminal to an earth ground.
- Do not open the casing of the power supply. There are no user-serviceable parts inside.
Product Overview
The PPOZYLPC S-400-24 is a high-efficiency switching power supply designed to convert AC input to a stable 24V DC output. It features a robust metal casing, built-in cooling fan, and screw terminal connections for secure wiring. This unit is suitable for powering LED lighting, CCTV systems, industrial automation, and other 24V DC devices.
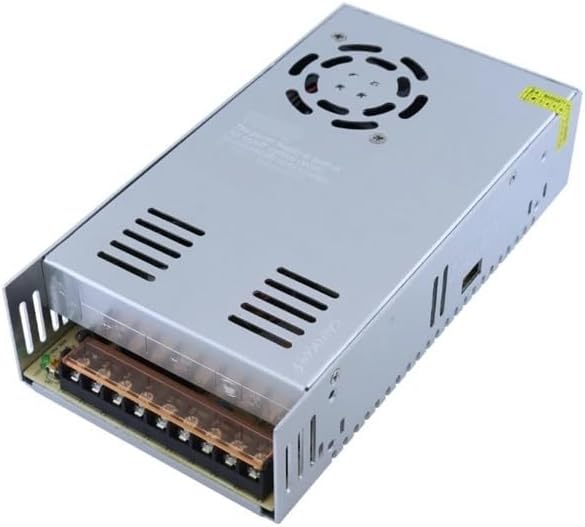
Figure 1: Overall view of the PPOZYLPC S-400-24 Switching Power Supply, showing the ventilation grille and terminal block.
Setup and Installation
1. Input Voltage Selection
The S-400-24 power supply supports both 110V AC and 220V AC input. A voltage selector switch is located on the side of the unit. Ensure this switch is set to the correct voltage for your region before connecting to AC power. Incorrect voltage selection can cause severe damage to the unit and connected devices.

Figure 2: Side view of the power supply, highlighting the model information and the input voltage selector switch (usually a small red switch).
2. Mounting
Mount the power supply in a stable, well-ventilated area. Ensure there is adequate space around the unit for airflow, especially around the cooling fan and ventilation grilles. Use appropriate screws to secure the unit through its mounting tabs.
3. Wiring Connections
Refer to the terminal block for proper wiring. All connections should be made using appropriate gauge wires, securely fastened to prevent loose connections.

Figure 3: Front view of the power supply, detailing the screw terminal block for input and output connections.
Terminal Block Description:
- L, N: AC Power Input (Live and Neutral). Connect your main AC power source here.
- Ground: Earth Ground. Connect to a reliable earth ground for safety.
- -V (COM): DC Output Negative. Connect the negative terminal of your 24V DC load.
- +V: DC Output Positive. Connect the positive terminal of your 24V DC load.
- ADJ: Output Voltage Adjustment. Use a small screwdriver to fine-tune the output voltage within a small range (typically ±10%).
CAUTION: Double-check all wiring connections before applying power. Incorrect wiring can lead to damage, fire, or electric shock.
Operating Instructions
- After completing all wiring and ensuring the input voltage selector is correct, connect the power supply to the AC mains.
- The LED indicator (if present) on the unit should illuminate, indicating power is on.
- Verify the output voltage using a multimeter at the +V and -V terminals before connecting your load. Adjust the ADJ potentiometer if necessary.
- Connect your 24V DC load to the +V and -V terminals.
- The power supply features built-in protections against overcurrent, overvoltage, and short circuits. In case of a fault, the unit may shut down automatically. Disconnect power, resolve the issue, and then reconnect power.
Maintenance
The PPOZYLPC S-400-24 is designed for reliable operation with minimal maintenance. Follow these guidelines:
- Cleaning: Periodically clean the exterior of the unit, especially the ventilation grilles, to prevent dust buildup. Use a soft, dry cloth. Do not use liquid cleaners.
- Ventilation: Ensure that the cooling fan and ventilation openings remain unobstructed at all times. Poor ventilation can lead to overheating and reduced lifespan.
- Connections: Periodically check all wiring connections to ensure they remain tight and secure. Loose connections can cause intermittent operation or overheating.

Figure 4: Top view of the power supply, showing the integrated cooling fan and important caution labels regarding proper usage.
Troubleshooting
| Problem | Possible Cause | Solution |
|---|---|---|
| No output voltage / LED off |
|
|
| Output voltage unstable or too low |
|
|
| Unit overheating |
|
|
Specifications
| Parameter | Value |
|---|---|
| Model Number | S-400-24 |
| Brand | PPOZYLPC |
| Output Voltage | 24V DC |
| Output Current | 16.5A |
| Output Power | 400W |
| Input Voltage | 110V / 220V AC (selectable) |
| Item Weight | 30 Grams (approx. 1.06 ounces) |
| Manufacturer | PPOZYLPC |
Note: Specifications are subject to change without notice.
Warranty and Support
For warranty information or technical support, please refer to the documentation provided with your purchase or contact your retailer. As specific warranty terms are not provided in this manual, please retain your proof of purchase for any warranty claims.