1. Introduction
This manual provides essential information for the safe and efficient operation of your Pretul DESI-36P2 3.6V Cordless Screwdriver. Please read it thoroughly before first use and keep it for future reference. This compact cordless screwdriver is designed for light-duty fastening tasks, featuring a two-position handle and an integrated LED work light.

Figure 1: Pretul DESI-36P2 Cordless Screwdriver. This image shows the screwdriver in its straight configuration, highlighting its compact design and yellow and black color scheme.
2. Safety Information
Always observe basic safety precautions when using electrical tools to reduce the risk of fire, electric shock, and personal injury.
- Work Area Safety: Keep your work area clean and well-lit. Cluttered or dark areas invite accidents.
- Electrical Safety: Do not expose power tools to rain or wet conditions. Water entering a power tool will increase the risk of electric shock.
- Personal Safety: Stay alert, watch what you are doing, and use common sense when operating a power tool. Do not use a power tool while you are tired or under the influence of drugs, alcohol, or medication.
- Tool Use and Care: Do not force the power tool. Use the correct power tool for your application. It will do the job better and safer at the rate for which it was designed.
- Battery Care: Recharge only with the charger specified by the manufacturer. A charger that is suitable for one type of battery pack may create a risk of fire when used with another battery pack.
3. Product Components and Features
Familiarize yourself with the parts of your Pretul DESI-36P2 cordless screwdriver.
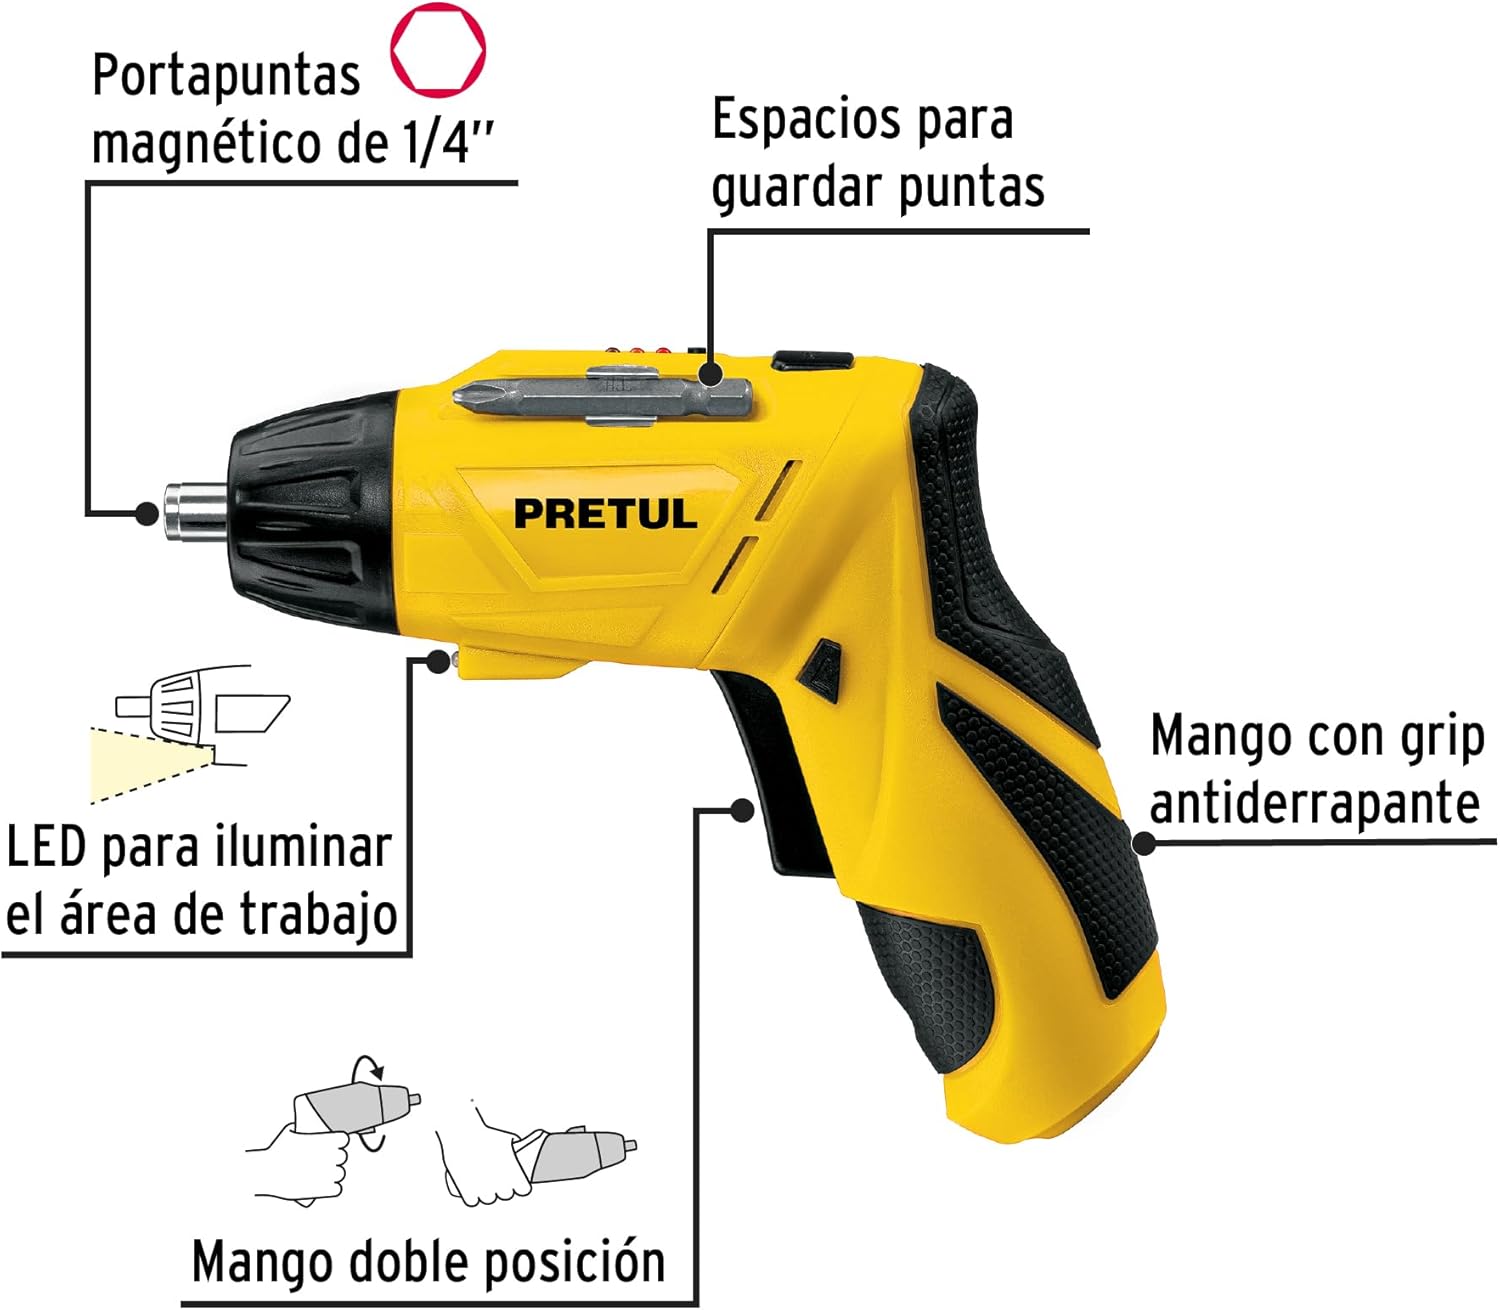
Figure 2: Key features of the Pretul DESI-36P2. This diagram illustrates the magnetic 1/4" bit holder, bit storage slots, anti-slip grip handle, LED work light, and the two-position handle mechanism.
- Magnetic 1/4" Hex Bit Holder: Securely holds screwdriver bits for quick changes.
- Bit Storage Slots: Conveniently located on the tool for storing extra bits.
- Anti-slip Grip Handle: Provides comfortable and secure handling during operation.
- LED Work Light: Illuminates the work area for improved visibility in dimly lit spaces.
- Two-Position Handle: Allows the screwdriver to be used in a straight or pistol-grip configuration for versatility and access in tight spaces.
- Forward/Reverse Switch: Controls the direction of rotation for tightening and loosening screws.
- Power Button: Activates the screwdriver.
4. Setup
4.1 Initial Charging
Before first use, fully charge the screwdriver's internal battery. Connect the charger to a standard electrical outlet and then to the charging port on the screwdriver. The charging indicator (if present) will show the charging status. Disconnect the charger once the battery is fully charged.
4.2 Attaching Screwdriver Bits
- Select the appropriate 1/4" hex screwdriver bit for your task.
- Insert the bit firmly into the magnetic bit holder at the front of the screwdriver until it is securely seated.
- To remove a bit, simply pull it out from the holder.
4.3 Adjusting Handle Position
The screwdriver features a two-position handle for enhanced versatility:
- Pistol Grip: Standard configuration for most tasks.
- Straight Grip: For reaching into confined spaces. To change the handle position, firmly grasp the handle and the body of the screwdriver, then pivot the handle until it locks into the desired position.
5. Operating Instructions
5.1 Powering On/Off
Press and hold the power button to activate the screwdriver. Release the button to stop operation. The LED work light will activate when the power button is pressed.
5.2 Selecting Rotation Direction
Use the forward/reverse switch, typically located near the trigger, to select the desired rotation direction:
- Push the switch to the left for forward rotation (tightening screws).
- Push the switch to the right for reverse rotation (loosening screws).
- Ensure the switch is in the center position to lock the tool and prevent accidental activation.
5.3 Fastening Screws
- Ensure the correct bit is installed and the rotation direction is set to forward.
- Place the bit onto the screw head, applying gentle pressure.
- Press the power button to start driving the screw. Release the button once the screw is fully seated or the desired torque is reached.
5.4 Loosening Screws
- Ensure the correct bit is installed and the rotation direction is set to reverse.
- Place the bit onto the screw head, applying gentle pressure.
- Press the power button to start loosening the screw. Release the button once the screw is free.
6. Maintenance
Regular maintenance ensures optimal performance and extends the life of your tool.
- Cleaning: Keep the tool's ventilation openings clear and free of debris. Use a soft, damp cloth to clean the exterior. Do not use harsh chemicals or abrasive cleaners.
- Bit Holder: Periodically inspect the bit holder for wear or damage. Clean any accumulated dust or metal shavings.
- Battery Storage: Store the screwdriver in a cool, dry place away from direct sunlight and extreme temperatures. For long-term storage, ensure the battery is partially charged (around 50%).
- Inspection: Regularly check for loose screws, damaged cords (if applicable), or any other conditions that may affect safe operation.
7. Troubleshooting
If you encounter issues with your screwdriver, refer to the following common problems and solutions:
| Problem | Possible Cause | Solution |
|---|---|---|
| Screwdriver does not turn on. | Battery is discharged. | Charge the battery fully. |
| Screwdriver lacks power. | Battery is low. | Recharge the battery. |
| Bit slips from screw head. | Incorrect bit size or worn bit. | Use the correct bit size; replace worn bits. |
| Handle does not lock into position. | Not fully pivoted. | Ensure the handle is fully pivoted until it clicks into place. |
If the problem persists after attempting these solutions, contact customer support.
8. Specifications
Technical specifications for the Pretul DESI-36P2 Cordless Screwdriver.

Figure 3: Dimensions of the Pretul DESI-36P2. This image shows the screwdriver with measurements indicating a length of 17.5 cm and a height of 13 cm.
| Feature | Specification |
|---|---|
| Model Number | DESI-36P2 (26402) |
| Brand | Pretul |
| Power Source | Battery |
| Battery Voltage | 3.6 Volts |
| Speed | 230 RPM |
| Torque | 3E+1 Pound-inches (approximately 30 in-lbs) |
| Bit Holder | 1/4" Hex Magnetic |
| Material | Plastic, Metal |
| Dimensions (L x H) | 17.5 cm x 13 cm (approximate, based on image) |
| Weight | 530 g (0.53 kg) |
| Included Components | 5 Phillips bits 1" (PH1, PH2, PH3), Charger, 2 Phillips bits 2" (PH1, PH2), 1/4" Magnetic extension |
9. Warranty and Support
The Pretul DESI-36P2 Cordless Screwdriver comes with a 1-year warranty from the date of purchase. Please retain your proof of purchase for warranty claims.

Figure 4: Product packaging showing the included components and a "1 year warranty" seal.
For technical support, service, or warranty inquiries, please contact Pretul customer service through their official channels or the retailer where the product was purchased.


