
MSI MSI PRO B660M-A CEC WiFi DDR4 V2
MSI PRO B660M-A CEC WiFi DDR4 V2 Micro ATX Motherboard Instruction Manual
Model: MSI PRO B660M-A CEC WiFi DDR4 V2
1. Introduction
This manual provides comprehensive instructions for the installation, operation, and maintenance of your MSI PRO B660M-A CEC WiFi DDR4 V2 Micro ATX Motherboard. This powerful and versatile board is designed to support the latest Intel processors, offering robust performance for demanding tasks such as gaming, video editing, and content creation. With support for DDR4 memory, it ensures fast data transfer speeds and efficient multitasking. The board includes multiple expansion slots for graphics cards, storage drives, and other components, allowing for extensive customization. It also features a range of connectivity options, including various USB ports, audio jacks, and network interfaces, ensuring seamless integration with your peripherals. Adhering to the guidelines in this manual will help ensure optimal performance and longevity of your motherboard.
2. Setup and Installation
Before beginning installation, ensure your workspace is clean, well-lit, and free of static electricity. It is recommended to use an anti-static wrist strap.
2.1. Motherboard Layout
Familiarize yourself with the various components and connectors on the motherboard.
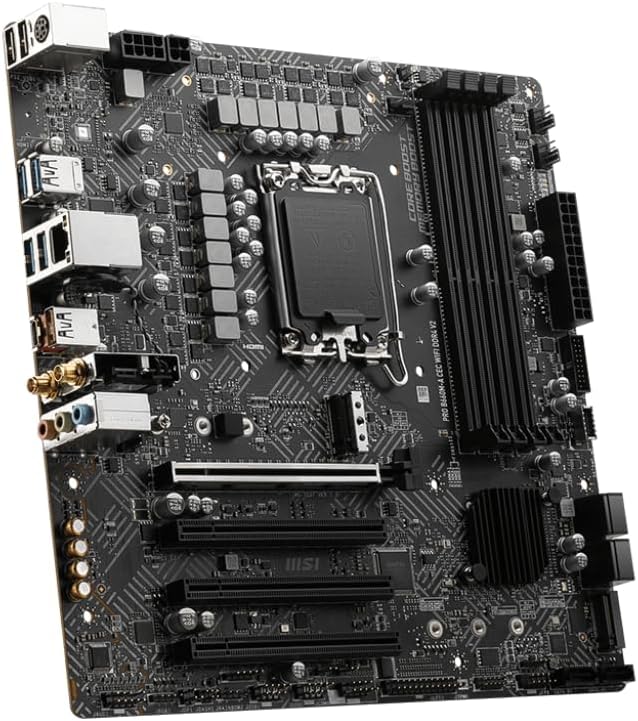
Figure 2.1: Top-down view of the MSI PRO B660M-A CEC WiFi DDR4 V2 motherboard, showcasing the CPU socket, RAM slots, PCIe slots, and various headers.
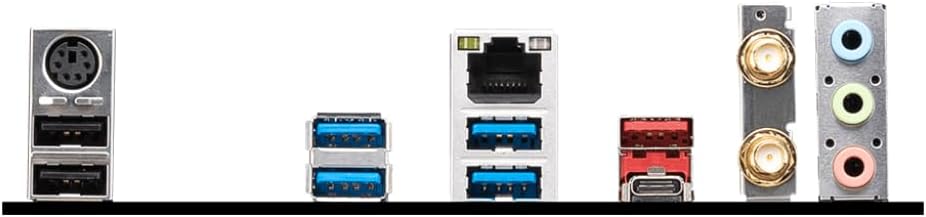
Figure 2.2: Detailed view of the rear input/output (I/O) panel, highlighting the various ports including USB, Ethernet, audio jacks, and display outputs.
2.2. CPU Installation (LGA 1700)
- Locate the LGA 1700 CPU socket on the motherboard.
- Gently lift the load lever and open the CPU retention frame.
- Align the triangular mark on your Intel 12th Gen CPU with the corresponding mark on the socket. Carefully place the CPU into the socket, ensuring it sits flush. Do not force it.
- Close the retention frame and push the load lever back into place until it clicks.
2.3. RAM Installation (DDR4)
This motherboard supports DDR4 RAM. Refer to your motherboard's specific manual for supported memory speeds and configurations.
- Open the clips on both ends of the DDR4 memory slots.
- Align the notch on the RAM module with the key in the memory slot.
- Press down firmly on both ends of the RAM module until the clips snap into place, securing the module.
2.4. Graphics Card Installation
The motherboard features PCIe slots for graphics cards. Note that if you are using an Intel 'F' series processor (which lacks integrated graphics), you must install a dedicated graphics card. In some cases, the primary PCIe slot (often silver-colored) may require a CPU with integrated graphics. If you experience no video output, try installing your graphics card in the next available PCIe slot (e.g., PCIe-2).
- Locate the appropriate PCIe x16 slot (typically the top-most, reinforced slot).
- Remove the corresponding expansion slot cover from your PC case.
- Align the graphics card with the PCIe slot and press down firmly until it is fully seated and the retention clip at the end of the slot locks into place.
- Secure the graphics card to the case with a screw.
- Connect any necessary PCIe power cables from your power supply to the graphics card.
2.5. Storage Device Installation
The motherboard supports M.2 SSDs and SATA drives.
- M.2 SSD: Locate the M.2 slot(s). Remove the M.2 standoff screw. Insert the M.2 SSD at an angle into the slot, then gently push it down and secure it with the standoff screw.
- SATA Drives: Connect one end of a SATA data cable to a SATA port on the motherboard and the other end to your SATA HDD/SSD. Connect a SATA power cable from your power supply to the drive.
2.6. Power Connections
Ensure all necessary power connections are made from your power supply to the motherboard and components.
- 24-Pin ATX Power: Connect the main 24-pin power cable from your PSU to the motherboard's 24-pin ATX power connector.
- 8-Pin CPU Power: Connect the 8-pin (or 4+4 pin) CPU power cable from your PSU to the motherboard's CPU power connector (usually located near the CPU socket).
3. Operating Your Motherboard
Once all components are installed and connected, you can power on your system.
3.1. First Boot and BIOS Setup
Upon the first boot, you may need to enter the BIOS/UEFI setup to configure settings, set boot order, or enable specific features. Typically, you can access the BIOS by pressing the DEL key during startup. Refer to the detailed user manual for specific BIOS navigation and settings.
3.2. Driver Installation
After installing your operating system, install the necessary drivers for the motherboard's chipset, audio, LAN, and other integrated components. These drivers are usually provided on a support CD/DVD or can be downloaded from the MSI official website.
4. Maintenance
Regular maintenance helps ensure the longevity and stable operation of your motherboard.
- Dust Removal: Periodically clean dust from the motherboard and case interior using compressed air. Ensure the system is powered off and unplugged before cleaning.
- BIOS/UEFI Updates: Check the MSI website for the latest BIOS/UEFI updates. Updates can improve compatibility, stability, and performance. Follow the update instructions carefully to avoid damaging the motherboard.
- Driver Updates: Keep your drivers updated to ensure optimal performance and compatibility with new software and hardware.
5. Troubleshooting
This section addresses common issues you might encounter.
- No Video Output:
- Ensure your monitor is connected to the correct display output (either integrated graphics on the motherboard or your dedicated graphics card).
- If using an Intel 'F' series processor (e.g., i7-12700F) which lacks integrated graphics, a dedicated graphics card is mandatory.
- If you have an 'F' series processor and no video output, and the diagnostic LEDs are stuck at VGA, try moving your graphics card to the next available PCIe slot (e.g., PCIe-2 instead of the primary PCIe-1 slot). The primary PCIe-1 slot (often silver-colored) may sometimes require a CPU with integrated graphics.
- Verify that all power cables (24-pin ATX, 8-pin CPU, PCIe power for GPU) are securely connected.
- Reseat your RAM modules. Try booting with only one RAM stick installed.
- System Not Powering On:
- Check if the power supply switch is in the ON position.
- Ensure the 24-pin ATX and 8-pin CPU power connectors are fully seated.
- Verify that the front panel power button cable is correctly connected to the motherboard header.
- System Instability/Crashes:
- Ensure all drivers are up to date.
- Check CPU and GPU temperatures to ensure they are not overheating.
- Run memory diagnostic tools to check for faulty RAM.
6. Specifications
| Feature | Detail |
|---|---|
| Brand | MSI |
| Model Name | MSI PRO B660M-A CEC WiFi DDR4 V2 |
| CPU Socket | LGA 1700 |
| Compatible Processors | Intel 12th Gen |
| RAM Memory Technology | DDR4 |
| Memory Storage Capacity | 64 GB |
| Chipset Type | Intel B660 |
| Platform | Windows |
| Main Power Connector Type | 24-Pin |
| Item Weight | 2.09 pounds |
| Package Dimensions | 14.13 x 10.39 x 3.7 inches |
7. Warranty and Support
This product is a renewed item. Please refer to the seller's specific warranty and return policy for details. For technical support, driver downloads, and further assistance, please visit the official MSI support website or contact their customer service.
- Seller Return Policy: 90 days for refund/replacement.
- Optional Protection Plans:
- 3-Year Protection Plan: $13.49
- 4-Year Protection Plan: $17.99
- Complete Protect: $16.99/month (covers all eligible past and future purchases)
Related documentsMSI PRO B660M-A CEC WiFi DDR4 V2


Ask a question about this manual
Ask about setup, troubleshooting, compatibility, parts, safety, or missing instructions. Manuals+ will review the question and use this page’s manual context to help answer it.