1. Introduction
This manual provides essential information for the safe and efficient installation, operation, and maintenance of your TCP Economy LED UFO High Bay Luminaire. Please read this manual thoroughly before installation and retain it for future reference.
The TCP Economy LED UFO High Bay Luminaire is designed for commercial and industrial applications, offering high efficacy and a long operational lifespan. It features a robust design suitable for various environments, including warehouses, retail spaces, and gymnasiums.

Figure 1: Front view of the TCP Economy LED UFO High Bay Luminaire, showing the LED array and clear lens.
2. Safety Information
- Electrical Safety: Installation must be performed by a qualified electrician in accordance with all national and local electrical codes. Always disconnect power at the circuit breaker before installing, servicing, or cleaning the fixture.
- Grounding: Ensure the fixture is properly grounded to prevent electrical shock.
- Handling: Do not handle the fixture with wet hands. Avoid touching the LED array directly.
- Operating Environment: This luminaire is rated IP65 for outdoor use and protection against dust and water jets. Do not submerge the fixture in water. Ensure the operating temperature is within the specified range.
- Mounting: The mounting structure must be capable of supporting the weight of the fixture.
- Modifications: Do not attempt to modify or disassemble the fixture. This will void the warranty and may create safety hazards.
3. Package Contents
Upon unpacking, verify that all components are present and undamaged. The package should contain:
- 1 x TCP Economy LED UFO High Bay Luminaire
- 1 x Eyebolt for suspended mounting
Note: Additional mounting hardware (e.g., chains, hooks) may be required and is sold separately.
4. Specifications
| Feature | Specification |
|---|---|
| Model Number | 762148336747 |
| Brand | TCP |
| Wattage Options | 115W / 160W / 200W |
| Efficacy | Up to 145 LPW |
| Color Temperature (CCT) | 4000K / 5000K |
| Dimming | 0-10V Dimming |
| IP Rating | IP65 (Dust-tight, protected against water jets) |
| Lifespan | 50,000 Hours |
| Input Voltage | 120-277V AC (Typical, verify product label) |
| Light Source Type | LED |
| Installation Type | Suspended (Eyebolt included) |
| Fixture Form | Ceiling |
| Indoor/Outdoor Usage | Outdoor |
| Shade Material | Acrylic |
| Item Weight | 6.44 pounds |
| Package Dimensions | 12.48 x 12.44 x 5.87 inches |
| Fixture Dimensions (approx.) | 11" Diameter x 5.9" Height (with eyebolt) |
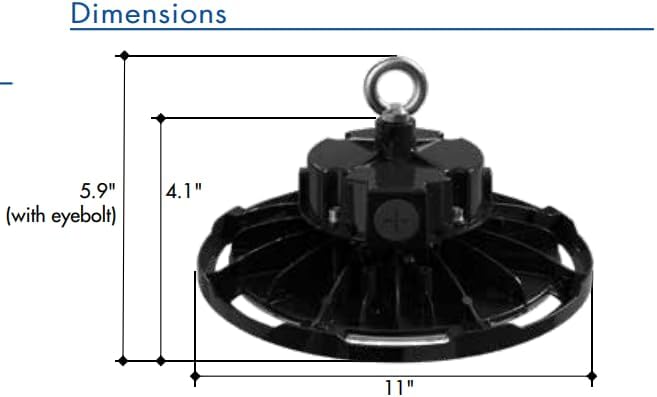
Figure 2: Approximate dimensions of the luminaire, including height with eyebolt and diameter.
5. Installation Instructions (Setup)
This luminaire is designed for suspended mounting. Follow these steps for proper installation:
- Safety First: Ensure power to the installation area is turned OFF at the circuit breaker before beginning any work.
- Inspect Fixture: Carefully remove the luminaire from its packaging and inspect for any damage. Do not install if damaged.
- Prepare Mounting Point: Identify a suitable structural mounting point capable of safely supporting the luminaire's weight (6.44 lbs). Install appropriate mounting hardware (e.g., chain, hook) if not already present.
- Attach Eyebolt: Securely thread the provided eyebolt into the top of the luminaire housing.
- Suspend Fixture: Carefully lift the luminaire and attach the eyebolt to your chosen mounting hardware. Ensure the fixture is stable and level.
- Wiring:
- Open the wiring compartment on the top of the fixture.
- Connect the AC input wires (Line, Neutral, Ground) from your power supply to the corresponding wires on the luminaire. Refer to local electrical codes for proper wiring practices.
- For 0-10V dimming functionality, connect the purple (DIM+) and gray (DIM-) wires from your 0-10V dimmer to the corresponding dimming wires on the luminaire. If dimming is not desired, cap these wires individually.
- Ensure all connections are secure and insulated.
- Close Compartment: Securely close the wiring compartment cover.
- Restore Power: Once installation is complete and all connections are verified, restore power at the circuit breaker.
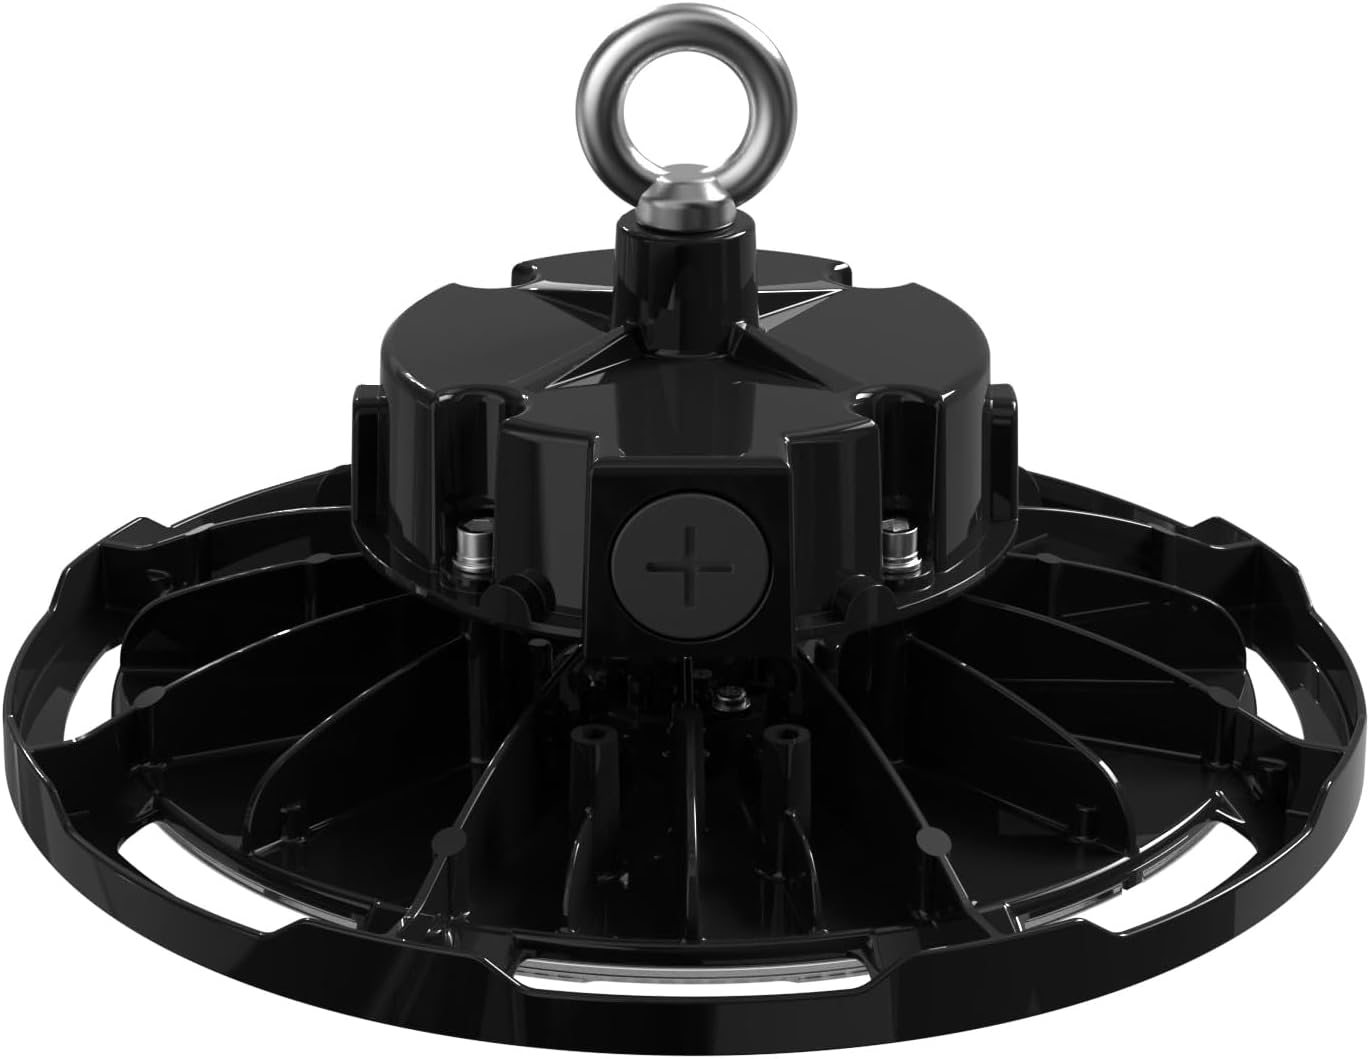
Figure 3: Top view of the luminaire, illustrating the eyebolt for suspension and the location of the wiring compartment.
6. Operation
The TCP Economy LED UFO High Bay Luminaire operates immediately upon receiving power.
- Power On/Off: Control the luminaire's power supply via the connected wall switch or circuit breaker.
- Dimming: If connected to a compatible 0-10V dimmer, adjust the light output by manipulating the dimmer control. The luminaire will respond to the 0-10V signal to vary its brightness.
7. Maintenance
The TCP Economy LED UFO High Bay Luminaire requires minimal maintenance.
- Cleaning: Ensure power is disconnected before cleaning. Use a soft, damp cloth to wipe the exterior of the fixture. Do not use abrasive cleaners or solvents, as these may damage the finish or optical components.
- Inspection: Periodically inspect the fixture and its mounting hardware for any signs of damage, loose connections, or wear. Address any issues promptly.
- No User-Serviceable Parts: There are no user-serviceable parts inside the luminaire. Do not attempt to open or repair the unit.
8. Troubleshooting
If the luminaire is not functioning as expected, perform the following basic checks:
- No Light:
- Verify that the power supply to the fixture is active at the circuit breaker and wall switch.
- Check all wiring connections for proper contact and insulation.
- Dimming Not Working:
- Ensure the 0-10V dimmer is compatible and correctly wired to the luminaire's dimming leads (purple and gray).
- Verify the dimmer is functioning correctly.
- Flickering:
- Check for loose wiring connections.
- Ensure the input voltage is stable and within the specified range.
If these steps do not resolve the issue, contact customer support for assistance. Do not attempt further repairs yourself.
9. Warranty and Support
This TCP Economy LED UFO High Bay Luminaire is covered by a Five-Year Limited Warranty against defects in manufacturing. Please retain your proof of purchase for warranty claims.

Figure 4: Warranty statement and product listings (UL and cUL listed, IP65 Rated).
For technical support, warranty inquiries, or replacement parts, please contact TCP customer service:
- Website: www.tcpi.com
- Phone: Refer to TCP's official website for current contact numbers.


