1. Introduction
Thank you for choosing the VEVOR 4L Water Distiller, Model YMK40101. This appliance is designed to produce high-quality distilled water by effectively removing impurities from tap water. Please read this manual thoroughly before operation to ensure safe and efficient use.

Image: Overview of VEVOR Water Distiller features, emphasizing purity and safety.

Image: VEVOR Water Distiller with certifications, indicating adherence to safety and health standards.
2. Safety Instructions
- Always connect the distiller to a grounded power outlet.
- Do not immerse the main unit in water or any other liquid.
- Keep out of reach of children and pets.
- Ensure proper ventilation around the unit during operation.
- Do not open the lid or touch hot surfaces during or immediately after operation. Steam and hot water can cause burns.
- Unplug the unit before cleaning or maintenance.
- Use only original VEVOR replacement parts and accessories.
- If the power cord is damaged, it must be replaced by the manufacturer, its service agent, or similarly qualified persons to avoid a hazard.
3. Package Contents
Upon unpacking, please verify that all items listed below are present and in good condition:
- VEVOR 4L Water Distiller Main Unit
- Water Collection Bottle (PBT Plastic)
- Power Cord
- Citric Acid Powder (for cleaning) x 1
- Activated Carbon Packs x 4
- Silicone Tube x 1
- User Manual

Image: All components included in the VEVOR 4L Water Distiller package.
4. Product Overview
The VEVOR 4L Water Distiller is engineered for efficient and reliable water purification. Key components and materials ensure high performance and durability.
4.1. Main Components
- Distiller Tank: The main boiling chamber, featuring a 304 stainless steel inner liner.
- Inner Lid: Covers the boiling chamber.
- Cooling Duct: Where steam condenses back into liquid water. Made of 304 stainless steel.
- Nozzle: Dispenses distilled water into the collection bottle.
- Collection Bottle: Made of PBT plastic, designed to collect the distilled water.
- Control Panel: Simple interface for operation.

Image: Internal structure and material composition of the distiller, highlighting food-grade 304 stainless steel.
4.2. Working Principle
The distiller operates by heating tap water to boiling point, converting it into steam. This steam rises, leaving impurities behind. The steam then passes through a cooling coil, where it condenses back into pure liquid water. An activated carbon filter further purifies the water before it is collected.

Image: Detailed diagram illustrating the distillation process and safety features like overheating protection.

Image: Visual representation of the multi-stage purification process.
5. Setup
- Unpack: Carefully remove all components from the packaging.
- Position: Place the distiller on a stable, flat, and heat-resistant surface. Ensure adequate ventilation around the unit.
- Connect Power: Plug the power cord into the distiller's power inlet and then into a grounded electrical outlet.
- Install Collection Bottle: Place the collection bottle directly under the distiller's nozzle.
- Initial Cleaning: Before first use, fill the boiling chamber with water up to the MAX line. Run one distillation cycle without collecting the water to clean the internal components. Discard this first batch of water.

Image: Rear view of the distiller, showing the power connection point.
6. Operating Instructions
- Fill Water: Open the distiller lid and fill the stainless steel boiling chamber with tap water. Do not exceed the 'MAX' fill line.
- Close Lid: Securely close the lid. Ensure the activated carbon filter pack is correctly installed in the nozzle.
- Position Collection Bottle: Place the collection bottle under the nozzle.
- Start Distillation: Press the 'RESET' button (or power button, depending on model) to start the distillation process. The unit will begin heating the water.
- Automatic Shut-off: The distiller will automatically shut off when the water in the boiling chamber reaches a low level or when the internal temperature exceeds a safe limit.
- Collection: Once the cycle is complete, allow the unit to cool down before handling. The distilled water will be in the collection bottle.
- Cool Down: For optimal performance and safety, allow the unit to cool for at least 30 minutes between cycles.
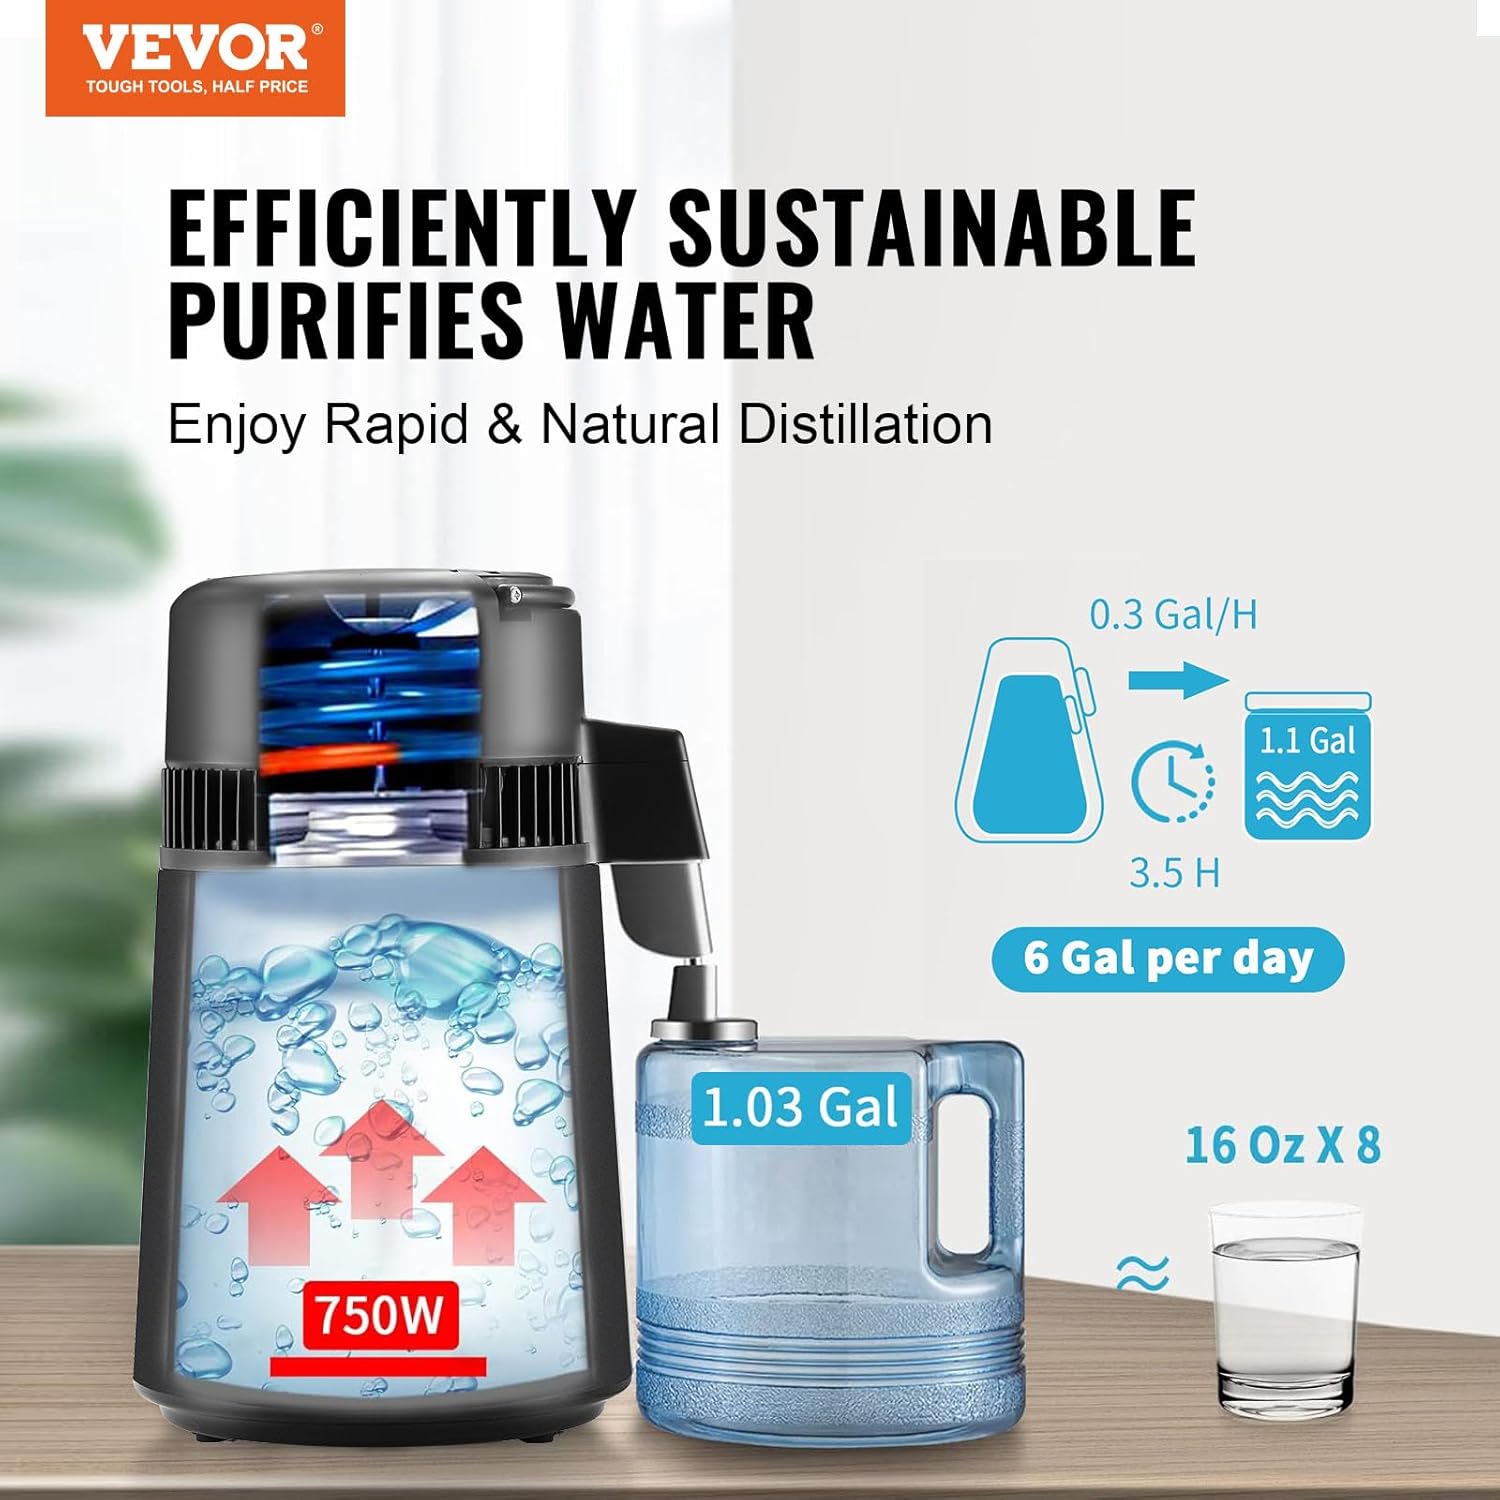
Image: Distillation rate and daily output of the VEVOR 4L Water Distiller.
7. Maintenance and Cleaning
Regular cleaning and maintenance are crucial for the longevity and efficiency of your distiller.
7.1. Daily Cleaning
- After each use, unplug the unit and allow it to cool completely.
- Discard any remaining water in the boiling chamber.
- Wipe the interior of the boiling chamber with a soft cloth.
- Rinse the collection bottle and lid with clean water.
7.2. Descaling (Weekly/Bi-weekly)
Mineral deposits (limescale) will accumulate in the boiling chamber. Use the provided citric acid powder for descaling.
- Ensure the unit is unplugged and cool.
- Pour approximately 1 liter of warm water into the boiling chamber.
- Add 1-2 tablespoons of citric acid powder.
- Close the lid and let it soak for 30 minutes to 2 hours, or overnight for heavy scale. Do not turn on the distiller during this process.
- After soaking, drain the solution and scrub the interior with a non-abrasive brush or cloth to remove loosened scale.
- Rinse thoroughly with clean water multiple times to remove all citric acid residue.
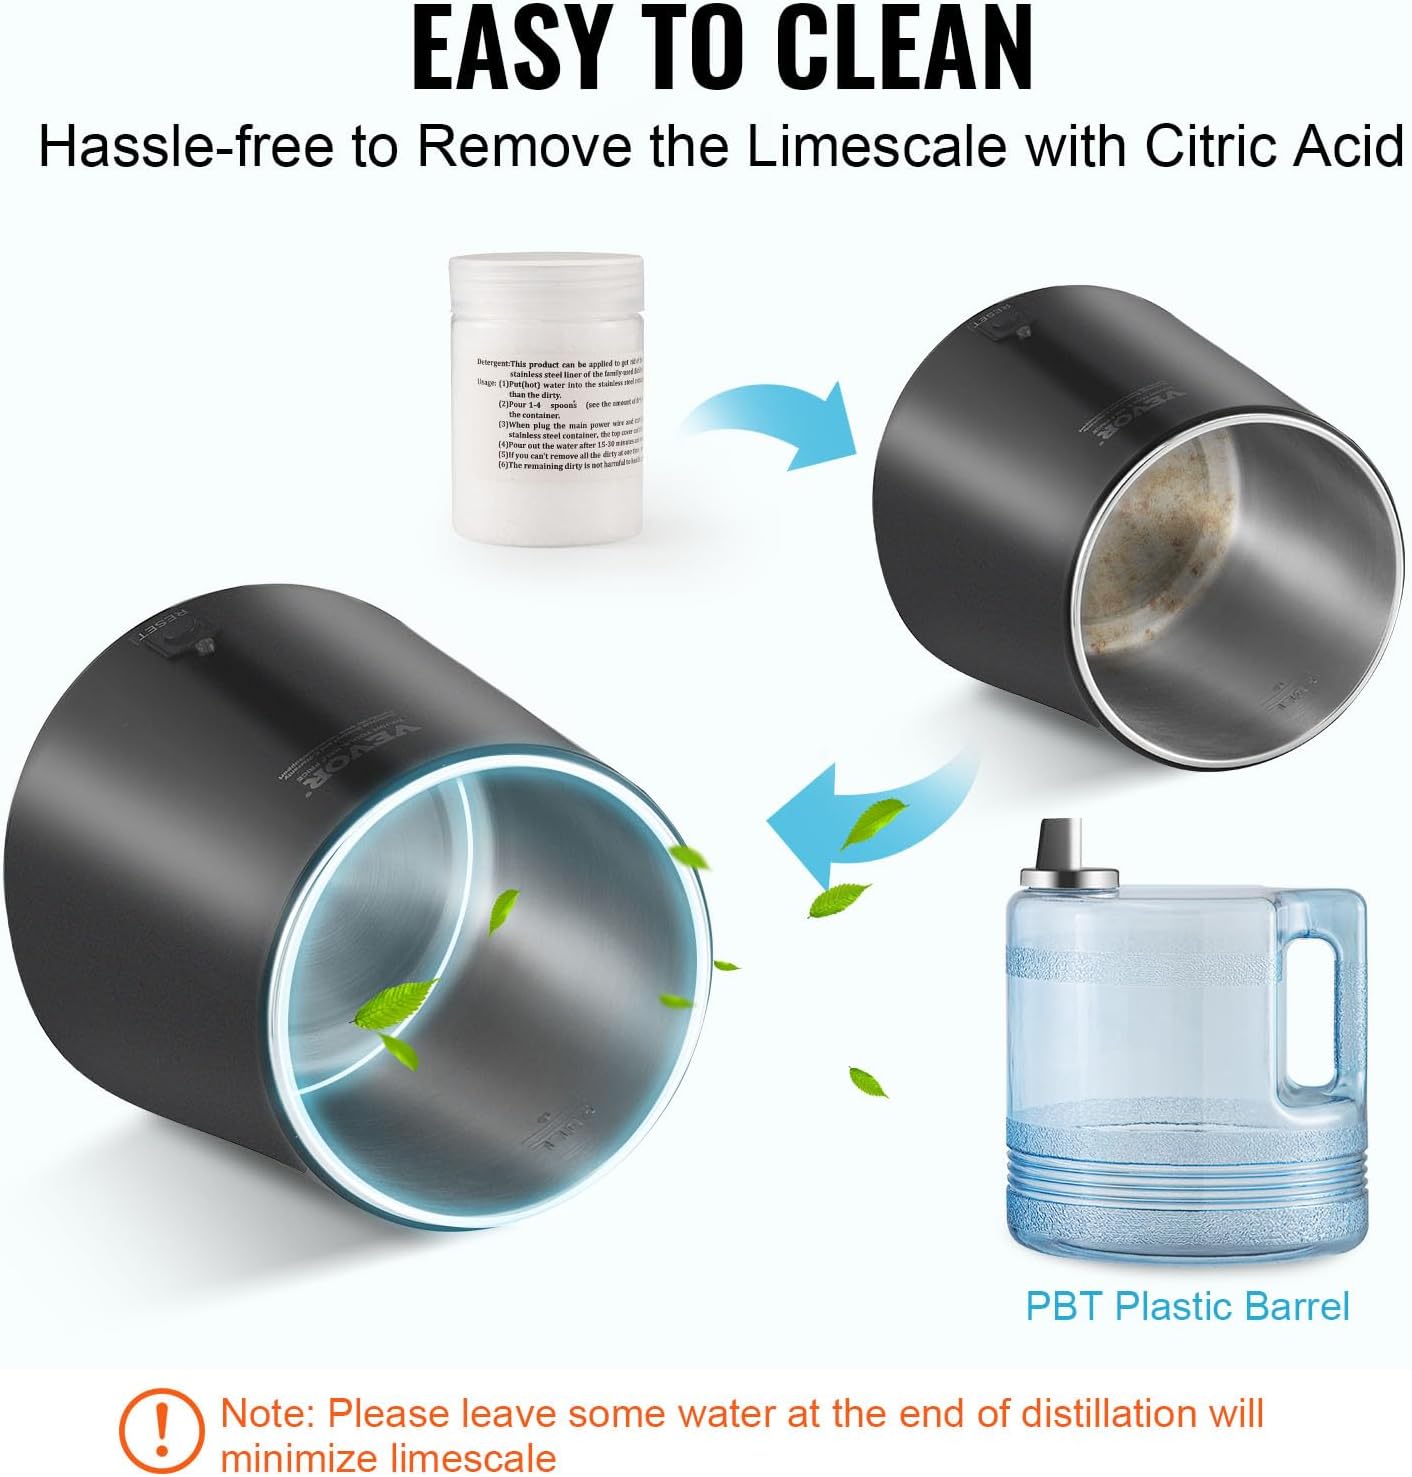
Image: Visual guide for descaling the distiller using citric acid.
7.3. Activated Carbon Filter Replacement
The activated carbon filter should be replaced periodically (approximately every 2-3 months or after 30-50 distillation cycles) to maintain water purity.
- Ensure the unit is unplugged and cool.
- Invert the distiller lid and remove the old carbon filter pack from the nozzle.
- Insert a new activated carbon pack into the nozzle.
- Push the nozzle down into the machine until it is securely in place.

Image: Step-by-step instructions for replacing the activated carbon filter.
8. Troubleshooting
| Problem | Possible Cause | Solution |
|---|---|---|
| Distiller does not turn on. | No power supply. | Check if the power cord is securely plugged into the unit and the outlet. Check the power outlet. |
| No water is produced. | Boiling chamber is empty or water level is too low. | Ensure water is filled to the 'MAX' line. |
| Distilled water has an odor. | Activated carbon filter needs replacement. | Replace the activated carbon filter pack. |
| Unit shuts off prematurely. | Overheating protection activated. | Allow the unit to cool down completely before restarting. Ensure proper ventilation. |
| Slow distillation rate. | Heavy limescale buildup. | Perform a descaling cleaning cycle using citric acid. |
9. Specifications
| Feature | Specification |
|---|---|
| Brand | VEVOR |
| Model Number | YMK40101 |
| Power | 750W |
| Capacity | 4 Liters (1.05 GAL) |
| Distillation Rate | 1 Liter per hour (approx. 0.26 GAL/h) |
| Inner Liner Material | 304 Stainless Steel |
| Collection Bottle Material | PBT Plastic |
| Shell Material | PP Plastic |
| Product Dimensions (L x W x H) | 27.18 x 23.11 x 39.12 cm (10.7 x 9.1 x 15.4 inches) |
| Product Weight | 3.7 kg (8.16 lbs) |
| Special Feature | Rapid Heat Dissipation |

Image: Summary of technical specifications for the VEVOR water distiller.

Image: Specifications table alongside various application scenarios.
10. Applications
The VEVOR 4L Water Distiller is versatile and suitable for various uses requiring purified water:
- Drinking Water: For a purer taste and reduced impurities.
- Coffee and Tea Preparation: Enhances flavor by eliminating mineral interference.
- Humidifiers and CPAP Machines: Prevents mineral buildup and extends appliance life.
- Laboratories and Dental Clinics: For experiments, sterilization, and equipment cleaning.
- Aquariums: Provides clean water for sensitive aquatic environments.
- Skincare and Beauty: For facial steamers and other cosmetic applications.

Image: Various household and professional applications for distilled water.

Image: VEVOR Water Distiller in a home kitchen setting.

Image: Distiller in a modern workspace, highlighting its compact design.
11. Warranty and Support
VEVOR products are designed for durability and performance. For warranty information, technical support, or service inquiries, please refer to the official VEVOR website or contact their customer service directly. Keep your purchase receipt as proof of purchase.
For further assistance, visit: www.vevor.com/support


