
1. Introduction
The Doslnlya NG-4 4-Channel UHF Wireless Microphone System is designed for clear and stable audio transmission in various settings, including churches, KTV, and events. This system features 4 metal handheld microphones with adjustable frequencies, offering reliable performance up to 164 feet (50 meters). This manual provides detailed instructions for setting up, operating, and maintaining your wireless microphone system.
2. Package Contents
Please verify that all items listed below are included in your package:
- 1 x Receiver Unit
- 4 x Handheld Wireless Microphones
- 1 x 6.35mm Audio Cable
- 1 x USB Charging Cable (for microphones)
- 1 x Power Adapter (for receiver)
- 4 x Anti-roll Microphone Rings (colored)
- 4 x Lithium Batteries (rechargeable, for microphones)
- 1 x User Manual

Image: All components included in the Doslnlya NG-4 package, including the receiver, four microphones, cables, power adapter, and colored anti-roll rings.
3. Setup Guide
3.1 Receiver Overview
Familiarize yourself with the receiver's front and rear panels.

Image: Detailed view of the receiver's front panel showing channel displays, function adjustment keys, power button, and infrared lamp. The rear panel displays antenna interfaces, XLR output interfaces, 6.35mm audio port, and power input.
- Front Panel: Features individual channel displays (CH-1 to CH-4), RF/AF indicators, Infrared (IR) lamp for pairing, and function adjustment keys (SET, UP, DOWN, POWER, LOCK).
- Rear Panel: Includes antenna interfaces (ANT A, ANT B), individual XLR outputs (BAL A, BAL B, BAL C, BAL D) for each microphone, a mixed 6.35mm (1/4 inch) output, and a DC 12V power input.
3.2 Microphone Overview
Each handheld microphone features an LCD screen displaying frequency and battery status, along with a power button and a USB-C charging port at the bottom.

Image: A hand holding one of the handheld microphones, highlighting its HD screen, power button, and the USB-C charging port at the base.
3.3 Initial Connection
- Connect Power: Plug the power adapter into the DC 12V input on the rear of the receiver and then into a power outlet.
- Connect Audio: Connect the receiver to your audio mixer, amplifier, or karaoke machine using either the mixed 6.35mm output or individual XLR outputs.
- Install Batteries: Ensure the rechargeable lithium batteries are correctly installed in each microphone. The system includes 4 lithium batteries. (Note: While some product information mentions AA batteries, the feature bullets and images indicate rechargeable lithium batteries with USB-C charging.)
- Attach Antennas: Screw the antennas securely into their respective ports on the rear of the receiver. Position them vertically for optimal signal reception.
4. Operating Instructions
4.1 Powering On/Off
- Power On Receiver: Press the POWER button on the receiver's front panel. The display screens will illuminate.
- Power On Microphones: Press and hold the power button on each handheld microphone until its LCD screen illuminates.
- Power Off: To power off, reverse the process: first turn off the microphones, then turn off the receiver.
4.2 Automatic Frequency Pairing (IR Sync)
The system is designed for automatic pairing between microphones and the receiver using infrared (IR) technology.

Image: Diagram illustrating the infrared (IR) pairing process between a handheld microphone and the receiver unit.
- Ensure both the receiver and the microphone are powered on.
- On the receiver, select the desired channel (CH-1 to CH-4) you wish to pair.
- Press the "SET" button on the receiver for the selected channel. The display will show 'IR'.
- Point the IR window of the microphone towards the IR lamp on the receiver (located next to the channel display).
- The microphone and receiver will automatically sync their frequencies. The display on both units will show the same frequency, and the RF indicator on the receiver will light up, confirming a successful connection.
For a visual guide on frequency synchronization, refer to the following video:
Video: This video demonstrates the process of synchronizing frequencies between a wireless bodypack microphone and its receiver. While the video shows a bodypack, the IR sync principle applies to handheld microphones as well.
4.3 Volume Control
Each channel on the receiver has an independent volume control knob. Adjust these knobs to achieve the desired audio level for each microphone.
4.4 Microphone Usage
- Hold the microphone approximately 2-6 inches from your mouth for optimal sound pickup.
- The microphones feature a unidirectional (heart-shaped) polar pattern, which helps to focus on the sound source directly in front of it and reduce background noise.
- Utilize the included anti-roll rings to prevent microphones from rolling off flat surfaces.
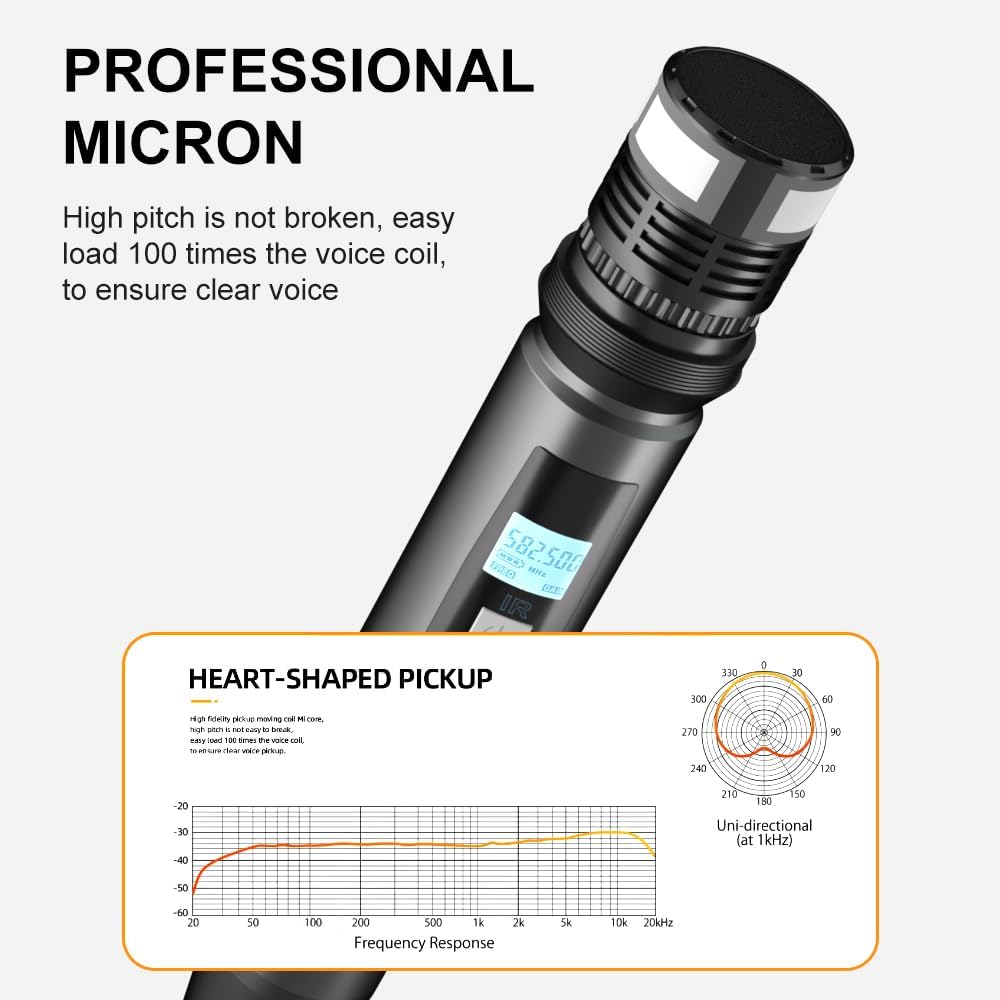
Image: Close-up of a microphone head with a diagram illustrating its heart-shaped (unidirectional) pickup pattern and frequency response.
5. Maintenance
5.1 Charging Microphones
The handheld microphones are equipped with rechargeable lithium batteries and a USB-C charging port at the bottom.

Image: Close-up of the bottom of a handheld microphone showing the DC-5V USB-C charging port.
- Connect the provided USB charging cable to the USB-C port on the microphone.
- Plug the other end of the USB cable into a compatible USB power source (e.g., computer, USB wall adapter).
- A full charge typically provides 4-5 hours of continuous use.
5.2 Cleaning
- Wipe the microphone bodies and receiver with a soft, dry cloth.
- For microphone grilles, gently clean with a soft brush to remove any debris.
- Avoid using liquid cleaners or abrasive materials directly on the devices.
6. Troubleshooting
- No Sound:
- Ensure all devices (receiver, microphones, connected audio equipment) are powered on.
- Check all cable connections between the receiver and your audio system.
- Verify that microphones are successfully paired with the receiver (RF indicator lit).
- Adjust volume knobs on the receiver and your audio equipment.
- Check microphone battery levels.
- Interference/Poor Sound Quality:
- Ensure antennas are properly positioned and unobstructed.
- Try changing the frequency of the affected microphone channel on the receiver and re-pairing. The system offers 100 adjustable frequency points.
- Move the receiver away from other electronic devices that may cause interference (e.g., Wi-Fi routers, cordless phones).
- Ensure you are within the optimal operating range (up to 164 ft / 50 m).
- Microphone Not Pairing:
- Confirm the microphone has sufficient battery power.
- Ensure the microphone's IR window is directly facing the receiver's IR lamp during the pairing process.
- Repeat the automatic frequency pairing steps carefully.
7. Specifications
| Feature | Specification |
|---|---|
| Model Number | NG-4 |
| Number of Channels | 4 |
| Frequency Points | 100 adjustable frequency points |
| Wireless Technology | UHF |
| Microphone Type | Metal Moving Coil Handheld |
| Polar Pattern | Unidirectional (Heart-shaped) |
| Operating Range | Up to 164 ft (50 m) |
| Microphone Power | Rechargeable Lithium Battery (USB-C charging) |
| Battery Life | 4-5 hours (approx.) |
| Connectivity | 6.35mm Jack, XLR |
| Material | Metal |
| Special Features | Noise Reduction, Anti-howling, Automatic Frequency Alignment |
8. Warranty and Support
For warranty information, technical support, or any inquiries regarding your Doslnlya NG-4 Wireless Microphone System, please refer to the contact card included in your package or visit the official Doslnlya website.
We are committed to providing high-quality products and excellent customer service.