
Introduction
Thank you for choosing the APORO T18 Portable 30W UHF Wireless Voice Amplifier. This device is designed to provide clear and powerful sound amplification for various applications, including teaching, training, conferences, and public speaking. Featuring a 30W output, UHF wireless microphone, long-lasting battery, and multiple playback options, the T18 offers versatility and convenience. Please read this manual carefully to ensure proper use and maintenance of your device.
Package Contents
Please check the package for the following items:
- 1 x APORO T18 Wireless Voice Amplifier
- 1 x Wireless Lapel Microphone
- 1 x 3.5mm Audio Cable
- 1 x USB Charging Cable
- 1 x Power Adapter (Charger)
- 1 x Waist Strap
- 1 x User Manual (this document)
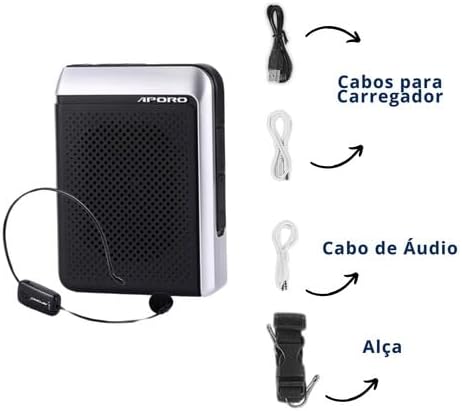
Figure 1: All items included in the APORO T18 package. This image displays the main amplifier unit, the wireless microphone, various cables (USB, 3.5mm audio), a power adapter, and a waist strap.
Product Overview
The APORO T18 features a compact and durable design with intuitive controls. Familiarize yourself with the device's components:

Figure 2: Front view of the APORO T18 Portable Voice Amplifier with the wireless microphone headset. The amplifier has a black mesh speaker grille and silver-colored sides, with the APORO logo visible.

Figure 3: Top view of the APORO T18 control panel, highlighting the 'REC' button for recording. The display shows 'UHF', indicating the wireless mode. Recording requires an SD card or USB drive.

Figure 4: Illustration of the APORO T18's battery capabilities: 4000 mAh battery, providing up to 10 hours of music playback or 20 hours of voice amplification.

Figure 5: The APORO T18 features silicone protection against dust and splashes, enhancing its durability. Water droplets are depicted around the device to illustrate this feature.

Figure 6: The APORO T18 offers versatile wearing options, including a belt clip for hands-free use. The image shows the device attached to a belt and a close-up of the belt clip mechanism.
Setup
1. Charging the Device
- Connect the USB charging cable to the amplifier's charging port.
- Connect the other end of the USB cable to the provided power adapter.
- Plug the power adapter into a standard electrical outlet.
- The charging indicator light will illuminate. A full charge typically takes 4-6 hours.
- Once fully charged, the indicator light may change or turn off. Disconnect the charger.
2. Pairing the Wireless Microphone
- Ensure both the amplifier and the wireless microphone are powered off.
- Turn on the amplifier.
- Turn on the wireless microphone. The microphone's indicator light should blink, indicating it's in pairing mode.
- The amplifier and microphone should automatically pair. The microphone's indicator light will become solid when successfully paired.
- If pairing fails, refer to the troubleshooting section or try restarting both devices.
3. Inserting SD Card or USB Drive (for recording/playback)
- Locate the SD card slot or USB port on the amplifier.
- Gently insert the SD card or USB drive into the respective slot/port until it clicks into place or is firmly seated.
- Ensure the device is inserted correctly to avoid damage.
Operating Instructions
1. Power On/Off
Press and hold the Power button (Ⓘ) for a few seconds to turn the amplifier on or off.
2. Volume Control
Use the Volume Up (+) and Volume Down (-) buttons to adjust the amplification level.
3. Microphone Usage
- Wear the wireless lapel microphone comfortably.
- Ensure the microphone is positioned correctly for optimal voice pickup.
- Adjust the amplifier's volume to a comfortable level, avoiding feedback (a high-pitched squeal).
4. Recording Function
- Insert an SD card or USB drive into the amplifier.
- Press the REC button to start recording. The display may show a recording indicator.
- Press the REC button again to stop recording.
- Recordings are saved to the inserted storage device.
5. FM Radio
- Press the Mode button to switch to FM Radio mode.
- Use the Previous/Next track buttons to scan for radio stations.
- The amplifier supports loop playback modes for FM radio.
6. AUX Connection
- Connect one end of the 3.5mm audio cable to the AUX input port on the amplifier.
- Connect the other end to the audio output of your computer, smartphone, or other compatible device.
- The amplifier will play audio from the connected device.
7. USB/SD Playback
- With an SD card or USB drive inserted, press the Mode button to select the appropriate playback mode.
- Use the Previous/Next track buttons to navigate through files.
- Press the Play/Pause button to control playback.
Maintenance
- Cleaning: Use a soft, dry cloth to clean the amplifier's surface. Do not use abrasive cleaners or solvents.
- Battery Care: To prolong battery life, avoid fully discharging the battery frequently. Charge the device regularly, even if not in use for extended periods.
- Storage: Store the amplifier in a cool, dry place away from direct sunlight and extreme temperatures.
- Protection: While the device offers splash protection, avoid submerging it in water or exposing it to heavy rain.
Troubleshooting
| Problem | Possible Cause | Solution |
|---|---|---|
| No sound from amplifier | Device is off; Low battery; Volume too low; Microphone not paired/connected; Incorrect mode selected. | Turn on device; Charge battery; Increase volume; Re-pair microphone; Select correct input mode (UHF, AUX, SD/USB). |
| Feedback (squealing sound) | Microphone too close to amplifier; Volume too high. | Increase distance between microphone and amplifier; Lower the volume. |
| Wireless microphone not pairing | Microphone battery low; Out of range; Interference. | Charge microphone; Ensure microphone is within 20 meters of amplifier; Move away from other wireless devices. |
| Recording not working | No SD card/USB drive inserted; Storage device full; Storage device not formatted correctly. | Insert a compatible SD card or USB drive; Delete old files; Format storage device (refer to device manual for formatting instructions if available, or use a computer). |
| Short battery life | Battery not fully charged; Old battery; High volume usage. | Ensure full charge; Consider battery replacement if very old; Reduce volume when possible. |
Specifications
| Feature | Detail |
|---|---|
| Brand | APORO |
| Model | T18 |
| Output Power | 30 Watts |
| Connectivity Technology | AUX, Bluetooth, USB, Wi-Fi (UHF Wireless) |
| Battery Capacity | 4000 mAh (Lithium) |
| Charging Time | 4-6 hours |
| Usage Time | 12-15 hours (amplification), 10 hours (music playback) |
| Wireless Range | Up to 20 meters (UHF) |
| Frequency Response | 50 - 18,000 Hz |
| Noise Level | 50 dB |
| Impedance | 16 Ohm |
| Material | Plastic |
| Color | Black |
| Dimensions (L x W x H) | 30 x 100 x 170 mm (3 x 10 x 17 cm) |
| Weight | 321 Grams |
| Supported Media | SD Card, USB Drive |
| Additional Features | FM Radio, Noise Reduction, Recording Function, Dust and Splash Protection |
Warranty and Support
The APORO T18 Portable Voice Amplifier comes with a manufacturer's warranty of 1 year from the date of purchase. This warranty covers defects in materials and workmanship under normal use.
For technical support, warranty claims, or further assistance, please contact your retailer or the APORO customer service department. Please retain your proof of purchase for warranty validation.
For more information, visit the official APORO website or contact their support channels.

