
1. Introduction
This manual provides detailed instructions for the installation, operation, maintenance, and troubleshooting of the Cydewhoale Digital Tube Display Ice Machine Controller Kit. This kit is designed to upgrade and control various commercial ice makers, ensuring efficient and reliable ice production.
2. Safety Information
- Always disconnect power to the ice machine before installing, servicing, or cleaning the controller kit.
- Installation should only be performed by qualified personnel to prevent electrical shock or damage to the equipment.
- Ensure all wiring connections are secure and correctly matched to avoid malfunctions.
- Do not expose the controller components to excessive moisture or extreme temperatures.
- Refer to your ice machine's original manual for specific safety guidelines related to its operation.
3. Package Contents
The Cydewhoale Digital Tube Display Ice Machine Controller Kit includes the following components:
- Motherboard
- LCD Display Board
- Float Switch
- Ice Bin Sensor
- Temperature Sensor

Figure 3.1: Overview of the Cydewhoale Digital Tube Display Ice Machine Controller Kit components.
4. Installation
4.1 Pre-Installation Check: Motherboard Compatibility
Before installation, it is critical to identify the type of motherboard currently installed in your ice machine. Commercial ice makers, including models from Vevor, Cotlin, and Cooski, may use different motherboard designs (e.g., small or big motherboards) with varying wiring connection terminal boards. Always check your original board and select the Cydewhoale kit that matches its configuration to ensure proper connectivity.
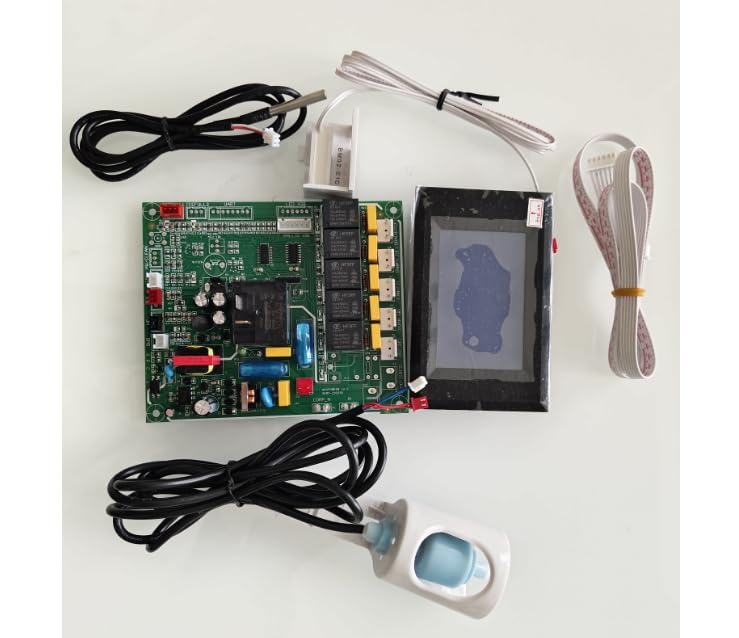
Figure 4.1: Example of a Big Motherboard.

Figure 4.2: Example of a Standard Motherboard.
4.2 General Installation Steps
- Disconnect Power: Ensure the ice machine is completely unplugged from its power source.
- Access Control Panel: Open the ice machine's control panel or access compartment to expose the existing controller components.
- Remove Old Components: Carefully disconnect and remove the old motherboard, display, and sensors, noting their original connections. It is recommended to take photos for reference.
- Install New Motherboard: Mount the new Cydewhoale motherboard in the designated location. Connect all wiring harnesses according to the original configuration and the specific wiring diagram provided with your kit (if applicable). Pay close attention to the terminal board connections.
- Install LCD Display Board: Secure the new LCD display board in the control panel. Connect its ribbon cable or wiring to the motherboard.
- Install Sensors: Place the float switch, ice bin sensor, and temperature sensor in their respective positions within the ice machine. Connect their wires to the motherboard.
- Secure Wiring: Ensure all wires are neatly routed and secured to prevent interference or damage.
- Close Panel: Close and secure the ice machine's control panel or access compartment.
- Restore Power: Plug the ice machine back into its power source.
5. Operating Instructions
5.1 Power On/Off
Once installed and powered, the digital display will illuminate. To turn the ice machine on or off, refer to the specific power button or sequence on the LCD display interface.
5.2 Digital Display Interface
The digital tube display provides real-time information about the ice machine's status, including:
- Current operating mode (e.g., ice making, defrost, harvest)
- Temperature readings (evaporator, condenser, ambient)
- Error codes or alerts
- Ice production cycle progress
5.3 Adjusting Settings
The intuitive interface allows for adjustments to various operational parameters. Use the buttons adjacent to the digital display to navigate menus and modify settings such as:
- Ice thickness (if supported by your ice machine model)
- Ice making cycle duration
- Defrost cycle frequency
Consult the specific instructions provided with your ice machine for detailed guidance on setting adjustments.
5.4 Ice Making Cycle
The controller kit manages the entire ice production process automatically. Once activated, it will initiate the freezing, harvesting, and defrost cycles as needed to maintain a consistent supply of ice.
6. Maintenance
6.1 Cleaning
- Display Panel: Wipe the digital display with a soft, damp cloth. Avoid abrasive cleaners or solvents.
- Sensors: Periodically inspect the float switch, ice bin sensor, and temperature sensor for any buildup or obstructions. Clean gently if necessary.
- Motherboard: Keep the motherboard area free from dust and debris. Use compressed air if needed, ensuring power is disconnected.
6.2 Regular Inspection
Regularly inspect all wiring connections to ensure they remain secure. Check for any signs of wear or damage to the components. Address any issues promptly to prevent operational problems.
7. Troubleshooting
If you encounter issues with your ice machine after installing the controller kit, refer to the following common troubleshooting steps:
| Problem | Possible Cause | Solution |
|---|---|---|
| Display not illuminating | No power; loose connection; faulty display board | Check power supply; verify all wiring connections to the display and motherboard; inspect display board for damage. |
| Ice machine not making ice | Incorrect wiring; sensor malfunction; water supply issue; compressor problem | Review wiring against original setup; check sensor connections and functionality; ensure water supply is open; consult ice machine's original manual for compressor troubleshooting. |
| Error code displayed | Specific component failure; operational fault | Note the error code and consult your ice machine's original manual or the kit's specific documentation for code interpretation and resolution. |
| Incompatible motherboard | Kit motherboard does not match original ice machine motherboard type | Ensure the correct motherboard variant (small or big) was selected for your ice machine. Incorrect variants will not connect properly. |
If problems persist after attempting these solutions, contact a qualified technician or the product support for further assistance.
8. Specifications
| Feature | Specification |
|---|---|
| Brand | Cydewhoale |
| Model | Digital tube display controller kit |
| Voltage | 115 Volts |
| Display Type | LCD (Digital Tube Display) |
| Included Components | Motherboard, LCD display board, float switch, ice bin sensor, temp sensor |
| Manufacturer | Xinruier |
| Part Number | ZB1026 |
| UPC | 762736383368 |
9. Warranty and Support
For warranty information or technical support, please refer to the documentation provided with your purchase or contact Cydewhoale customer service. Keep your purchase receipt for warranty claims.