
Carpeer 9inch (B0DDXXJ5SD)
Carpeer 9-inch Wireless Carplay Screen with 4K Dash Cam and 1080P Backup Camera User Manual
Model: 9inch (B0DDXXJ5SD)
1. Introduction
This manual provides comprehensive instructions for the installation, operation, and maintenance of your Carpeer 9-inch Wireless Carplay Screen. This device integrates a portable touchscreen display with wireless Apple CarPlay and Android Auto functionality, a 4K front dash camera, and a 1080P backup camera. It is designed to enhance your driving experience with navigation, communication, and recording capabilities.
The Carpeer 9-inch Wireless Carplay Screen is compatible with a wide range of vehicles (12V-24V), including cars, trucks, vans, caravans, trailers, and campers.

Image 1.1: Carpeer 9-inch Wireless Carplay Screen main unit and included accessories.
Video 1.1: Overview of the Carpeer 9-inch Wireless Carplay Screen features and functionality.
2. Package Contents
Please verify that all items listed below are included in your package:
- Carpeer 9-inch Wireless Carplay Screen (Main Unit with 4K Dash Cam)
- Dash Mount Bracket
- Cigarette Lighter Power Cable
- 1080P Backup Camera
- AUX Cable
- 64GB TF Card
- Stand Stickers (2 pieces)
- User Manual (this document)

Image 2.1: Visual representation of all items included in the product package.
3. Product Overview
The Carpeer 9-inch Wireless Carplay Screen features a high-definition touchscreen display, an integrated 4K front dash camera, and connectivity ports for various functions. The unit is designed for easy installation and intuitive operation.
3.1 Main Unit Features
- 9-inch HD Touchscreen Display
- Integrated 4K Front Dash Camera
- Type-C Port
- AV-IN Port (for backup camera)
- TF Card Slot
- AUX Output Port

Image 3.1: Comparison of the 9-inch HD touchscreen resolution.
4. Setup and Installation
4.1 Mounting the Screen
- Attach the dash mount bracket to the main unit.
- Clean the desired mounting surface on your dashboard.
- Apply the stand stickers to the base of the mount for secure placement.
- Position the screen on the dashboard, ensuring it does not obstruct your view or interfere with airbags.
4.2 Power Connection
- Insert the cigarette lighter power cable into your vehicle's 12V/24V power outlet.
- Connect the other end of the power cable to the Type-C port on the main unit.
4.3 Backup Camera Installation
The 1080P backup camera provides a clear rear view for safer parking and reversing.
- Mount the backup camera at the rear of your vehicle, typically near the license plate.
- Route the camera cable to the main unit, connecting it to the AV-IN port.
- Connect the red wire from the backup camera cable to your vehicle's reversing lamp power supply. This enables automatic display of the rear view when reversing.

Image 4.1: Backup camera wiring diagram.
5. Operating Instructions
5.1 Power On/Off
The device will power on automatically when connected to the vehicle's power supply and the ignition is turned on. To power off, simply turn off the vehicle's ignition or disconnect the power cable.
5.2 Wireless Apple CarPlay & Android Auto
Connect your smartphone wirelessly for access to navigation, music, calls, and more.
5.2.1 Wireless Apple CarPlay (iOS 12 or above)
- Ensure Bluetooth and Wi-Fi are enabled on your iPhone.
- On the Carpeer screen, select the "CarPlay" icon.
- On your iPhone, go to Bluetooth settings and select the device named starting with "F900_xxxxxx".
- Confirm the pairing request on both devices.
- Select "Use CarPlay" on your iPhone when prompted.
- The connection should be successful within approximately 10 seconds.

Image 5.1: Step-by-step guide for connecting Wireless Apple CarPlay.
5.2.2 Wireless Android Auto (Android 11 or above)
- Ensure Bluetooth and Wi-Fi are enabled on your Android phone.
- On the Carpeer screen, select the "Android Auto" icon.
- On your Android phone, go to Bluetooth settings and select the device named starting with "F900_xxxxxx".
- Confirm the pairing request and allow access to contacts and call history.
- The connection should be successful within approximately 10 seconds.
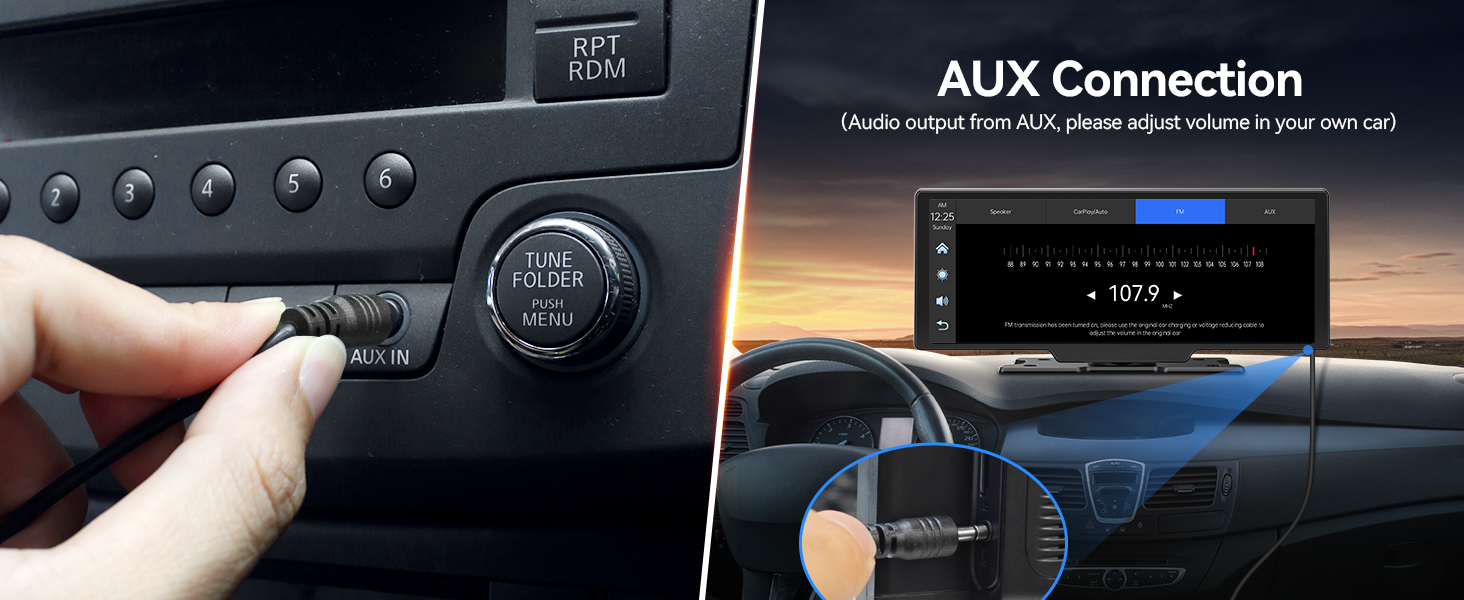
Image 5.2: Step-by-step guide for connecting Wireless Android Auto.
5.2.3 Exiting CarPlay/Android Auto Mode
To disconnect from CarPlay or Android Auto:
- Turn off the CarPlay/Android Auto function on your phone or forget the device in your phone's Bluetooth settings.
- Alternatively, disconnect your mobile phone's Wi-Fi directly.

Image 5.3: Methods for exiting CarPlay or Android Auto mode.
5.3 Audio Output Options
The Carpeer screen offers multiple ways to output audio to your car's sound system.
5.3.1 Bluetooth Connection to Car Speaker
For Apple CarPlay & Android Auto mode use only.
- After successfully connecting to CarPlay or Android Auto, click the "Audio Out" option on the Carpeer screen's menu.
- Select "Carplay/Auto" as the audio output method.
- Connect your phone's Bluetooth to your car's audio system.
- Bluetooth transmission provides a more stable audio connection than AUX or FM.

Image 5.4: Bluetooth audio connection steps.
5.3.2 FM Transmission
Transmit audio to your car's FM radio.
- Turn on the FM radio function of your car and choose an unoccupied channel.
- On the Carpeer screen, enter FM Transmission mode and tune to the same channel as your car radio.
- Enter CarPlay or Android Auto mode and play music.
- Adjust the volume on your car's audio system.
Note: Please avoid using a channel occupied by an existing FM radio station to prevent interference.

Image 5.5: FM transmission connection steps.
5.3.3 AUX Connection
Connect directly to your car's AUX input.
- Connect the provided AUX cable from the Carpeer screen's AUX output to your car's AUX input port.
- Adjust the volume using your car's audio controls.

Image 5.6: AUX audio connection.
5.4 Dash Cam Functions (4K Front & 1080P Rear)
The integrated dash cam system provides continuous recording for security and evidence.
- Dual Recording: Simultaneously records from the 4K front camera and the 1080P rear camera.
- Loop Recording: Records continuously, overwriting the oldest footage when the memory card is full. Important videos can be locked to prevent overwriting.
- G-Sensor: Automatically detects sudden impacts or collisions and locks the current video segment to prevent it from being overwritten.
- Night Vision: Enhanced recording capability in low-light conditions.

Image 5.7: Overview of 4K front and 1080P rear dash cam features.

Image 5.8: Visual comparison of front 4K and rear 1080P camera clarity.
5.4.1 Viewing Recorded Videos on Your Phone
- Scan the QR code provided on the screen or in the manual to download the control APP (Viidure).
- Turn on Wi-Fi on your phone and connect to the dashcam's Wi-Fi network.
- Use the APP to view, download, or edit recorded videos.

Image 5.9: Steps for accessing dash cam footage via smartphone app. Download the app here.
5.5 GPS Navigation
Utilize real-time GPS navigation through Apple CarPlay or Android Auto. The screen displays maps and directions from your connected smartphone.

Image 5.10: GPS navigation interface in use.
5.6 Voice Control (Siri/Google Assistant)
Access your smartphone's voice assistant (Siri for Apple CarPlay, Google Assistant for Android Auto) for hands-free control of navigation, music, calls, and more.

Image 5.11: Examples of voice commands for Siri and Google Assistant.
5.7 Hands-free Calling
Make and receive calls safely while driving through the connected CarPlay or Android Auto interface.

Image 5.12: Hands-free calling interface.
5.8 Split-Screen Display
The screen supports various split-screen configurations, allowing you to view multiple functions simultaneously, such as navigation and dash cam footage, or music playback and phone calls.

Image 5.13: Examples of split-screen layouts.
5.9 Mirror Link (iOS AirPlay / Android Miracast)
Mirror your smartphone's screen directly onto the Carpeer display.
5.9.1 iOS Mirror Link (AirPlay)
Exit Apple CarPlay mode first.
- Click "AirPlay" on the Carpeer screen.
- Turn on Wi-Fi on your iPhone.
- Find the car play Wi-Fi network (e.g., "F900_xxxxxx") and enter the password "12345678" to connect.
- Open your iPhone's Control Center and click the "Screen Mirror" icon.
- Select "F900_xxxxxx" to complete screen mirroring.
- The connection is successful.

Image 5.14: iOS Mirror Link connection steps.
5.9.2 Android Miracast Link
Exit Android Auto mode first.
- Click the "Miracast" icon in your phone's menu (usually in quick settings).
- Select the "Screen Mirror" option and choose "F900_xxxxxx".
- Wait approximately 10 seconds to enter Android Miracast mode.

Image 5.15: Android Miracast Link connection steps.
6. Maintenance
6.1 Cleaning the Screen
To clean the touchscreen, use a soft, lint-free cloth. For stubborn smudges, slightly dampen the cloth with water or a screen-safe cleaning solution. Avoid using harsh chemicals, abrasive materials, or excessive moisture.
6.2 TF Card Management
Periodically format the TF card to ensure optimal recording performance and prevent data corruption. Back up any important video files before formatting. The included 64GB TF card supports continuous loop recording.
6.3 Camera Lens Care
Keep the front and rear camera lenses clean from dust and smudges to ensure clear video recording. Use a soft cloth specifically designed for optical lenses.
7. Troubleshooting
If you encounter issues with your Carpeer screen, please refer to the following common problems and solutions:
- No Power:
- Ensure the cigarette lighter power cable is securely connected to both the device and the vehicle's power outlet.
- Check if the vehicle's ignition is on.
- Verify the vehicle's cigarette lighter fuse is not blown. - Wireless CarPlay/Android Auto Not Connecting:
- Ensure Bluetooth and Wi-Fi are enabled on your smartphone.
- Forget the device in your phone's Bluetooth settings and try reconnecting.
- Restart both your smartphone and the Carpeer screen.
- Ensure your phone's operating system meets the minimum requirements (iOS 12+ for CarPlay, Android 11+ for Android Auto). - No Audio Output:
- Check the selected audio output method on the Carpeer screen (Bluetooth, FM, AUX).
- If using FM, ensure the frequency matches your car radio and is not occupied by a strong radio station.
- If using AUX, ensure the cable is fully inserted and your car's audio system is set to AUX input.
- Adjust the volume on both the Carpeer screen and your car's audio system. - Dash Cam Not Recording:
- Ensure the 64GB TF card is properly inserted into the TF card slot.
- Check if the TF card is full; format it if necessary (after backing up important files).
- Verify that loop recording is enabled in the settings. - Backup Camera Not Displaying:
- Ensure the backup camera cable is securely connected to the AV-IN port on the main unit.
- Verify that the red wire from the backup camera is correctly connected to the vehicle's reversing lamp power supply.
8. Specifications
| Feature | Detail |
|---|---|
| Product Dimensions | 10 x 4 x 5 inches |
| Item Weight | 1.76 pounds |
| Brand | Carpeer |
| Model | 9inch (B0DDXXJ5SD) |
| Vehicle Service Type | Car |
| Connectivity Technology | Bluetooth |
| Special Features | Android Auto, Apple CarPlay, 4K Dash Cam, 1080P Backup Camera, Loop Recording, GPS Navigation |
| Included Components | 1080P Backup Camera, 64GB TF Card, AUX Cable, Dash Mount Bracket, Cigarette Lighter Power Cable |
| Are Batteries Included | No |
| Compatible Devices | Smartphones (iOS 12+, Android 11+) |
| Power Input | 12V-24V DC (via cigarette lighter) |
9. Warranty and Support
Carpeer is committed to providing quality products and customer satisfaction.
- 90-Day Return/Exchange: We offer a 90-day return or exchange policy for products with quality problems.
- Lifetime After-Sale Service: Carpeer provides lifetime after-sale service for its products.
- 24-Hour Response: Our customer support team aims to respond to inquiries quickly and provide timely assistance.
For technical support, warranty claims, or any other inquiries, please contact Carpeer customer service through the platform where you purchased the product or refer to the contact information provided in your product packaging.

Image 9.1: Carpeer customer support details.
Ask a question about this manual
Ask about setup, troubleshooting, compatibility, parts, safety, or missing instructions. Manuals+ will review the question and use this page’s manual context to help answer it.