
Introduction
Thank you for choosing the Timegyro Digital Wall Clock. This manual provides detailed instructions for the proper setup, operation, and maintenance of your new clock. Please read this manual thoroughly before use to ensure optimal performance and longevity of your device. Keep this manual for future reference.
Safety Information
- Do not expose the clock to extreme temperatures, direct sunlight, or high humidity.
- Avoid dropping the clock or subjecting it to strong impacts.
- Use only the specified battery type (2 x D size batteries, not included).
- Ensure batteries are inserted with correct polarity (+/-).
- Remove batteries if the clock will not be used for an extended period to prevent leakage.
- Keep out of reach of children.
- Clean the clock with a soft, dry cloth. Do not use abrasive cleaners or solvents.
Package Contents
Please check the package contents upon opening. If any items are missing or damaged, contact customer support.
- 1 x Timegyro Digital Wall Clock
- 1 x Instruction Manual
Note: 2 x D size batteries are required and are not included in the package.
Product Overview
Familiarize yourself with the clock's components and controls.
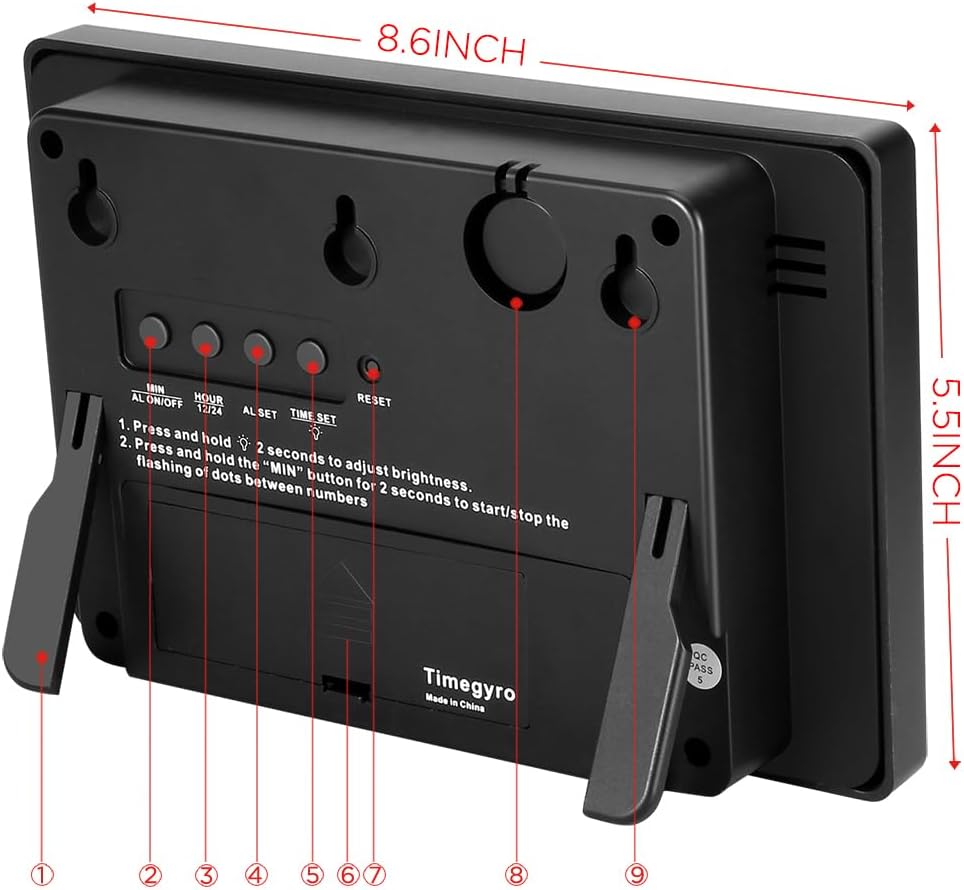
Image Description: This image displays the back of the Timegyro Digital Wall Clock, highlighting its dimensions (8.6 inches wide, 5.5 inches high) and the various control buttons. Key features visible include the battery compartment, a folding stand, and wall mounting holes. The buttons are labeled for MIN/AL ON/OFF, HOUR/12/24, AL SET, TIME SET, and RESET.
Control Buttons and Functions:
- MIN / AL ON/OFF: Adjusts minutes during time/alarm setting. Toggles alarm on/off.
- HOUR / 12/24: Adjusts hours during time/alarm setting. Toggles between 12-hour and 24-hour display modes.
- AL SET: Enters alarm setting mode. Confirms alarm settings.
- TIME SET: Enters time setting mode. Confirms time settings.
- RESET: Resets the clock to factory defaults.
- SNOOZE / AL STOP (Front Button): Activates snooze during an alarm. Stops the alarm.
Setup
Installing Batteries
- Open the battery compartment cover on the back of the clock.
- Insert two (2) D size batteries (not included), ensuring correct polarity (+ and -).
- Close the battery compartment cover securely.
The clock will power on automatically once batteries are installed.

Image Description: This image shows the front of the Timegyro Digital Wall Clock, featuring a large, clear LED display showing '15:28'. A 'SNOOZE AL STOP' button is visible on the left side of the frame.
Operating Instructions
Setting the Time
- Press and hold the TIME SET button for 2 seconds. The hour digits will begin to flash.
- Press the HOUR / 12/24 button to adjust the hour.
- Press the TIME SET button again. The minute digits will begin to flash.
- Press the MIN / AL ON/OFF button to adjust the minutes.
- Press the TIME SET button one more time to confirm and exit time setting mode. The settings will auto-save after 15 seconds of inactivity.
Setting the Alarm
- Press the AL SET button. An alarm icon will appear on the display, and the hour digits will flash.
- Press the HOUR / 12/24 button to adjust the alarm hour.
- Press the AL SET button again. The minute digits will flash.
- Press the MIN / AL ON/OFF button to adjust the alarm minutes.
- Press the AL SET button one more time to confirm and exit alarm setting mode. The alarm and snooze function will activate automatically upon saving.
Turning Alarm On/Off
- To turn the alarm on or off, press the MIN / AL ON/OFF button when not in setting mode. An alarm icon will indicate if the alarm is active.
Snooze Function
- When the alarm sounds, press the large SNOOZE / AL STOP button on the front of the clock to activate snooze. The alarm will sound again after a short interval.
- To stop the alarm completely, press any other button on the back of the clock, or press and hold the SNOOZE / AL STOP button.
Adjusting Brightness
The clock offers three brightness settings: Low, Medium, and High. It also features an automatic night mode.
- Press and hold the HOUR / 12/24 button for 2 seconds to cycle through the brightness levels (Low, Medium, High).
- The clock automatically enters night mode from 8:00 p.m. to 6:00 a.m., dimming to low brightness to conserve battery life. This overrides manual settings during these hours.

Image Description: This image illustrates the clock's brightness adjustment feature, showing how the display appears during the day and at night. It also depicts three distinct brightness levels, from dim to bright, demonstrating the clock's adaptability to different lighting conditions.
12/24 Hour Mode
- To switch between 12-hour (Standard) and 24-hour (Military) time display, press the HOUR / 12/24 button when not in setting mode. In 12-hour mode, 'PM' will be displayed for afternoon hours.
Mounting Options
Your Timegyro Digital Wall Clock can be placed on a tabletop or mounted on a wall.
Wall Mounting
- Locate the hanging holes on the back of the clock.
- Using appropriate hardware (screws, wall anchors - not included), secure the clock to the wall. Ensure the clock is level and securely fastened.
Tabletop Placement
- Extend the folding stand located on the back of the clock.
- Place the clock on a flat, stable surface such as a desk or table.

Image Description: This image illustrates the two primary mounting options for the clock. The top section shows a close-up of the back of the clock, highlighting the 'Wall hole' for hanging. The bottom section shows the clock both wall-mounted in a kitchen setting and placed on a desk using its 'Base' (folding stand).
Maintenance
- Cleaning: Wipe the clock's surface with a soft, dry, lint-free cloth. Do not use liquid cleaners or sprays directly on the clock.
- Battery Replacement: When the display dims significantly or the clock stops functioning, replace both D size batteries. Ensure to replace both batteries at the same time and dispose of old batteries responsibly.
Troubleshooting
| Problem | Possible Cause | Solution |
|---|---|---|
| Clock display is blank or dim. | Batteries are low or incorrectly installed. | Replace batteries with new D size batteries, ensuring correct polarity. |
| Time is incorrect. | Time was not set correctly or has drifted. | Re-set the time using the TIME SET button. |
| Alarm does not sound. | Alarm is not activated or set incorrectly. | Ensure the alarm is turned on (alarm icon visible) and the alarm time is set correctly. |
| Display is too bright/dim. | Brightness setting is not preferred. | Adjust brightness by pressing and holding the HOUR / 12/24 button for 2 seconds. Note automatic dimming from 8 PM to 6 AM. |
| Clock is unresponsive. | Temporary electronic glitch. | Remove batteries for a few minutes, then reinsert. If issue persists, press the RESET button. |
Specifications
- Brand: Timegyro
- Model: B0DDPZDBYP
- Display Type: Digital LED
- Power Source: 2 x D size batteries (not included)
- Brightness Settings: Low, Medium, High (with automatic night dimming)
- Time Modes: 12-Hour (AM/PM) / 24-Hour
- Alarm: Yes, with Snooze function
- Mounting Options: Wall Mount, Tabletop (with folding stand)
- Product Dimensions: Approximately 8.6" W x 5.5" H x 1.57" D
- Material: Plastic
Warranty and Support
Timegyro products are designed for reliability and performance. For warranty information or technical support, please refer to the contact details provided with your purchase documentation or visit the official Timegyro website. Please retain your proof of purchase for warranty claims.