1. Introduction and Overview
The FriendlyElec NanoPi M6 is an open-source mini router and smart gateway device designed for various applications including IoT development, NAS network storage, smart home gateways, and cloud servers. It is built around the powerful Rockchip RK3588S System-on-Chip (SoC), offering high performance and extensive connectivity options.
This device supports advanced multimedia capabilities, including 8K video decoding and encoding, making it suitable for high-definition media applications. Its compact design and rich hardware resources provide flexibility for both enthusiasts and developers.
2. Package Contents
Verify that all items listed below are included in your package:
- 1x FriendlyElec NanoPi M6 Computer Mini Router (4GB Metal Case)
- 1x 20W PD Power Supply
- 1x 3.5 inch HD LCD Screen (if applicable to your specific model variant)
3. Product Features
The NanoPi M6 is equipped with advanced hardware components to deliver robust performance:
- SoC: Rockchip RK3588S, featuring a quad-core ARM Cortex-A76 (up to 2.4GHz) and quad-core Cortex-A55 CPU (up to 1.8GHz).
- GPU: Mali-G610 MP4, supporting OpenGLES 1.1, 2.0, 3.2, OpenCL up to 2.2, and Vulkan 1.2.
- VPU: 8K 60fps H.265/VP9 decoder, 8K 30fps H.264 decoder, 4K 60fps AV1 decoder, and 8K 30fps H.264/H.265 encoder.
- NPU: 6TOPs, with support for INT4/INT8/INT16/FP16.
- RAM: 64-bit LPDDR5 at 2400MHz (available in 4GB, 16GB, 32GB configurations).
- Storage: eMMC module socket (HS400 mode) and microSD slot (SDR104 mode) for boot and storage.
- Networking: 1x Native Gigabit Ethernet port.
- USB: 1x USB 3.0 Type-A and 2x USB 2.0 Type-A ports.
- M.2 Connectors: 1x M.2 M-Key (PCIe 2.1 x1 for SSDs) and 1x M.2 E-Key (PCIe 2.1 x1 and USB2.0 Host for Wi-Fi & BT modules).
- Video Output: 1x Standard HDMI output (compatible with HDMI2.1, HDMI2.0, HDMI1.4, up to 7680x4320 60Hz), 2x 4-lane MIPI-DSI.
- Audio: 1x 3.5mm jack for stereo headphone output, 1x 2.0mm PH-2A connector for analog microphone input.
- GPIO: 30-pin 2.54mm header for SPI, UARTs, I2Cs, SPDIFs, PWMs, and GPIOs.
- Buttons: MASK, Reset, Recovery, Power.
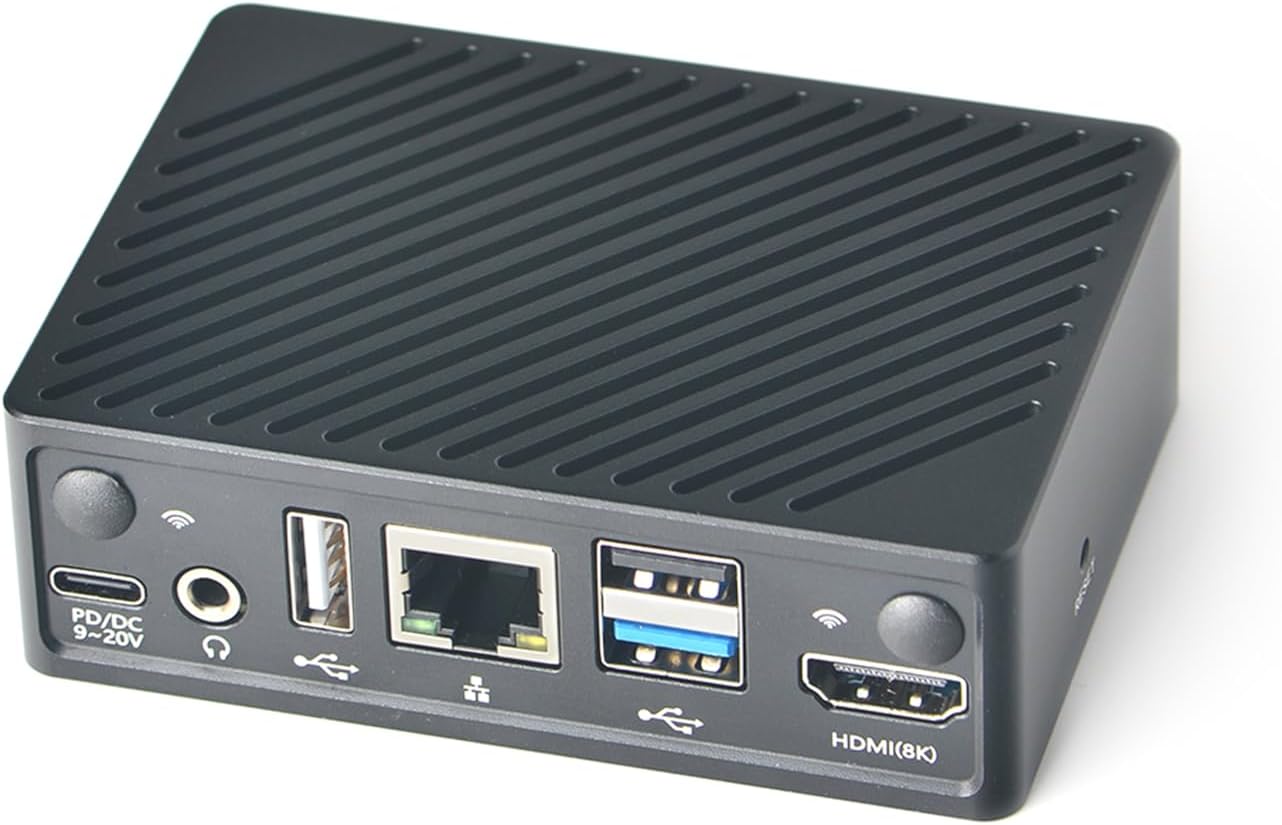
Figure 3.1: Front view of the NanoPi M6, showing USB, Ethernet, HDMI, and power ports.

Figure 3.2: Rear view of the NanoPi M6, highlighting the power button and system indicator LEDs.

Figure 3.3: Detailed diagram of the Rockchip RK3588S SoC, showcasing its quad-core CPU, GPU, and hardware acceleration capabilities.

Figure 3.4: Internal view of the NanoPi M6 board, indicating the locations of the eMMC socket, M.2 E-Key, and M.2 M-Key connectors.
4. Setup
The NanoPi M6 offers multiple options for operating system installation:
4.1 Option 1: Installing an OS With a Cable
This method is generally preferred by developers. It requires a USB Type-A to male cable and a personal computer.
- Connect the NanoPi M6 to your computer using a USB Type-A to male cable.
- Follow the specific instructions provided in the official FriendlyElec Wiki for flashing the OS image via USB.
4.2 Option 2: Installing an OS Via a Web Browser
This method is often preferred by regular users and requires a TF card and a web browser.
- Insert a prepared TF card with the necessary bootloader files into the NanoPi M6.
- Power on the device and access the web interface from a computer connected to the same network.
- Use the eMMC Tools within the web interface to upload and flash the OS image to the internal eMMC module.
4.3 Option 3: Installing an OS With a Card Only
This option is suitable for users who intend to install an OS directly onto a TF card for the NanoPi M6 boards. An LCD or HDMI display is optional for monitoring the installation progress.
- Prepare a TF card with the desired OS image using an image writing tool on a computer.
- Insert the prepared TF card into the NanoPi M6's microSD slot.
- Connect the power supply (PD/DC 6-20V) to the NanoPi M6. The device will boot from the TF card.

Figure 4.1: Visual representation of the three primary methods for installing an operating system on the NanoPi M6.
5. Operating Instructions
The NanoPi M6 supports a variety of operating systems, offering flexibility for different applications:
- FriendlyWrt: A custom system based on OpenWrt, ideal for router and network gateway applications.
- Android: Enables the device to function as a media center or smart display.
- Debian/Ubuntu: Provides a full desktop Linux experience for development and general computing tasks.
After installing your chosen operating system, connect the NanoPi M6 to a display via HDMI, and attach a keyboard and mouse to the USB ports for initial setup and interaction. For headless operation (without a display), you can access the device via SSH over the network.
5.1 Software Applications
The NanoPi M6 is compatible with various software tools and platforms, including Docker, which allows for easy deployment and management of containerized applications. This enables the creation of diverse solutions such as:
- WordPress for web hosting.
- Home Assistant for smart home automation.
- Jellyfin/Emby for media servers.
- Nextcloud for personal cloud storage.
- GitLab for code management.
- Minecraft Server for gaming.

Figure 5.1: Examples of the NanoPi M6 running Android TV 12, Debian Bullseye, and Ubuntu 22.04 LTS, demonstrating its versatility.

Figure 5.2: Overview of Docker support on the NanoPi M6, illustrating a range of compatible applications for various uses.
6. Specifications
Detailed technical specifications for the NanoPi M6 (4GB Metal Case) are provided below:
| Feature | Specification |
|---|---|
| Package Dimensions | 4.72 x 3.15 x 1.57 inches |
| Item Weight | 10.6 ounces |
| ASIN | B0DDPZ24K6 |
| Item Model Number | 4GB Metal Case |
| Date First Available | August 20, 2024 |
| Manufacturer | WayPonDEV |
| RAM Memory Installed Size | 4 GB |
| Total USB Ports | 3 |
| Resolution (Max) | 7680x4320 (8K) |
| Maximum Memory Speed | 2400 MHz |
| Operating System Support | FriendlyWrt, Android, Debian, Ubuntu |
| CPU Model | Cortex A76 / A55 (RK3588S) |
| CPU Speed | Up to 2.4 GHz |
| Graphics Coprocessor | Mali-G610 MP4 |
| Personal Computer Design Type | Mini PC |
| Model Name | NanoPi M6 OpenWRT Computer Mini Router |
7. Maintenance
To ensure the longevity and optimal performance of your NanoPi M6, consider the following maintenance guidelines:
- Keep Clean: Regularly clean the device to prevent dust accumulation, especially around ventilation areas. Use a soft, dry cloth.
- Proper Ventilation: Ensure the device is placed in a well-ventilated area to prevent overheating. Avoid blocking any vents.
- Power Supply: Always use the provided 20W PD Power Supply or a compatible power source that meets the specified voltage and current requirements (PD/DC 6-20V).
- Software Updates: Keep your operating system and installed software up to date to benefit from the latest features, security patches, and performance improvements.
- Handle with Care: Avoid dropping the device or exposing it to excessive shock, vibration, or extreme temperatures.
8. Troubleshooting
If you encounter issues with your NanoPi M6, consider these basic troubleshooting steps:
- No Power: Ensure the power supply is correctly connected and functioning. Try a different power outlet.
- No Display Output: Verify that the HDMI cable is securely connected to both the NanoPi M6 and the display. Check the display's input source.
- Network Connectivity Issues: Check Ethernet cable connections. If using Wi-Fi (with an M.2 module), ensure the module is correctly installed and drivers are loaded.
- OS Not Booting: Confirm that the OS image is correctly flashed to the eMMC or TF card. Ensure the boot order is correctly configured if booting from TF card.
- Peripheral Not Detected: Ensure USB devices are properly connected. Try different USB ports.
- System Unresponsive: Press the Reset button to restart the device. If the issue persists, perform a power cycle (disconnect and reconnect power).
For more detailed troubleshooting or specific technical support, refer to the official FriendlyElec Wiki or community forums.
9. Warranty and Support
The NanoPi M6 is manufactured by WayPonDEV. For product support, documentation, and community resources, please refer to the official FriendlyElec Wiki and forums.
- Official Wiki: wiki.friendlyelec.com/wiki/index.php/NanoPi_M6#Get_Started
- Community Forum: forum.youyeetoo.com/
For any after-sales inquiries or specific issues not covered in this manual or the wiki, please contact WayPonDEV directly through their seller page on Amazon or other relevant support channels.


