
1. Introduction
This manual provides detailed instructions for the installation, operation, and maintenance of your Vorally Wireless Android 13 Car Stereo. This advanced car multimedia system features a 9-inch HD touch screen, GPS navigation, wireless CarPlay/Android Auto compatibility, Bluetooth, and Wi-Fi connectivity. Please read this manual thoroughly before use to ensure proper functionality and safety.
2. Package Contents
Verify that all items listed below are included in your package. If any items are missing or damaged, please contact customer support.
- 1 x Car Stereo Radio (Main Unit)
- 1 x Power Cord
- 1 x GPS Antenna
- 1 x Rear Camera Input Cable
- 1 x RCA Cable
- 2 x USB Cables
- 1 x AHD Camera
- 1 x Microphone
- 1 x Instruction Manual

Image: Contents of the Vorally Car Stereo package, including the main unit, various cables, GPS antenna, AHD camera, and microphone.
3. Specifications
Key technical specifications of the Vorally Wireless Android 13 Car Stereo:
| System | Android 13 |
| Chipset | 8227L demo |
| Screen Size | 9 inches |
| Memory (RAM+ROM) | 2 GB + 32 GB |
| Screen Resolution | 1280x720 |
| Radio Microprocessor | MT6625 |
| Output Power | 4x45W |
| Working Temperature | -20 ℃ to 75 ℃ |
| Chip Power Amplifier | TDA7388 |
| Broadcasting Band | Frequency / RDS |
| Video Output | Supported |
| Reverse Input | AHD/CVBS |
| External Microphone | Supported |
| Screen Segmentation | Supported |
| Maps | Built-in offline maps (requires internet to download data) |
| WiFi | Supported |
| Audio Formats | APE/FLAC/WAV/MP3/WMA, etc. |
| Video Formats | MKV/RMVB/AVI/MP4/MDV, etc. |
| Image Formats | PNG/JPEG/JPG/GIF/WBMP/BNP, etc. |
| Factory Setting Keyword | 8888 |
| Supported Languages | Chinese, English, French, Italian, Korean, Japanese, Arabic, Spanish, Portuguese, Russian, Turkish, Vietnamese, Hebrew, Polish, German |
| Compatible Vehicle Fitment | CRV 2007-2011 |
4. Setup and Installation
Proper installation is crucial for the performance and safety of your car stereo. It is recommended that installation be performed by a qualified professional.
4.1 Compatibility Check
Before installation, confirm that this unit is compatible with your vehicle's make, model, and year. Refer to the compatibility table and check your vehicle's existing wiring connectors.

Image: Important note regarding checking vehicle compatibility and existing wiring connectors before installation.
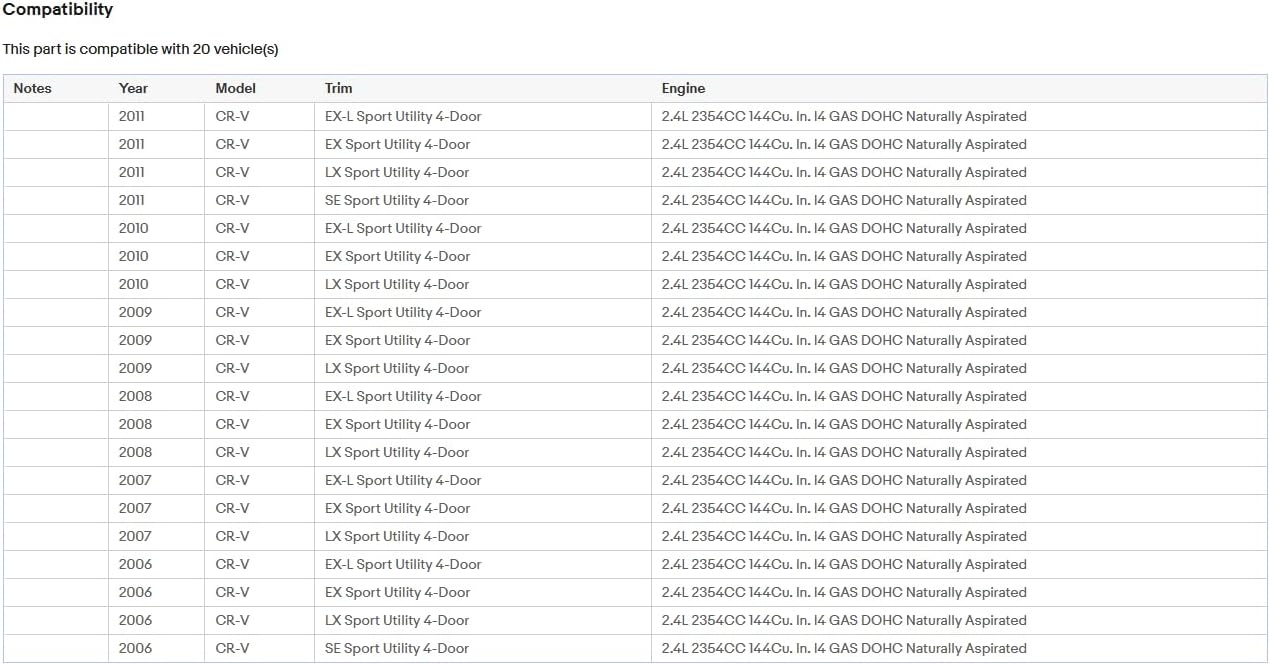
Image: A table detailing vehicle compatibility, specifically for CRV models from 2007 to 2011, including trim and engine types.
4.2 Wiring Diagram
Connect the provided cables to the corresponding ports on the car stereo and your vehicle's wiring harness. Ensure all connections are secure to prevent malfunctions.

Image: Rear view of the car stereo unit showing various input/output ports and the connected wiring harness for power, audio, video, and accessories.
4.3 Component Installation
- Main Unit: Carefully insert the car stereo into the dashboard opening until it clicks into place or can be secured with mounting brackets.
- GPS Antenna: Mount the GPS antenna in a location with a clear view of the sky, typically on the dashboard or under the windshield, ensuring it is not obstructed by metal.
- Rear Camera: Install the AHD camera at the rear of the vehicle, ensuring a clear view for reversing. Route the camera cable to the main unit.
- Microphone: Position the external microphone in a suitable location, such as near the rearview mirror or on the steering column, for optimal voice pickup during calls.
- USB Cables: Route the USB cables to an accessible location, such as the glove compartment or center console, for connecting USB devices.
5. Operating Instructions
This section covers the basic operation of your Vorally car stereo.
5.1 Power On/Off and Basic Interface
Press the power button to turn the unit on or off. The 9-inch HD touch screen provides a clear and responsive interface for navigating through functions.
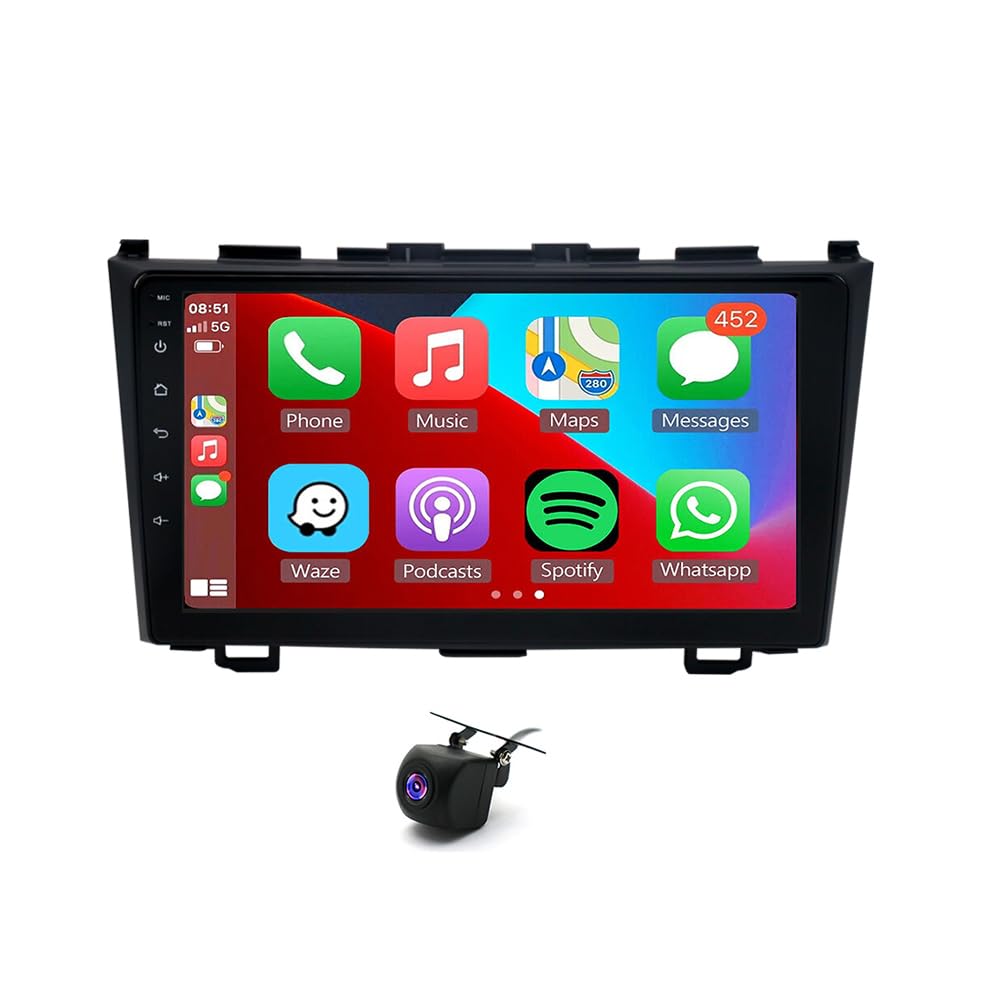
Image: The car stereo's main interface displaying various Android application icons, including phone, music, maps, and settings.
5.2 Wireless CarPlay / Android Auto
Connect your smartphone via wired or wireless connection to access CarPlay or Android Auto. This allows integration with phone contacts, messages, navigation, and voice control.
- For Wireless Connection: Enable Bluetooth and Wi-Fi on your smartphone. Pair your phone with the car stereo via Bluetooth. Follow the on-screen prompts to initiate CarPlay or Android Auto.
- For Wired Connection: Connect your smartphone to one of the USB ports using a data cable. The system should automatically detect and launch CarPlay or Android Auto.
5.3 GPS Navigation
The unit comes with built-in offline maps. For real-time traffic updates and the latest map data, connect the unit to Wi-Fi to download necessary information or use online navigation apps via CarPlay/Android Auto.
5.4 Bluetooth Functions
Pair your phone with the car stereo via Bluetooth for hands-free calling and audio streaming.
- Pairing: Go to the Bluetooth settings on the car stereo and your phone. Select the car stereo from your phone's available devices. Confirm the pairing code if prompted.
- Hands-Free Calls: Once paired, you can make and receive calls directly through the car stereo. The external microphone ensures clear audio transmission.
- Audio Streaming: Play music from your phone through the car stereo's speakers.
5.5 Wi-Fi Connectivity
Connect the car stereo to a Wi-Fi hotspot (e.g., from your smartphone or a dedicated car Wi-Fi device) to access online features, download apps, and update maps.
5.6 FM Radio
Access the FM radio function to listen to local broadcasts. The unit supports RDS (Radio Data System) for displaying station information.
- Scanning: Use the auto-scan feature to find and save available stations.
- Presets: The unit supports up to 18 preset stations for quick access.
6. Maintenance
To ensure the longevity and optimal performance of your car stereo, follow these maintenance guidelines:
- Screen Cleaning: Use a soft, lint-free cloth to gently wipe the touch screen. Avoid abrasive cleaners or harsh chemicals that could damage the screen.
- Software Updates: Periodically check for software updates through the system settings or the manufacturer's website to ensure you have the latest features and bug fixes.
- Environmental Conditions: Avoid exposing the unit to extreme temperatures, direct sunlight for prolonged periods, or excessive moisture.
- Cable Connections: Regularly check all cable connections to ensure they are secure and free from damage.
7. Troubleshooting
If you encounter any issues with your car stereo, refer to the following common problems and solutions:
| Problem | Possible Cause | Solution |
|---|---|---|
| Unit does not power on | Loose power connection, blown fuse, vehicle battery issue | Check power cable connections. Inspect vehicle fuses. Ensure vehicle battery is charged. |
| No sound | Volume too low, mute activated, speaker wiring issue | Increase volume. Check if mute is active. Verify speaker wire connections. |
| Touch screen unresponsive | Software glitch, screen calibration issue | Restart the unit. Perform a factory reset (refer to settings, keyword: 8888). |
| GPS signal lost or inaccurate | GPS antenna obstruction, poor satellite reception | Ensure GPS antenna has a clear view of the sky. Move vehicle to an open area. |
| Bluetooth pairing issues | Phone not discoverable, incorrect pairing process | Ensure phone's Bluetooth is on and discoverable. Restart both devices and try pairing again. |
If the problem persists after attempting these solutions, please contact customer support.
8. Warranty and Customer Support
Your Vorally car stereo is backed by a comprehensive warranty and dedicated customer support.
8.1 Warranty Information
- 30 Days: Exchange or Return policy.
- 365 Days: Product Warranty.

Image: Visual representation of the 30-day exchange/return policy and 365-day product warranty.
8.2 Customer Support
For any questions, technical assistance, or warranty claims, please contact our customer support team:
- Email: yutaidaloralus@outlook.com
- Seller: Vorally

Image: Steps to contact customer support, including identifying the seller and using the 'Ask a question' feature.