
1. Introduction
This manual provides detailed instructions for the installation, operation, maintenance, and troubleshooting of your Generic H61 Motherboard Combo. This combo includes an H61 Express motherboard, an Intel Core i3 3rd Gen processor (3240/3220), 4GB DDR3 RAM, and a high-performance CPU fan. It is designed for stability and reliability in both home and office environments.
2. Product Overview
The Generic H61 Motherboard Combo is a pre-assembled set of core computer components, offering a solid foundation for building or upgrading a personal computer. It supports Intel's 2nd and 3rd generation Core i3, i5, and i7 processors.
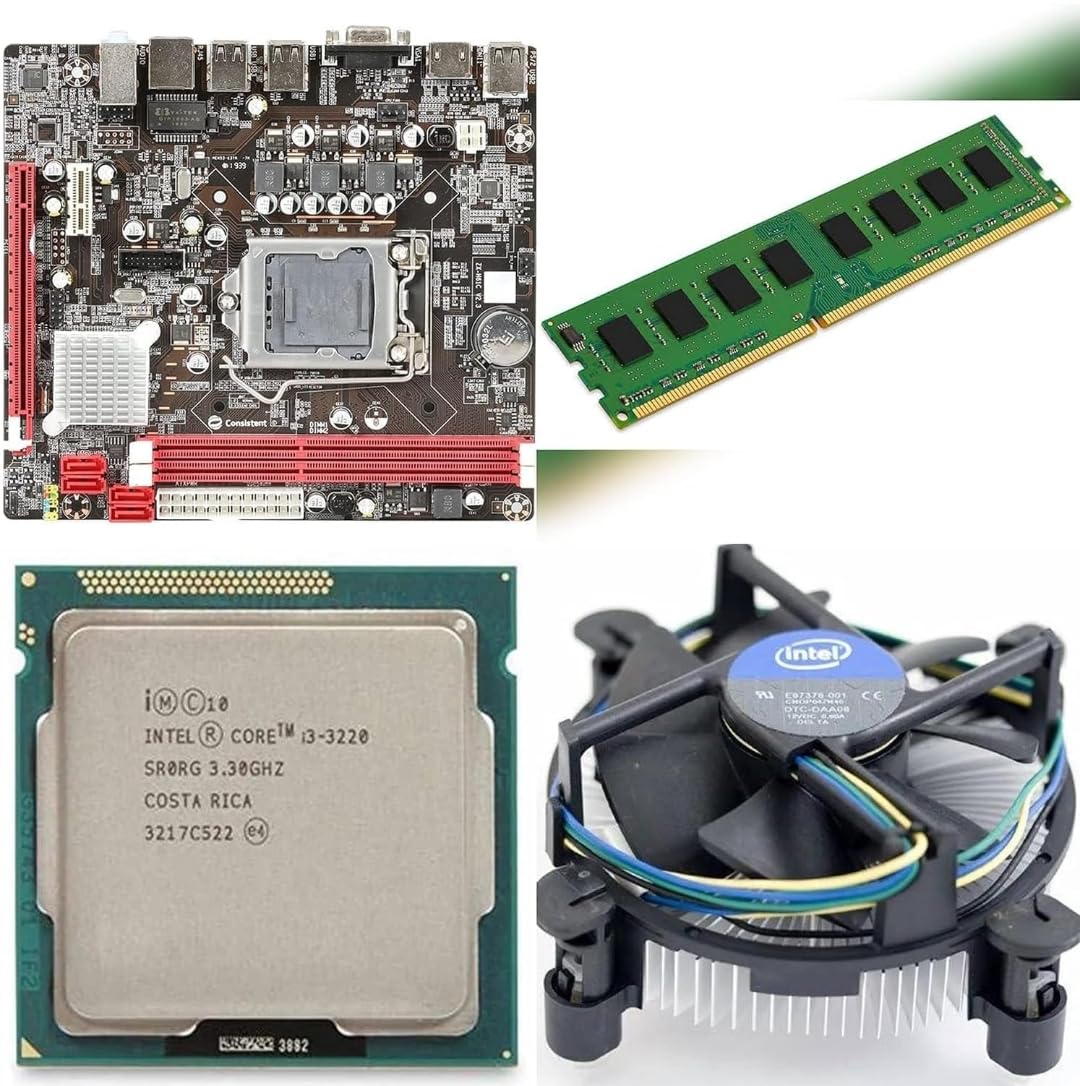
Image: Generic H61 Motherboard Combo, showcasing the motherboard, CPU, RAM, and CPU fan.
Key Features:
- Compatibility: Supports Intel 2nd and 3rd generation Core i3, i5, and i7 processors.
- Chipset: Intel H61 Express chipset.
- Memory: Supports DDR3 memory up to 16 GB, with a clock speed of 1600 MHz.
- Connectivity: Multiple ports including HDMI, VGA, USB 2.0, and LAN.
- Expansion: PCI Express x16 and PCI Express x1 slots for graphics cards or other components.
- Storage: Features NVMe M.2 chip support and SATA 2.
3. Setup Guide
Follow these steps to properly install and set up your motherboard combo into a computer chassis.
3.1. Preparation
- Ensure your power supply unit (PSU) is compatible and provides sufficient wattage.
- Gather necessary tools: screwdriver, thermal paste (if not pre-applied to CPU fan), anti-static wrist strap.
- Work on a clean, static-free surface.
3.2. Motherboard Installation
- Carefully place the motherboard into your PC case, aligning it with the standoffs.
- Secure the motherboard with screws, ensuring it is firmly seated but not overtightened.
3.3. CPU, RAM, and CPU Fan Installation (Pre-installed in combo)
The CPU (Intel Core i3 3rd Gen), RAM (4GB DDR3), and CPU fan are pre-installed on the motherboard as part of this combo. If you need to re-seat or replace these components, refer to the following general guidelines:
- CPU: Open the CPU socket lever, align the CPU with the triangular mark on the socket, gently place it in, and close the lever.
- RAM: Open the clips on the DDR3 memory slots, align the RAM module notch with the slot key, and press down firmly until the clips snap into place.
- CPU Fan: Apply a thin layer of thermal paste to the CPU (if not pre-applied). Align the fan's mounting pins with the motherboard holes and press down until secured. Connect the CPU fan cable to the 'CPU_FAN' header on the motherboard.
3.4. Connecting Power Supply
- Connect the 24-pin ATX power connector from your PSU to the main power socket on the motherboard.
- Connect the 4-pin or 8-pin CPU power connector (EPS12V) from your PSU to the corresponding socket near the CPU.
3.5. Storage and Peripherals
- NVMe M.2 SSD: If using an NVMe M.2 SSD, insert it into the M.2 slot and secure it with the provided screw.
- SATA Drives: Connect SATA data cables from your hard drives or SSDs to the SATA ports on the motherboard. Connect SATA power cables from your PSU to the drives.
- Front Panel Connectors: Connect the power button, reset button, USB ports, and audio jacks from your PC case to the corresponding headers on the motherboard. Refer to your PC case manual for specific pin layouts.
- Graphics Card (Optional): If installing a dedicated graphics card, insert it into the PCI Express x16 slot and secure it. Connect any required PCIe power cables from your PSU.
- External Peripherals: Connect your monitor to the HDMI or VGA port, and connect USB devices (keyboard, mouse) and LAN cable.
4. Initial System Boot and BIOS Configuration
After all components are connected, you can proceed with the initial boot.
- Power On: Connect the power cord to your PSU and turn on the power switch. Press the power button on your PC case.
- Access BIOS/UEFI: During startup, repeatedly press the designated key (usually DEL, F2, or F10) to enter the BIOS/UEFI setup utility.
- Basic Settings:
- Verify that the CPU, RAM, and storage devices are correctly detected.
- Set the correct date and time.
- Configure the boot order to prioritize your operating system installation media (USB drive or DVD).
- Save and Exit: Save your changes and exit the BIOS. The system will restart.
- Operating System Installation: Proceed with the installation of your preferred operating system.
- Driver Installation: After OS installation, install all necessary drivers for the motherboard chipset, audio, LAN, and any discrete graphics card. Drivers can typically be found on the manufacturer's website.
5. Maintenance
Regular maintenance ensures the longevity and optimal performance of your motherboard combo.
- Dust Removal: Periodically clean dust from the CPU fan, heatsinks, and other components using compressed air. Ensure the system is powered off and unplugged before cleaning.
- Airflow: Ensure your PC case has adequate airflow to prevent overheating. Keep vents clear of obstructions.
- BIOS Updates: Check the motherboard manufacturer's website for BIOS/UEFI updates. Updates can improve stability, compatibility, and performance. Follow update instructions carefully to avoid system damage.
- Cable Management: Organize internal cables to improve airflow and prevent interference.
6. Troubleshooting
If you encounter issues, refer to the following common troubleshooting steps.
6.1. No Power
- Check if the power cord is securely connected to the PSU and the wall outlet.
- Ensure the PSU switch is in the 'ON' position.
- Verify that the 24-pin and CPU power connectors are firmly seated on the motherboard.
- Confirm that the front panel power button cable is correctly connected to the motherboard.
6.2. No Display
- Ensure the monitor is powered on and the video cable (HDMI/VGA) is securely connected to the motherboard's output and the monitor's input.
- If using a discrete graphics card, connect the monitor to the graphics card's output, not the motherboard's.
- Reseat the RAM modules. Try booting with only one RAM module installed.
- Clear the CMOS (Complementary Metal-Oxide-Semiconductor) by removing the motherboard battery for 30 seconds or using the CMOS clear jumper.
6.3. System Instability / Random Restarts
- Check CPU and system temperatures. Overheating can cause instability.
- Run a memory diagnostic tool to check for faulty RAM.
- Ensure all drivers are up to date.
- Verify PSU wattage is sufficient for all components.
7. Specifications
Detailed technical specifications for the Generic H61 Motherboard Combo.
| Feature | Specification |
|---|---|
| Brand | Generic |
| CPU Socket | LGA 1155 |
| Compatible Devices | Personal Computer |
| RAM Memory Technology | DDR3 |
| Chipset Type | Intel H61 Express |
| Processor Socket | LGA 1155 |
| Memory Clock Speed | 1600 MHz |
| CPU Model (Included) | Core i3 3rd Gen (3240/3220) |
| Drive Memory Storage Capacity (Max) | 16 GB |
| RAM Memory Maximum Size | 16 GB |
| Main Power Connector Type | 24-Pin |
| Graphics Card Interface | PCI-Express x16 |
| Memory Slots Available | 2 |
| System Bus Standard Supported | SATA 2 |
| Item Dimensions L x W x H | 38L x 12W x 38H Centimeters |
| Item Weight | 900 Grams |
8. Warranty and Support
This Generic H61 Motherboard Combo comes with a 2-year brand warranty. For warranty claims or technical support, please contact your retailer or the brand's customer service channel. Ensure you retain your proof of purchase for warranty validation.


