
HQST HCC100HTR-FC
HQST 100A MPPT Solar Charge Controller
User Manual
1. Introduction
Thank you for choosing the HQST 100A MPPT Solar Charge Controller. This device is designed to efficiently manage power flow from your solar panels to your battery bank, ensuring optimal charging and system protection. It features advanced Maximum Power Point Tracking (MPPT) technology for high efficiency, Bluetooth connectivity for smart monitoring, and comprehensive safety protections.

Image: The HQST 100A MPPT Solar Charge Controller, showcasing its LCD display, connection ports, and included accessories like the temperature sensor and a smartphone displaying the monitoring app.
2. Safety Information
Please read all instructions and warnings carefully before installation and operation. Failure to follow these instructions may result in electric shock, severe injury, or death, and may damage the controller or other equipment.
- Ensure all wiring is correctly polarized and securely connected.
- Always disconnect the solar panel and battery power before installing or moving the controller.
- This controller is designed for negative grounding systems. Ensure proper grounding to prevent damage.
- Do not disassemble or attempt to repair the controller. Contact qualified personnel for service.
- Install the controller in a well-ventilated area, away from flammable materials and moisture.
3. Product Features
- Bluetooth APP Control & LCD Display: Monitor real-time data and modify parameters via the "ChargePro 2.0" or "PVChargePro" app. The integrated LCD screen provides direct access to operating data.
- Low-Temp Cut-Off Protection for LiFePO4: Features automatic low-temperature charging (below 32°F) and discharging (below 5°F) cut-off for LiFePO4 batteries, preventing damage. This function can be manually toggled.
- Improved High-Efficiency Charging: Advanced MPPT technology ensures up to 99% tracking efficiency and 98.7% peak conversion efficiency, maximizing energy harvest from solar panels.
- Wide Compatibility: Supports 12V, 24V, 36V, and 48V battery systems and is compatible with LiFePO4, sealed, AGM, GEL, flooded, and user-customized battery types.
- Parallel Charge Extension Function: Up to 9 MPPT controllers (M4880F/M48100F models) can be connected in parallel to charge the same battery bank, increasing charging current.
- Active Cooling Fan System: Two built-in fans automatically activate when the controller operates at high power or exceeds 113°F (45°C), ensuring consistent performance and longevity.
- Comprehensive Safety Protection: Offers 10 protections including overcharging, over-voltage, over-current, overheating, and reverse polarity, safeguarding your system.

Image: Visual representation of the comprehensive safety protections, including PV over-voltage, PV reverse, PV over-current, Battery over-voltage, Battery over-current, Battery over-charge, Battery reverse, Overheating, High ambient temp, and Low temp cut-off for Li batteries.

Image: Detail of the active cooling fan system, highlighting the two built-in fans that activate automatically. Also shows negative grounding, installation holes, and the easy-to-read LCD display.
4. Package Contents
Upon opening your package, please verify that all the following items are included:
- 100A MPPT Solar Charge Controller (x1)
- User Manual (x1)
- Temperature Sensor Cables (6.6 ft) (x1)
- Mounting Sticker (for Temp Sensor) (x1)

Image: A visual representation of the items included in the product package: the 100A MPPT Solar Charge Controller, user manual, temperature sensor cables, and a mounting sticker for the temperature sensor.
5. Installation and Setup
5.1 Wiring Connections
Ensure all connections are made in the correct order to prevent damage to the controller or batteries. This controller is a negative grounding type.
- Connect the battery to the controller's battery terminals. Ensure correct polarity.
- Connect the solar panels to the controller's PV terminals. Ensure correct polarity.
- Connect the external temperature sensor to the designated port.

Image: A detailed view of the controller's connection points, including terminals for solar panels, batteries, RS485 communication, parallel wiring, and the external temperature sensor port.
5.2 Parallel Connection (Optional)
For increased charging current to a single battery bank, multiple HQST MPPT controllers (M4880F/M48100F models) can be connected in parallel using parallel charge cables (sold separately). Ensure all controllers are set to the same battery voltage.
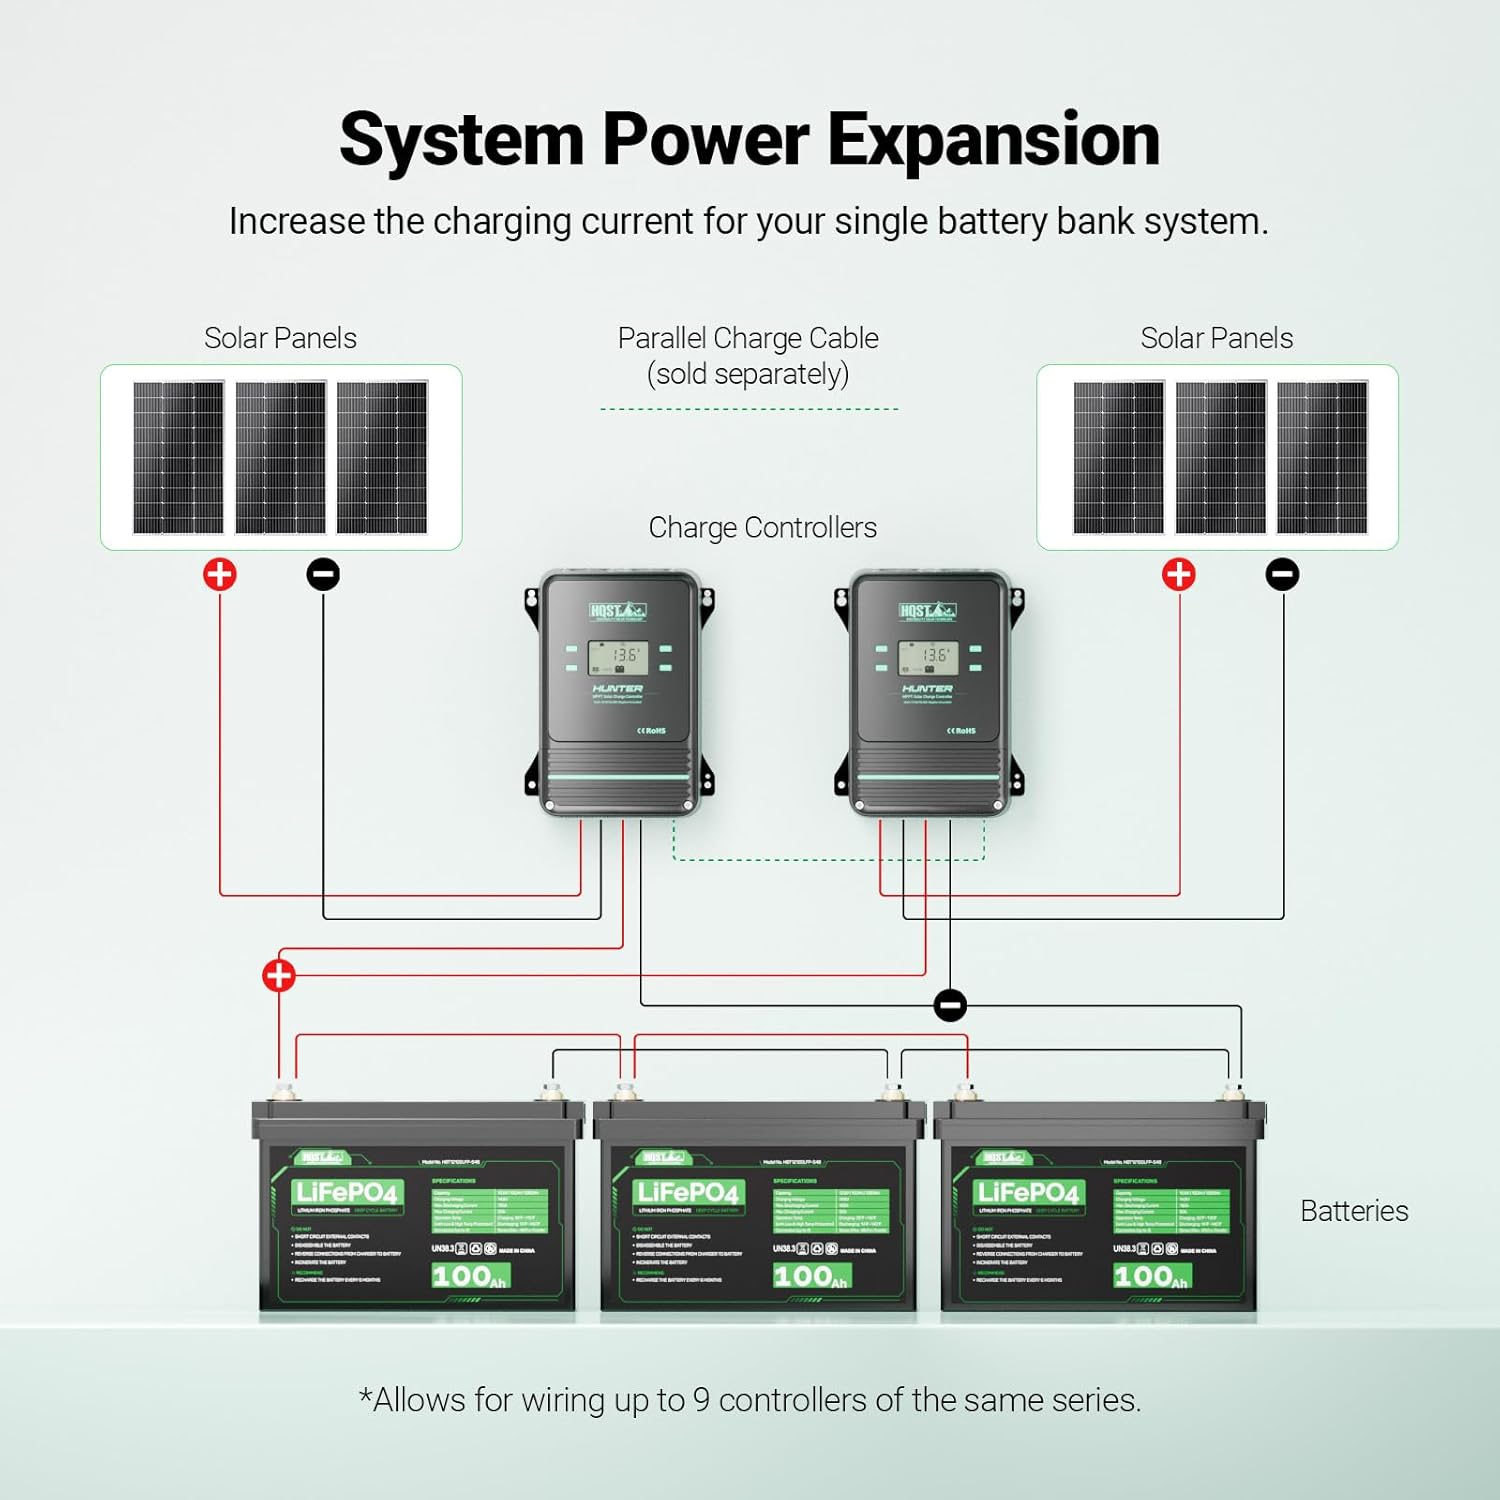
Image: A schematic showing how solar panels, multiple charge controllers, and batteries are wired together for system power expansion using parallel connections.
5.3 Battery Type Setting
The controller supports various battery types. For LiFePO4 batteries, the type must be set manually. Refer to the 'Operation' section or the mobile app for detailed instructions on setting battery parameters.

Image: An illustration demonstrating the controller's compatibility with various battery bank voltages (12V, 24V, 36V, 48V) and battery chemistries (LiFePO4, Sealed, AGM, GEL, Flooded, and User Custom).
6. Operation
6.1 LCD Display Navigation
The LCD display provides real-time information about your solar charging system. Use the UP and DOWN buttons to navigate through different display screens.

Image: A sequence of LCD screens illustrating the various data points that can be viewed, including PV voltage, battery voltage, battery capacity percentage, charging amperage, accumulated energy (kWh), controller temperature, and error codes.
6.2 Activating Dormant LiFePO4 Batteries
This controller can activate dormant LiFePO4 batteries that have turned off due to over-discharging. This function is applicable only during daytime when the PV system is active.

Image: An illustration demonstrating the controller's ability to revitalize fully discharged LiFePO4 batteries by adjusting charge current and voltage, provided the PV system is active.
7. Bluetooth App Control
The HQST 100A MPPT Solar Charge Controller features a built-in Bluetooth module for convenient monitoring and control via a smartphone app.
7.1 App Download
Download the "ChargePro 2.0" (new version) or "PVChargePro" (old version) app from your device's app store.

Image: Instructions for downloading the app, including a visual of searching for "ChargePro 2.0" and QR codes for direct download from the Apple App Store and Google Play Store.
7.2 Pairing with Your Phone
The Bluetooth connection is effective within a 10m/33ft range in an unobstructed area.
- For Android: (1) Allow location access first, (2) tap the Bluetooth icon in the app, (3) select M48100F to pair.
- For iOS: (1) Tap the Bluetooth icon in the app, (2) select M48100F to pair.

Image: A smartphone screen displaying the successful Bluetooth pairing with the controller, showing "M48100F" as connected.
7.3 App Functionality
The app allows for real-time monitoring, viewing historical data, and configuring battery settings.

Image: Three distinct app screens demonstrating real-time monitoring of solar input and battery status, a graph of historical charging data over 300 days, and the interface for configuring battery parameters.
8. Maintenance
Regular maintenance ensures the longevity and optimal performance of your HQST Solar Charge Controller.
- Periodically inspect all wiring connections for tightness and corrosion.
- Clean the controller's exterior with a dry cloth. Ensure ventilation openings are free from dust and debris.
- Check the battery terminals for any signs of corrosion and clean if necessary.
- Monitor the LCD display and app for any error codes or unusual readings.
9. Troubleshooting
If you encounter issues with your HQST Solar Charge Controller, refer to the following common troubleshooting steps. For persistent problems, contact HQST customer support.
- No Display/Power: Check battery connections and voltage. Ensure the battery is connected first before solar panels.
- No Charging: Verify solar panel connections and ensure sufficient sunlight. Check for error codes on the LCD display.
- Battery Not Fully Charged: Confirm battery type settings in the controller or app match your battery. Check for proper voltage settings.
- Bluetooth Connection Issues: Ensure your phone is within the 10m/33ft range. Restart the app and controller. For Android, ensure location services are enabled for the app.
- Overheating: Ensure the controller is installed in a well-ventilated area. Check if the cooling fans are operating.
10. Specifications
| Parameter | Value |
|---|---|
| Input Voltage | PV 150V Max. |
| Battery System Voltage | 12V/24V/36V/48V, Auto (FLD/GEL/SEL/USE), Manual (LI/USE) |
| Max Solar Input Voltage | <150 VDC |
| Rated Solar Charge Current | 100A |
| Max Solar Input Power | 1500W/12V; 3000W/24V; 4500W/36V; 6000W/48V |
| Operating Temperature | -13°F~113°F / -25°C~+45°C |
| Fan-on Temperature | >113°F / 45°C |
| Wiring Cable (Recommended) | 2 AWG |
| Product Net Weight | 5.7 lbs (2.6 kg) |
| Package Dimensions | 12.33 x 10.24 x 5.48 inches |
| Item Weight | 6.56 pounds |
| Model Number | HCC100HTR-FC |
| UPC | 840315223820 |
| Color | Black |
| Display Type | LCD |
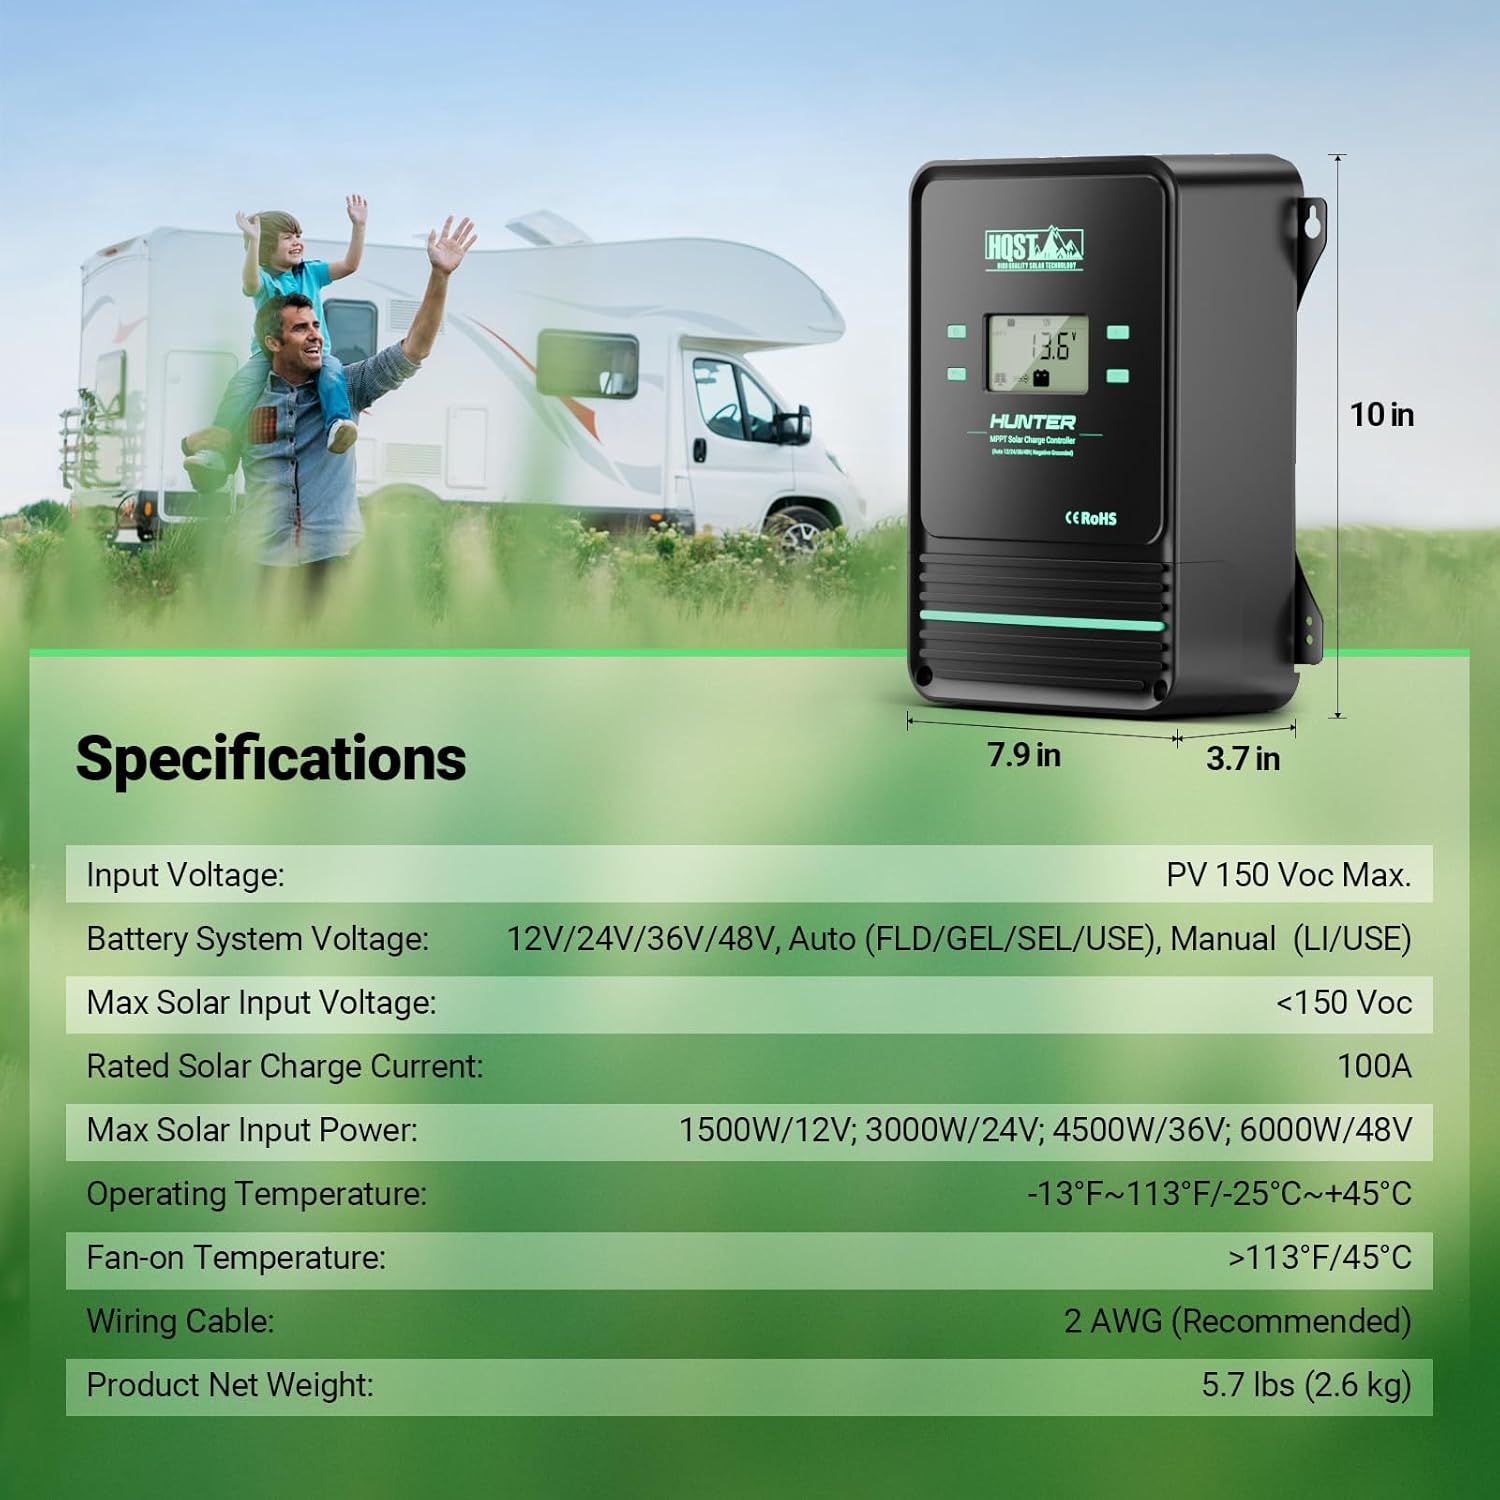
Image: A visual summary of the product's dimensions and technical specifications, including input voltage, battery system voltage, max solar input power, and operating temperature.
11. Warranty and Support
HQST provides a warranty for its products. For detailed warranty information, product support, or technical assistance, please visit the official HQST website or contact their customer service directly. Keep your purchase receipt for warranty claims.
Ask a question about this manual
Ask about setup, troubleshooting, compatibility, parts, safety, or missing instructions. Manuals+ will review the question and use this page’s manual context to help answer it.