Introduction
This user manual provides comprehensive instructions for the installation, operation, and maintenance of your AnyTone CB Radio AT-505PRO. This compact and durable CB radio offers full 40-channel operation with AM/FM/PA system capabilities, designed for reliable communication in various mobile environments. Please read this manual thoroughly before operating the device to ensure proper usage and optimal performance.
What's in the Box
Verify that all items listed below are present in your package:
- CB Radio Unit
- Microphone
- Microphone Hanger
- Mobile Mounting Bracket
- Spare Fuses (3A 250V)
- Non-slip Mat
- Adjusting Screws
- User's Manual (this document)

Figure 1: Package Contents of the AT-505PRO CB Radio.
Product Features
- Compact & Affordable: Ideal for users seeking an affordable CB Radio with Public Address (PA) and Instant Channel 9 Emergency Button.
- Durable & Easy to Use: Advanced microelectronics in a modern, compact design.
- 40-Channel Operation: Full 40-channel capability for comprehensive communication.
- Backlit LCD Display: Optimized for day or night viewing, showing current channel, volume, and other features.
- Dynamic Squelch Control (ASQ): For crisp, clear sound by suppressing weak radio signals.
- AM/FM/PA System: Versatile communication modes.
- Channel Up/Down Buttons: Easy channel navigation.
Setup
1. Mounting the Radio
Use the provided mobile mounting bracket and screws to securely install the CB radio in your vehicle. Ensure the mounting location allows for proper ventilation and easy access to controls.
2. Connecting the Antenna
Connect a suitable CB antenna (not included) to the Antenna Jack located on the rear of the radio. Ensure the connection is secure to prevent signal loss.
3. Connecting the Microphone
Plug the microphone cable into the Microphone Plug on the front panel of the radio. Secure the microphone using the provided hanger.
4. Power Connection
Connect the radio's power cable to a 12-volt DC power source in your vehicle. Ensure correct polarity (red to positive, black to negative) to avoid damage. The radio operates on 12 Volts.

Figure 2: Front and Rear Panel Layout with Controls and Connections.
Operating Instructions
1. Power On/Off and Volume Control
Turn the VOL knob clockwise to power on the radio and adjust the listening volume. Turn counter-clockwise to power off.
2. Squelch Control (SQL / ASQ)
The SQL knob controls the squelch level. Turn it clockwise until the background noise disappears. This suppresses weak signals and static. The ASQ (Automatic Squelch) function provides dynamic squelch control for optimal sound clarity.
3. Channel Selection
Use the Channel Up (▲) and Channel Down (▼) buttons on the front panel to select desired channels (1-40). The selected channel will be displayed on the backlit LCD.
4. AM/FM/PA Mode Selection
Use the 3 Position Switch (AM, PA, FM) on the front panel to select the desired operating mode:
- AM: Amplitude Modulation for standard CB communication.
- FM: Frequency Modulation for clearer audio in certain conditions (if supported by local regulations).
- PA: Public Address mode. Connect an external PA speaker (not included) to the PA Optional Speaker Jack on the rear of the radio. Your voice from the microphone will be amplified through the external speaker.
5. Emergency Channel (EMG)
Press the EMG/MENU button to quickly switch to Channel 9, the emergency channel. Press again to return to the previous channel.
6. VOX Function
The VOX (Voice Operated Transmit) function allows hands-free transmission. To activate/deactivate VOX, press and hold the Channel Down (▼) button. Adjust VOX sensitivity via the menu (refer to advanced settings if available).
7. Transmitting
To transmit, press and hold the PTT (Push-To-Talk) button on the microphone. Speak clearly into the microphone. Release the PTT button to receive.

Figure 3: AnyTone AT-505PRO CB Radio in operation.
Maintenance
- Cleaning: Use a soft, damp cloth to clean the exterior of the radio. Do not use harsh chemicals or abrasive cleaners.
- Connections: Periodically check all cable connections (power, antenna, microphone) to ensure they are secure and free from corrosion.
- Fuse Replacement: If the radio does not power on, check the inline fuse on the power cable. Replace it with a fuse of the same rating (3A 250V) if blown.
- Storage: When not in use for extended periods, store the radio in a cool, dry place away from direct sunlight and extreme temperatures.
Troubleshooting
| Problem | Possible Cause | Solution |
|---|---|---|
| No Power | Loose power connection, blown fuse, incorrect polarity. | Check power cable connections. Replace fuse if blown. Verify correct polarity. |
| No Reception / Poor Reception | Antenna not connected, squelch set too high, antenna issue. | Ensure antenna is securely connected. Adjust SQL knob counter-clockwise. Check antenna for damage or proper tuning. |
| No Transmission | Microphone not connected, PTT button not pressed, faulty microphone. | Ensure microphone is securely plugged in. Press PTT button firmly. Test with another microphone if available. |
| Excessive Static/Noise | Squelch set too low, electrical interference, weak signal. | Adjust SQL knob clockwise. Check for nearby electrical noise sources. Move to an area with stronger signal. |
Specifications
| Feature | Detail |
|---|---|
| Model Number | AT-505PRO |
| Brand | AnyTone |
| Number of Channels | 40 |
| Frequency Range | 26.965 MHz to 27.405 MHz |
| Tuner Technology | AM |
| Voltage | 12 Volts |
| Item Weight | 1.37 pounds (approx. 0.62 kg) |
| Product Dimensions | 7.56 x 4.93 x 1.78 inches (approx. 19.2 x 12.5 x 4.5 cm) |
| Talking Range Maximum | 20 Mile (approx. 32 km) |
| Water Resistance Level | Not Water Resistant |
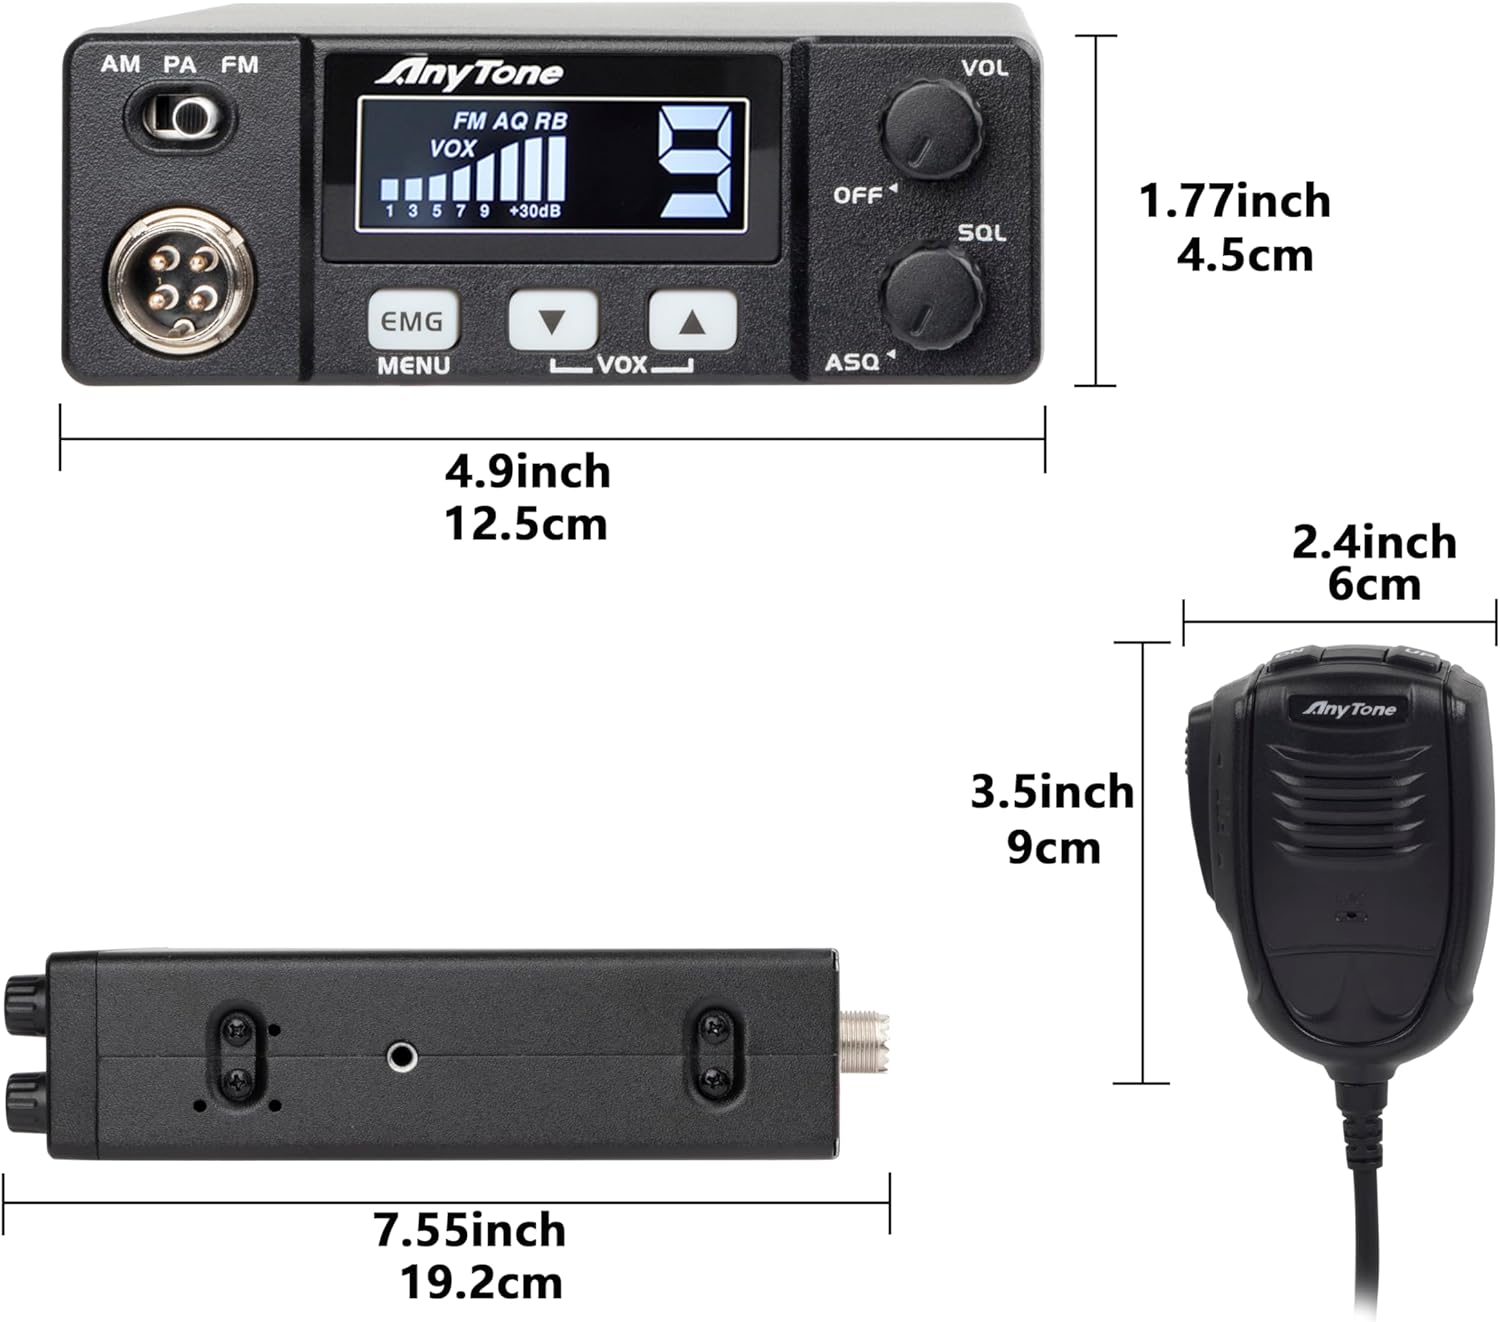
Figure 4: Dimensions of the AT-505PRO CB Radio and Microphone.
Warranty Information
The AnyTone AT-505PRO CB Radio comes with a 1-year warranty from the date of purchase. This warranty covers manufacturing defects and malfunctions under normal use. It does not cover damage caused by misuse, accidents, unauthorized modifications, or improper installation. Please retain your proof of purchase for warranty claims.
Customer Support
For technical assistance, troubleshooting, or warranty inquiries, please contact AnyTone customer support. Refer to the official AnyTone website or the contact information provided with your purchase for the most up-to-date support channels.
You can also visit the AnyTone Store on Amazon for more product information and resources.