
FOLAI 510
FOLAI 5-in-1 Multifunctional Stud Finder Wall Scanner, Model 510 User Manual
1. Introduction
This manual provides detailed instructions for the safe and effective use of your FOLAI 5-in-1 Multifunctional Stud Finder Wall Scanner, Model 510. This device is designed to accurately detect the centers and edges of wood studs, metal pipes, rebar, and live AC wires hidden behind various wall types, floors, and ceilings. Please read this manual thoroughly before operation to ensure optimal performance and safety.

Image 1.1: The FOLAI 5-in-1 Stud Finder (Model 510) and included 9V battery.
2. Safety Information
Always prioritize safety when using power tools and detection devices. Failure to follow these instructions may result in electric shock, fire, or serious injury.
- Avoid Live Wires: The device includes a WireWarning feature that detects live AC wires up to 2 inches (51 mm) deep. This feature is active in StudScan, DeepScan, and MetalScan modes. Always exercise caution and verify the absence of live wires before drilling or cutting into walls.
- Battery Safety: Use only 9V alkaline batteries. Ensure correct polarity when installing. Remove the battery if the device will not be used for an extended period to prevent leakage.
- Environmental Conditions: Do not expose the device to extreme temperatures, humidity, or direct sunlight. Operate in dry conditions.
- Surface Limitations: This stud finder is effective on most common wall types including drywall, plaster walls, and textured surfaces. It is not recommended for use on cement board walls or brick walls.
- Calibration: Always calibrate the device on the wall surface before scanning. Incorrect calibration can lead to inaccurate readings.
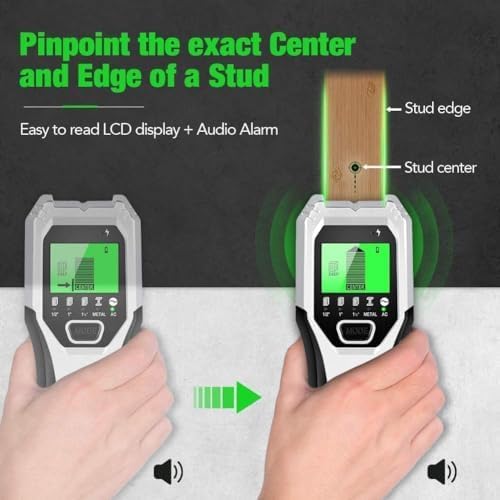
Image 2.1: The device indicates live AC wires to prevent accidental drilling into electrical lines.
3. Package Contents
Upon opening the package, verify that all items are present:
- FOLAI 5-in-1 Stud Finder Wall Scanner (Model 510)
- 9V Alkaline Battery
- User Manual (this document)
4. Product Features
The FOLAI 5-in-1 Stud Finder is equipped with advanced sensors and multiple scanning modes for comprehensive detection:
- 5 Scan Modes:
- Stud Scan (0.5 inch / 12mm): Detects wood studs up to 0.5 inches deep.
- Stud Scan (1 inch / 25mm): Detects wood studs up to 1 inch deep.
- Stud Scan (1.5 inch / 38mm): Detects wood studs up to 1.5 inches deep.
- Metal Scan (2.36 inch / 60mm): Detects metal objects (pipes, rebar, etc.) up to 2.36 inches deep.
- AC Scan (2 inch / 51mm): Detects live unshielded AC wires up to 2 inches deep.
- High Accuracy: Upgraded sensor chips provide precise and consistent detection.
- WireWarning Detection: Automatically detects live AC wires in StudScan, DeepScan, and MetalScan modes for enhanced safety.
- HD LCD Display: Clear visual indication of stud edges, centers, and detected materials.
- Audio Alarm: Provides an audible alert when a target is detected.

Image 4.1: Illustration of the five scanning modes and their respective maximum detection depths.

Image 4.2: The device features upgraded sensors for accurate detection of various materials.
5. Setup
5.1 Battery Installation
- Open the battery compartment cover on the back of the device.
- Insert the included 9V alkaline battery, ensuring the positive (+) and negative (-) terminals align correctly.
- Close the battery compartment cover securely.
5.2 Initial Calibration
Proper calibration is crucial for accurate readings. Always calibrate the device on the wall surface where you intend to scan, ensuring it is free of studs, metal, or wires.
- Place the stud finder flat against the wall surface.
- Press and hold the 'MODE' button for a few seconds until the device calibrates. The display will show a 'READY' indicator.
- Keep the device flat against the wall during calibration. Do not lift or move it until calibration is complete.
6. Operating Instructions
6.1 Selecting a Scan Mode
Press the 'MODE' button repeatedly to cycle through the available scanning modes (Stud Scan 0.5", Stud Scan 1", Stud Scan 1.5", Metal Scan, AC Scan). The selected mode will be indicated on the LCD display.
6.2 Scanning for Studs (Wood)
- Select the desired Stud Scan depth (0.5", 1", or 1.5").
- Place the device flat against the wall and perform initial calibration as described in Section 5.2.
- Slowly slide the device horizontally across the wall surface. Maintain constant contact and pressure.
- As the device approaches a stud, the signal strength bars on the LCD will increase, and an audio alarm may sound.
- When the device indicates the edge of the stud, mark the location. Continue sliding until the signal disappears, marking the other edge. The center of the stud is between these two marks.
- The display will show a 'CENTER' indicator when the device is directly over the stud's center.

Image 6.1: The LCD display clearly indicates the center and edges of a detected stud.
6.3 Scanning for Metal
- Select 'Metal Scan' mode.
- Place the device flat against the wall and calibrate.
- Slowly slide the device horizontally. The signal strength bars and audio alarm will indicate the presence of metal objects.
- Mark the location where the signal is strongest to pinpoint the metal object.
6.4 Scanning for AC Wires
- Select 'AC Scan' mode.
- Place the device flat against the wall and calibrate.
- Slowly slide the device horizontally. The 'AC' icon on the display will illuminate, and an audio alarm will sound when live AC wires are detected.
- Mark the location of the detected wire. Always re-scan the area from different directions to confirm the wire's path.
Important: The WireWarning feature is always active in StudScan, DeepScan, and MetalScan modes. If the AC icon illuminates during these modes, it indicates the presence of live AC wires near the detected object. Exercise extreme caution.
7. Maintenance
- Cleaning: Wipe the device with a soft, damp cloth. Do not use abrasive cleaners or solvents.
- Storage: Store the device in a dry, cool place away from direct sunlight and extreme temperatures. Remove the battery if storing for extended periods.
- Battery Replacement: Replace the 9V battery when the low battery indicator appears on the LCD display.
8. Troubleshooting
| Problem | Possible Cause | Solution |
|---|---|---|
| Inaccurate readings or false positives. |
|
|
| Device does not turn on. |
|
|
| AC wire detection is inconsistent. |
|
|
9. Specifications
- Model: 510
- Manufacturer: FOLAI
- Power Source: 9V Alkaline Battery (included)
- Item Weight: 9.1 ounces
- Package Dimensions: 7.91 x 3.54 x 2.05 inches
- Stud Scan Depth: 0.5 inch (12mm), 1 inch (25mm), 1.5 inch (38mm)
- Metal Scan Depth: Up to 2.36 inches (60mm)
- AC Scan Depth: Up to 2 inches (51mm)
- Color: Green
10. Warranty and Support
For warranty information or technical support, please refer to the contact details provided with your purchase or visit the official FOLAI website. Keep your purchase receipt as proof of purchase.
Ask a question about this manual
Ask about setup, troubleshooting, compatibility, parts, safety, or missing instructions. Manuals+ will review the question and use this page’s manual context to help answer it.