Introduction
Thank you for purchasing the BEPER P101CAF100 Duetta Espresso Coffee Machine. This manual provides essential information for the safe and efficient operation, maintenance, and troubleshooting of your new coffee machine. Please read these instructions carefully before first use and keep them for future reference.
Important Safety Instructions
- Always ensure the appliance is connected to a grounded power outlet with the correct voltage.
- Do not immerse the appliance, power cord, or plug in water or other liquids.
- Keep the appliance out of reach of children and pets.
- Unplug the machine from the power outlet before cleaning, maintenance, or if it is not in use for an extended period.
- Exercise caution when handling hot surfaces, steam, and hot water to prevent burns.
- Do not operate the appliance if the power cord or plug is damaged, or if the appliance malfunctions or has been damaged in any way.
- This machine is equipped with overheating and overpressure protection devices for your safety.
Product Components
Familiarize yourself with the parts of your BEPER Duetta Espresso Coffee Machine:
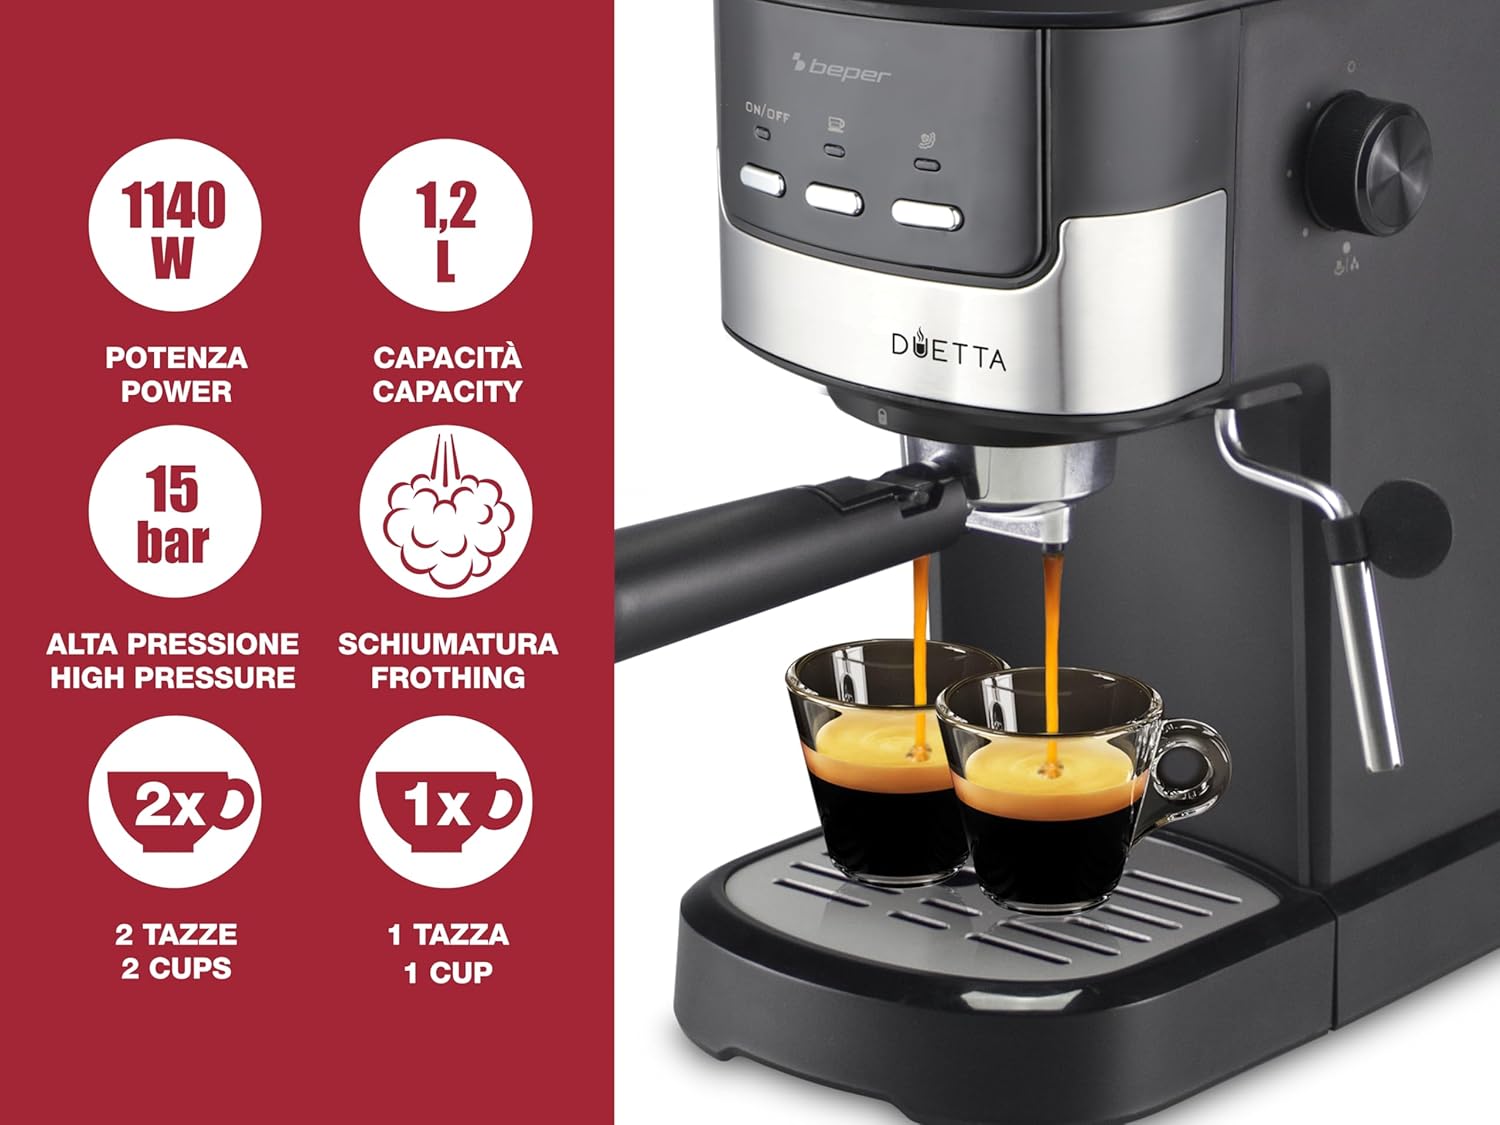
Image 1: The BEPER P101CAF100 Duetta Espresso Coffee Machine, shown with two cups of espresso.
- Water Tank: Transparent and removable, with a 1.2-liter capacity.
- Control Panel: Features On/Off switch and brewing buttons.
- Portafilter: Holds ground coffee or ESE pods.
- Filter Baskets: Includes double stainless steel filters for one and two cups.
- Steam Wand: For frothing milk.
- Steam Control Knob: Adjusts steam intensity.
- Cup Warmer: Located on top of the machine.
- Drip Tray: Removable for easy cleaning.
- Measuring Cup and Presser: Included accessories for precise coffee dosing.

Image 2: Close-up of the machine showing the adjustable steam wand, filter baskets for one and two cups, the cup warmer, and the removable drip tray.
Setup
1. Unpacking and Initial Cleaning
- Carefully remove all packaging materials and ensure all components are present.
- Wash the water tank, portafilter, filter baskets, and drip tray with warm soapy water. Rinse thoroughly and dry.
- Wipe the exterior of the machine with a damp cloth.
2. Filling the Water Tank
- Remove the transparent water tank from the back of the machine.
- Fill the tank with fresh, cold water up to the MAX level indicator.
- Place the water tank back securely into its position.
3. Priming the Machine (First Use)
- Ensure the water tank is filled.
- Place a cup under the portafilter (without coffee).
- Turn on the machine using the On/Off button. The indicator light will illuminate.
- Once the machine reaches operating temperature (indicator light stops flashing or turns solid), press the coffee brewing button to dispense water. Let water run for about 30 seconds to prime the pump and rinse the system.
- Repeat this process for the steam wand by turning the steam control knob to release steam for a few seconds.
Operating Instructions
1. Making Espresso with Ground Coffee

Image 3: The Duetta machine is compatible with both ground coffee and standard ESE coffee pods.
- Ensure the machine is primed and heated.
- Select the appropriate filter basket (one-cup or two-cup) and place it into the portafilter.
- Using the measuring cup, add the desired amount of finely ground espresso coffee into the filter basket. For a single shot, use one scoop; for a double shot, use two scoops.
- Use the presser to tamp the coffee firmly and evenly. This creates a compact puck for optimal extraction.
- Attach the portafilter to the brewing head by aligning it and twisting firmly to the right until secure.
- Place one or two espresso cups on the drip tray under the portafilter spouts.
- Press the coffee brewing button. The machine will dispense espresso. Press the button again to stop brewing when the desired volume is reached.
- Carefully remove the portafilter after brewing and discard the used coffee grounds.

Image 4: Illustration of adding ground coffee to the filter basket and tamping it down with the included presser.
2. Making Espresso with ESE Pods
- Ensure the machine is primed and heated.
- Place a standard ESE coffee pod into the appropriate filter basket.
- Attach the portafilter to the brewing head.
- Place a cup under the portafilter spout.
- Press the coffee brewing button to start and stop the espresso flow.
- Remove the used pod and clean the portafilter.
3. Frothing Milk
- Fill a milk frothing pitcher with cold milk (dairy or non-dairy) to about one-third full.
- Ensure the machine is heated and the steam function is ready (steam indicator light is on).
- Position the steam wand just below the surface of the milk.
- Turn the steam control knob to release steam. Move the pitcher up and down to create foam.
- Once the desired texture and temperature are achieved, turn off the steam control knob.
- Immediately wipe the steam wand with a damp cloth to prevent milk residue from drying.

Image 5: Demonstrating the use of the steam wand to froth milk for cappuccinos and lattes.
4. Using the Cup Warmer

Image 6: Cups placed on the top of the machine, utilizing the integrated cup warmer.
- Place your espresso cups on the metal plate located on top of the machine.
- The residual heat from the machine will gently warm the cups, helping to maintain the temperature of your espresso.
Cleaning and Maintenance
1. Daily Cleaning
- Drip Tray: Empty and clean the removable drip tray after each use or when the indicator floats up. Wash with warm soapy water and rinse.
- Portafilter and Filter Baskets: Remove spent coffee grounds and rinse the portafilter and filter baskets under running water. Ensure all coffee residue is removed.
- Steam Wand: After each use, purge a small amount of steam and wipe the wand with a damp cloth to remove any milk residue.
- Exterior: Wipe the exterior of the machine with a soft, damp cloth. Do not use abrasive cleaners or solvents.

Image 7: The removable drip tray for easy cleaning.
2. Descaling
Regular descaling is essential to maintain optimal performance and extend the lifespan of your espresso machine. The frequency depends on water hardness and usage, but generally, descale every 2-3 months.
- Use a commercial descaling solution specifically designed for coffee machines, following the manufacturer's instructions.
- Fill the water tank with the descaling solution and water mixture.
- Run the solution through the machine by brewing several cups (without coffee) and dispensing steam until the tank is empty.
- Rinse the water tank thoroughly and fill it with fresh water.
- Run several cycles of fresh water through the machine to remove any residual descaling solution.
Troubleshooting
| Problem | Possible Cause | Solution |
|---|---|---|
| No coffee dispenses. | No water in tank, machine not primed, clogged filter, or machine not heated. | Fill water tank, prime the machine, clean filter, wait for machine to heat up. |
| Coffee is too weak or watery. | Coffee too coarse, not enough coffee, or insufficient tamping. | Use finer grind, increase coffee amount, tamp more firmly. |
| No steam from wand. | Steam function not activated, wand clogged, or machine not hot enough. | Ensure steam button is on, clean steam wand, wait for steam indicator light. |
| Water leaks from machine. | Portafilter not properly secured, water tank not seated correctly, or drip tray full. | Secure portafilter, reseat water tank, empty drip tray. |
If you encounter issues not listed here, or if solutions do not resolve the problem, please contact customer support.
Technical Specifications
| Feature | Detail |
|---|---|
| Brand | BEPER |
| Model Number | P101CAF100 |
| Color | Black |
| Product Dimensions | 39.5 x 17 x 31 cm |
| Item Weight | 2.6 kg |
| Capacity | 1.2 Liters |
| Power/Wattage | 1100 Watts |
| Voltage | 240 Volts |
| Special Features | Milk Frother, Cup Warmer |
| Coffee Maker Type | Espresso Machine |
| Operation Mode | Semi-Automatic (inferred from features) |
Customer Support
For further assistance, warranty information, or to report any issues with your BEPER P101CAF100 Duetta Espresso Coffee Machine, please contact BEPER customer service. Refer to your purchase documentation for specific contact details.
You can also visit the official BEPER brand store for more information: BEPER Brand Store


