
1. Introduction
This manual provides comprehensive instructions for the proper installation, operation, and maintenance of your HECASA Front Bumper. Please read all instructions carefully before beginning installation to ensure safe and correct assembly and use.
1.1 Compatibility
This HECASA Front Bumper (Model CB-2386) is designed for:
- 2019-2024 Dodge Ram 2500
- 2019-2024 Dodge Ram 3500

Figure 1.1: HECASA Front Bumper compatibility with 2019-2024 Ram 2500 and 3500 models.
2. Safety Information
Warning: Installation of this bumper requires mechanical aptitude and may involve heavy lifting. Professional installation is strongly recommended. Always wear appropriate personal protective equipment, including safety glasses and gloves, during installation.
- Ensure the vehicle is securely supported on a level surface before beginning work.
- Disconnect the vehicle's battery before working on electrical components.
- Do not overtighten fasteners. Refer to vehicle manufacturer specifications for torque values where applicable.
- Keep hands and clothing clear of moving parts and pinch points.

Figure 2.1: The bumper is designed to absorb and distribute collision forces, providing robust protection.
3. Package Contents
The HECASA Front Bumper assembly is shipped in two packages. Verify all components are present and undamaged before proceeding with installation.
- Front Bumper Assembly (main sections)
- Installation Accessories (bolts, nuts, washers, brackets)
- 2x LED Spotlights
- 2x D-Rings
- Integrated Winch Plate
- Detachable Bull Bar

Figure 3.1: Exploded view of the HECASA Front Bumper package contents.
4. Installation Instructions
Professional installation is recommended due to the complexity and weight of the bumper. This bumper replaces the factory front bumper.
4.1 Tools Required (Not Included)
- Socket Wrench Set
- Torque Wrench
- Pry Tool (for trim removal)
- Wire Strippers/Crimpers (if wiring modifications are needed)
- Drill and appropriate bits (if sensor hole modification is needed)
- Lifting equipment or assistance for heavy components
4.2 Step-by-Step Installation
- Prepare Vehicle: Park the vehicle on a level surface, engage the parking brake, and disconnect the negative terminal of the battery.
- Remove Factory Bumper: Carefully remove the existing front bumper according to your vehicle's service manual. This typically involves disconnecting fog lights, parking sensors, and unbolting the bumper from the frame.
- Assemble Bumper Components: The HECASA bumper arrives in multiple sections. Assemble the main bumper sections, bull bar, and light mounts using the provided hardware. Do not fully tighten all bolts at this stage to allow for adjustment.
- Address Sensor Holes (if applicable): Some users have reported that the sensor holes may be too small for factory parking sensors. If necessary, carefully enlarge the sensor holes using an appropriate drill bit.
- Install Wiring: Route the wiring for the LED spotlights. Connect them to an appropriate power source (e.g., existing fog light harness or a new switch, sold separately). If your vehicle has parking sensors, you may need to splice the factory wiring harness to extend or adapt it to the new bumper's sensor locations. Ensure all electrical connections are secure and insulated.
- Mount Bumper to Vehicle: With assistance or lifting equipment, carefully position the assembled HECASA bumper onto the vehicle's frame mounts. Secure it using the provided mounting hardware.
- Adjust and Tighten: Adjust the bumper for proper alignment with the vehicle body. Once aligned, progressively tighten all mounting bolts to the manufacturer's recommended torque specifications.
- Final Checks: Reconnect the vehicle's battery. Test all lights and sensors. Ensure all components are securely fastened.

Figure 4.1: Front view of the HECASA Bumper assembly.
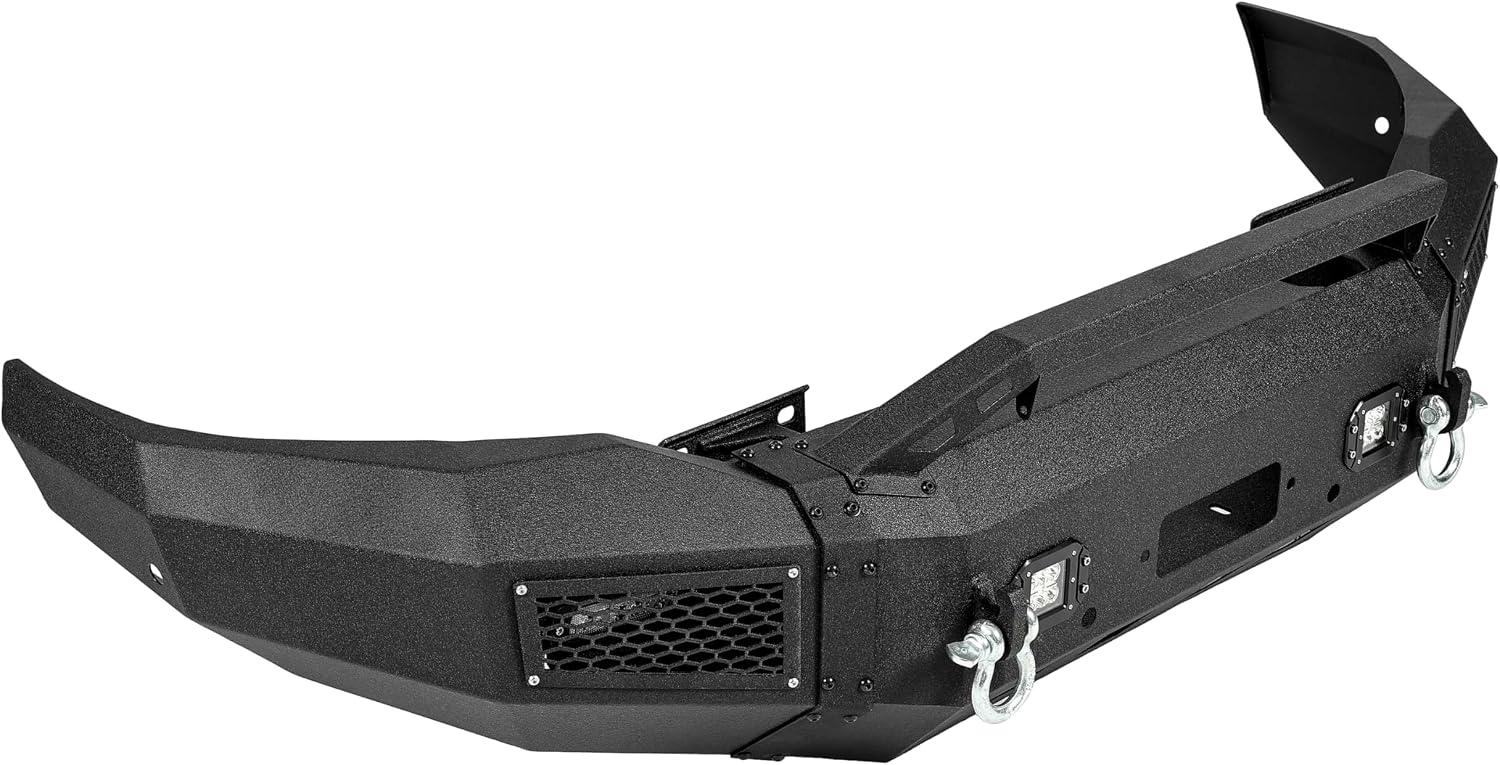
Figure 4.2: Angled view of the HECASA Bumper assembly.
5. Operating Instructions
5.1 LED Spotlights
The integrated LED spotlights provide additional illumination. They can be wired to operate with your vehicle's fog lights, high beams, or an independent switch. Consult a professional for wiring if you are unsure.

Figure 5.1: Integrated LED lights for enhanced visibility.
5.2 Winch Plate
The bumper features an integrated winch plate. Ensure your winch is compatible with the bumper's dimensions. Some winches may require relocation of their control box for proper fitment within the bumper's opening (approximately 9 inches wide).

Figure 5.2: Built-in winch plate for recovery operations.
5.3 D-Rings
The included D-rings serve as robust recovery points. Always use appropriate recovery straps and follow safe recovery procedures. Ensure D-rings are securely fastened before use.

Figure 5.3: D-rings for vehicle recovery.
6. Maintenance
Regular maintenance will ensure the longevity and performance of your HECASA Front Bumper.
- Cleaning: Clean the bumper regularly with mild soap and water to remove dirt, salt, and debris. Avoid abrasive cleaners that could damage the powder-coated finish.
- Inspection: Periodically inspect all mounting bolts and fasteners for tightness. Re-torque as necessary. Check the powder-coated finish for any chips or scratches and touch up as needed to prevent rust. Inspect LED lights for proper function and D-rings for any signs of wear or damage.
- Weather Suitability: The bumper is designed for durability in various weather conditions, including heavy rain, snow, fog, and dusty environments.

Figure 6.1: The bumper is built for durability and stability in all weather conditions.
7. Troubleshooting
This section addresses common issues encountered during installation or use.
| Issue | Possible Cause / Solution |
|---|---|
| No installation instructions included. | Refer to this digital manual for detailed steps. Online video tutorials for factory bumper removal may also be helpful. |
| Sensor holes are too small for factory parking sensors. | Carefully enlarge the sensor holes using an appropriate drill bit. Professional assistance is recommended if you are unsure. |
| Wiring harness for sensors/lights does not reach or fit. | The factory wiring harness may need to be extended or adapted. This may involve splicing wires. Ensure proper insulation and secure connections. |
| Winch does not fit properly with the control box. | Some winch models require the control box to be relocated for proper fitment within the bumper's winch opening. |
| Bumper arrived with minor cosmetic damage (e.g., chipped powder coating). | Inspect the product upon arrival. Minor chips can be touched up with appropriate paint to prevent rust. Contact customer support for significant damage. |
8. Specifications
| Feature | Detail |
|---|---|
| Brand | HECASA |
| Model Number | CB-2386 |
| Auto Part Position | Front |
| Material | Steel |
| Color | Black |
| Exterior Finish | Powder Coated |
| Product Dimensions (D x W x H) | 48.03" x 10.63" x 10.04" |
| Included Components | Front bumper assembly, installation accessories, LED lights, D-rings |
| Special Features | Winch Plate, LED Lights, D-Rings, Sensor Holes, Detachable Bull Bar |
9. Warranty and Support
For specific warranty information or technical support, please refer to the HECASA official website or contact their customer service directly. Keep your purchase receipt for warranty claims.
HECASA is committed to providing quality automotive parts. For any questions or concerns regarding your product, please reach out to the manufacturer.