
1. Introduction
This manual provides detailed instructions for the installation, operation, and maintenance of your Vorally Wireless & Wired Car Stereo Radio. Please read this manual thoroughly before using the product to ensure proper functionality and safety.
What's in the Box
- Vehicle Navigation Unit (1)
- Power Cable
- RCA Input/Output Cables
- USB Cable (Double USB interface)
- Camera Input Cable
- Radio Adapter Cable
- GPS Antenna
- USB Adapter Cable
- External Microphone
- Canbus Box (if applicable for your vehicle model)
- Instruction Manual

2. Safety Information
- Professional Installation Recommended: Due to the complexity of car electrical systems, professional installation is highly recommended to prevent damage to the unit or vehicle.
- Check Compatibility: Before installation, verify the unit's compatibility with your car model, year, and existing wiring. Consult the manufacturer if unsure.
- Power Disconnection: Always disconnect the vehicle's battery before performing any electrical work to avoid short circuits or electrical shock.
- Avoid Distractions: Do not operate the unit's complex functions while driving. Focus on the road and obey all traffic laws.
- Proper Ventilation: Ensure the unit is installed in a location with adequate ventilation to prevent overheating.
3. Product Overview
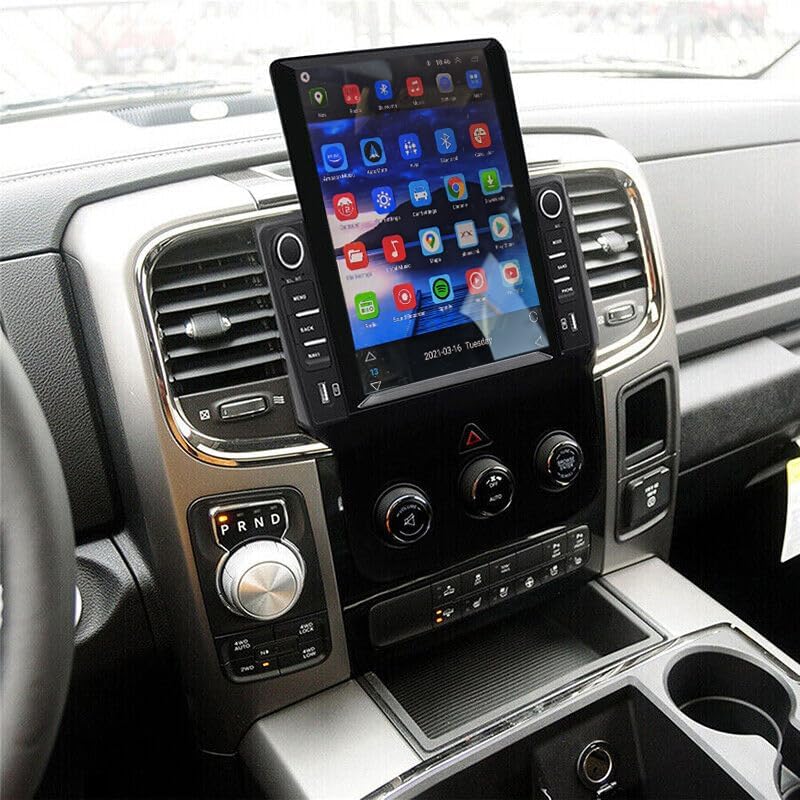
The Vorally Car Stereo Radio is an advanced in-dash navigation and entertainment system designed for vehicles. It features a large 9.7-inch HD 2.5D tempered glass touchscreen, offering a clear and responsive user experience. The unit supports both wireless and wired CarPlay and Android Auto, integrated GPS navigation, Bluetooth for hands-free calling and audio streaming, Wi-Fi connectivity, and FM/RDS radio.


4. Setup and Installation
4.1 Pre-Installation Check
Before proceeding with installation, ensure the unit is compatible with your vehicle. Verify the year and model number of your car. If uncertain, provide a complete image of the plugs on the back of your center console and the on-board main unit to the seller for confirmation of compatibility and any additional wiring harnesses or adapters required.
4.2 Wiring Connections
Refer to the wiring diagram provided with your unit and the image below for general connection guidance. Ensure all connections are secure to prevent intermittent issues.
- Power Cable: Connect the main power harness to your vehicle's power supply.
- RCA Input/Output: For external amplifiers, subwoofers, or additional video displays.
- USB Cables: Utilize the double USB interfaces for media playback, phone charging, or wired CarPlay/Android Auto connections.
- Camera Input: Connect the rear view camera cable for reversing assistance.
- Radio Adapter Cable: Connect to your vehicle's antenna.
- GPS Antenna: Mount the GPS antenna in a location with a clear view of the sky for optimal signal reception.
- External Microphone: Connect the external microphone for improved call quality during Bluetooth hands-free operation.
- Canbus Box: If your vehicle requires a Canbus decoder for steering wheel controls or other vehicle data integration, connect it as per the specific vehicle instructions.

4.3 Mounting the Unit
Securely mount the vehicle navigation unit into your car's dashboard. Ensure all cables are properly routed and not pinched. Test all functions before fully reassembling the dashboard trim.
5. Operating Instructions
5.1 Basic Operation
- Power On/Off: The unit typically powers on with the vehicle's ignition. A long press on the power button (if available) may turn the unit off or put it into standby.
- Touch Screen: Navigate the interface by tapping, swiping, and pinching on the 9.7-inch capacitive touchscreen.
- Volume Control: Adjust volume using the physical knobs or on-screen controls.
5.2 System Settings
Access the 'Settings' menu to configure various aspects of the unit, including:
- System Information: Android 12 operating system, 2GB RAM, 32GB ROM.
- Display: Adjust brightness, wallpaper, and screen timeout. Screen resolution is 1024x768.
- Sound: Equalizer settings (TDA7388 power amplifier chip), volume levels.
- Language: Select your preferred language (Chinese, English, French, Italian, Korean, Japanese, Arabic, Spanish, Portuguese, Russian, Turkish, Vietnamese, Hebrew, Polish, German).
- Date & Time: Set automatically via GPS or manually.
5.3 GPS Navigation
The unit includes built-in offline maps. For real-time traffic and updated maps, connect to Wi-Fi and use online navigation applications like Google Maps.
- Offline Maps: Download map data for your region when connected to the internet.
- Online Navigation: Connect to Wi-Fi to use Google Maps or other navigation apps for live traffic and updated routes.
5.4 Connectivity
- Wireless/Wired CarPlay & Android Auto: Connect your smartphone via USB or wirelessly to access phone contacts, email, navigation, music, and voice control through the unit's interface.
- Bluetooth: Pair your phone for hands-free calling (synchronize phone book) and audio streaming.
- Wi-Fi: Connect to a Wi-Fi hotspot for internet access, app downloads, and online services.
5.5 Radio (FM/RDS)
Access the radio application to tune into FM stations. The RDS (Radio Data System) function provides additional information like station name and program type where available.
- Frequency Range: Tune within the FM band.
- Preset Stations: Save your favorite stations for quick access.
- RDS: Displays station information.
5.6 Media Playback
The unit supports various audio and video formats for local media playback via USB.
- Audio Formats: APE, FLAC, WAV, MP3, WMA, etc.
- Video Formats: MKV, RMVB, AVI, MP4, MDV, etc.
- Picture Formats: PNG, JPEG, JPG, GIF, WBMP, BNP, etc.
5.7 Rear View Camera
When the vehicle is shifted into reverse, the unit automatically displays the feed from the connected rear view camera, providing visual assistance for parking and maneuvering.
5.8 Steering Wheel Control
The unit supports steering wheel control functions. Access the 'Steering Learn' option in the settings to map your vehicle's steering wheel buttons to the stereo's functions (e.g., volume, track skip, mode).
5.9 Split Screen
The split-screen feature allows you to run two applications simultaneously, such as navigation on one side and music playback on the other.
Video 5.1: Demonstration of the car stereo's features, including GPS navigation, CarPlay/Android Auto compatibility, reversing image display, FM/RDS radio, built-in Bluetooth, wireless/wired mirroring, and steering wheel control setup.
6. Maintenance
- Screen Cleaning: Use a soft, lint-free cloth slightly dampened with water or a screen cleaner specifically designed for electronics. Avoid harsh chemicals.
- Software Updates: Periodically check for software updates through the system settings or the manufacturer's website to ensure optimal performance and access to new features.
- Temperature: Operate the unit within the specified work temperature range of -20℃ to 75℃ (-4℉ to 167℉).
7. Troubleshooting
If you encounter issues, refer to the following common troubleshooting steps:
- No Power: Check all power connections and vehicle fuses. Ensure the ignition is on.
- No Sound: Verify speaker connections, volume levels, and audio output settings.
- GPS Signal Issues: Ensure the GPS antenna has a clear view of the sky. Check antenna connection.
- Touch Screen Unresponsive: Try restarting the unit. If the issue persists, a factory reset might be necessary.
- Bluetooth Connection Problems: Ensure Bluetooth is enabled on both the unit and your phone. Delete previous pairings and try reconnecting.
- Factory Settings Keyword: If prompted for a factory setting password, use 8888 or 3368.
For persistent issues, contact customer support.
8. Specifications
| Feature | Specification |
|---|---|
| System | Android 12 |
| Chipset | 8227L-DEMO |
| Screen Size | 9.7 Inches |
| Memory (RAM+ROM) | 2GB (RAM) + 32GB (ROM) |
| Screen Resolution | 1024x768 |
| Radio Chip | MT6625 |
| Power Output | 4x45W |
| Work Temperature | -20℃ - 75℃ (-4℉ - 167℉) |
| Steering Wheel Control | Support |
| Power Amplifier Chip | TDA7388 |
| Radio Band | FM/RDS |
| Video Output | Support |
| Reversing Input | CVBS |
| External Microphone | Support |
| Split Screen | Support |
| Maps | Built-in offline maps (requires internet to download data) |
| WIFI | Support |
| USB | Double USB interface |
| Audio Format | APE/FLAC/WAV/MP3/WMA etc |
| Video Format | MKV/RMVB/AVI/MP4/MDV etc |
| Picture Format | PNG/JPEG/JPG/GIF/WBMP/BNP etc |
| Physical Dimensions | Value |
|---|---|
| Item Weight | 4.13 pounds |
| Product Dimensions | 14.96 x 12.2 x 6.69 inches |
9. Warranty and Support
This product is covered by a standard manufacturer's warranty. Please refer to the warranty card included in your package for specific terms and conditions. For technical support, troubleshooting assistance, or warranty claims, please contact the seller or manufacturer directly through their official support channels.
Ensure you have your product model number (VIKA-CZPLAY-XHZ011) and purchase details available when contacting support.
Ask a question about this manual
Ask about setup, troubleshooting, compatibility, parts, safety, or missing instructions. Manuals+ will review the question and use this page’s manual context to help answer it.