
1. Introduction
This manual provides essential information for the safe and efficient operation of your BELTTT 3000W Pure Sine Wave Inverter. Please read it thoroughly before installation and use. This inverter converts 12V DC power from a battery into 120V AC power, suitable for various applications including RVs, trucks, off-grid systems, and home backup power.

Image 1.1: BELTTT 3000W Pure Sine Wave Inverter with accessories.
2. Safety Precautions
Always observe the following safety guidelines to prevent injury or damage to the inverter and connected devices:
- Ensure proper ventilation around the inverter.
- Do not expose the inverter to water, rain, or excessive moisture.
- Avoid operating the inverter in direct sunlight or near heat sources.
- Connect the inverter only to a 12V DC power source.
- Always connect the ground terminal of the inverter to a proper earth ground.
- Do not open the inverter casing; there are no user-serviceable parts inside.
- Keep children away from the inverter.

Image 2.1: Advanced safety protection systems integrated into the inverter.
3. Package Contents
Verify that all items are present in your package:
- BELTTT 3000 Watt Pure Sine Wave Inverter
- 2x 1/0AWG 3Ft Battery Cables (Red and Black)
- Remote Controller with 23Ft Cable
- Thimble Spanner
- User Manual (this document)
- 9x 45A Fuses

Image 3.1: All components included in the product package.
4. Setup and Installation
4.1 Inverter Placement
Choose a dry, well-ventilated location for the inverter, away from direct sunlight, heat, and flammable materials. Ensure sufficient clearance around the unit for proper airflow.
4.2 Battery Compatibility
The inverter is compatible with various 12V battery types, including Lithium (LI), Flooded (FLD), Gel (GEL), Sealed Lead-Acid (SLD), and Absorbed Glass Mat (AGM) batteries. Ensure your battery system can provide the necessary current for your intended load.

Image 4.1: Inverter compatibility with different 12V battery chemistries.
4.3 Wiring Diagram
Follow the wiring diagram carefully for safe and correct installation. Incorrect wiring can damage the inverter, battery, or connected appliances.

Image 4.2: Typical wiring diagram for a solar power system with the inverter.
4.4 Connecting the Inverter
- Grounding: Connect the inverter's ground terminal to a reliable earth ground.
- DC Input: Connect the red (positive) battery cable to the inverter's positive DC input terminal and the black (negative) battery cable to the inverter's negative DC input terminal. Ensure connections are tight and secure.
- Remote Controller: Plug the remote controller cable into the designated port on the inverter. The 23-foot cable allows for flexible placement of the remote control panel.
- AC Output: Once DC input is secure, you can connect your AC appliances to the dual AC sockets or the 20A outlet. For higher power loads, utilize the hardwire port.

Image 4.3: Front and rear panel connections of the inverter.

Image 4.4: Smart Remote Control Panel for convenient operation.
5. Operating Instructions
5.1 Powering On/Off
After all connections are secure, press the ON/OFF button on the inverter or the remote control to power on the unit. The LCD display will illuminate, indicating operational status.
5.2 Pure Sine Wave Output
This inverter produces a pure sine wave output, which is identical to the AC waveform from the utility grid. This makes it suitable for sensitive electronics such as televisions, home theater systems, and medical equipment, reducing the risk of damage or malfunction.

Image 5.1: Pure Sine Wave output for sensitive electronics.
5.3 Intelligent LCD Display
The high-brightness LCD screen provides real-time monitoring of key operational parameters:
- DC Input Voltage: Displays the voltage from your battery.
- AC Output Voltage: Shows the inverter's output voltage.
- Battery Status: Indicates the current charge level of the connected battery.
- Load Status: Displays the current power draw from connected appliances.
- Frequency: Shows the output frequency (e.g., 60Hz).
- Error Codes: Provides diagnostic codes for troubleshooting (refer to Section 7).
Output voltage and frequency can be adjusted within a small range using the dedicated buttons on the inverter or remote control.
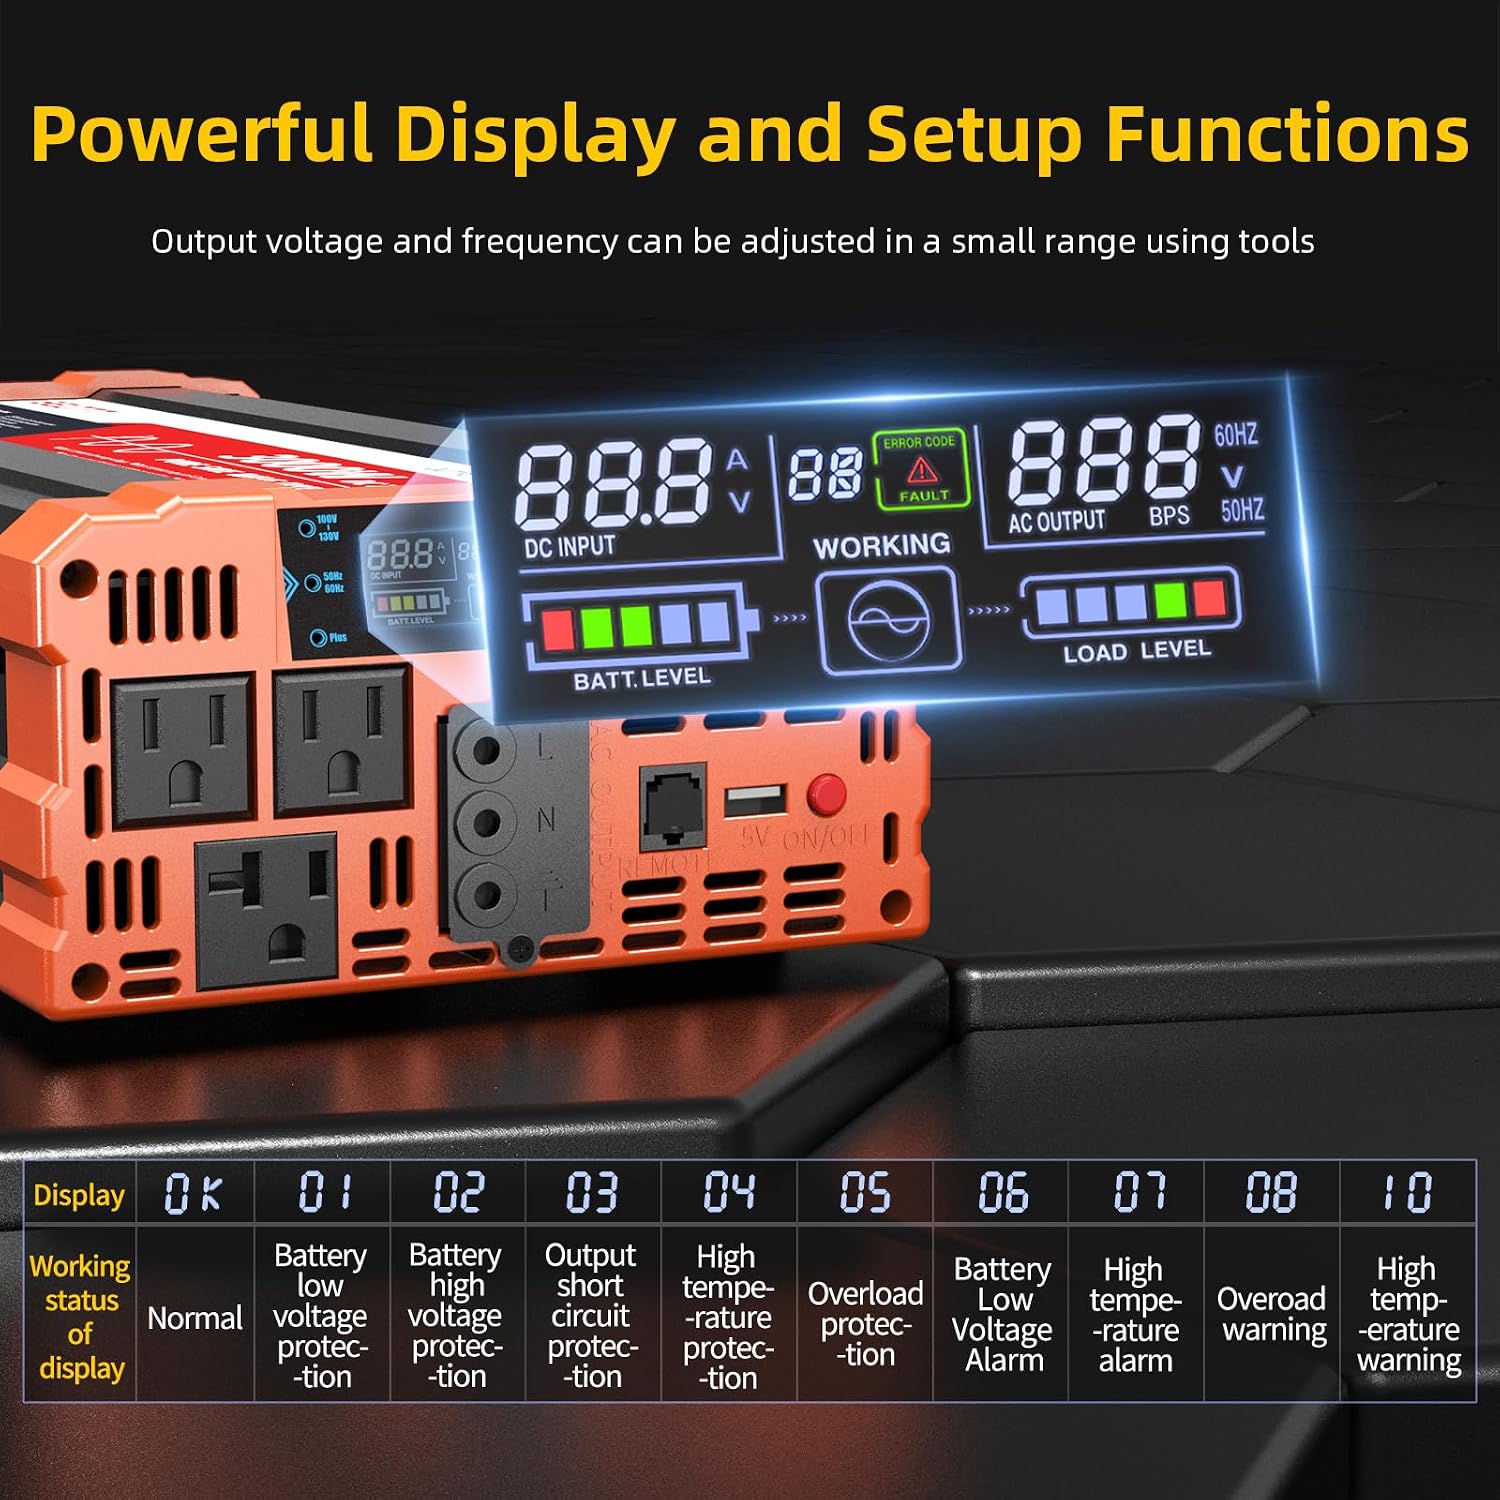
Image 5.2: Detailed view of the intelligent LCD display and adjustment functions.
5.4 Connecting Appliances
Plug your 120V AC appliances into the available AC outlets. For charging USB devices, use the 5V 2.1A USB port. Ensure the total wattage of connected devices does not exceed the inverter's continuous power rating of 3000W.

Image 5.3: Inverter providing power to multiple electronic devices.
6. Maintenance
Regular maintenance ensures optimal performance and longevity of your inverter.
- Cleaning: Periodically clean the exterior of the inverter with a dry, soft cloth. Ensure ventilation openings are free from dust and debris. Do not use liquid cleaners.
- Connections: Regularly check all electrical connections (DC input, AC output, grounding) to ensure they are tight and free from corrosion. Loose connections can cause overheating and power loss.
- Battery Health: Monitor your battery's health and charge level, especially during prolonged storage or heavy use.
- Fuse Replacement: If a fuse blows, replace it with a fuse of the same type and rating (45A). Refer to the 'What's in the Box' section for spare fuses.
7. Troubleshooting
The inverter features an intelligent LCD display that shows error codes to assist with troubleshooting. Refer to the table below for common issues and their solutions.

Image 7.1: LCD display error codes and their descriptions.
| Error Code / Symptom | Possible Cause | Solution |
|---|---|---|
| 01: Battery Low Voltage Protection | Battery voltage is too low. | Recharge or replace the battery. Reduce load. |
| 02: Battery High Voltage Protection | Battery voltage is too high. | Check charging system. Disconnect overcharging source. |
| 03: Output Short Circuit Protection | Short circuit detected at AC output. | Disconnect all AC loads. Check wiring for shorts. Replace blown fuses if necessary. |
| 04, 07, 10: High Temperature Protection/Alarm/Warning | Inverter is overheating. | Ensure adequate ventilation. Reduce load. Allow inverter to cool down. Clean fan vents. |
| 05, 08: Overload Protection/Warning | Connected load exceeds inverter's capacity. | Reduce the total wattage of connected appliances. Disconnect high-power devices. |
| No Power Output | Loose connections, blown fuse, inverter off. | Check battery connections. Verify inverter is switched on. Check and replace fuses. |
8. Specifications
| Feature | Specification |
|---|---|
| Model Number | BAP3000 |
| Continuous Power | 3000W |
| Peak Surge Power | 6000W |
| DC Input Voltage | 12V DC |
| AC Output Voltage | 110V - 120V AC |
| Output Waveform | Pure Sine Wave |
| USB Output | 5V 2.1A |
| AC Outlets | Dual AC Socket, 20A Outlet |
| Remote Controller Cable Length | 23 Ft |
| Product Dimensions | 17 x 7.7 x 3.9 inches |
| Item Weight | 11.9 pounds |
| Operating Temperature Range | -4°F (-20°C) to 104°F (40°C) |

Image 8.1: Inverter dimensions and weight.
9. Warranty and Support
For warranty information and customer support, please refer to the official BELTTT website or contact the manufacturer directly. The product is manufactured by POOJIN ELECTRONIC.
A digital version of this manual is available for download: BELTTT 3000W Inverter User Manual (PDF)
Visit the BELTTT Store for more products and information: BELTTT Store on Amazon


