
1. Introduction
This manual provides detailed instructions for the installation, operation, and maintenance of your SIXTOP Single Din Car Stereo. Please read this manual thoroughly before using the product to ensure proper functionality and to prevent damage. Keep this manual for future reference.
Safety Information
- Do not operate the device in a manner that distracts you from driving. Always prioritize road safety.
- Ensure all wiring is correctly connected to prevent short circuits or electrical hazards. Consult a professional for installation if unsure.
- Avoid exposing the unit to extreme temperatures, direct sunlight for prolonged periods, or excessive moisture.
- Do not attempt to disassemble or modify the unit. This may void the warranty and cause damage.
2. Package Contents
Verify that all items listed below are included in your package:
- SIXTOP Single Din Car Stereo Unit
- Remote Control
- Horn Cable
- Microphone
- Power Cable
- User Manual
- Video Extension Cable
- 12LED Rear Camera

Image: Overview of the package contents including the main unit, remote control, cables, microphone, and rear camera. Dimensions of the stereo unit are also shown.
3. Product Overview & Dimensions
The SIXTOP Single Din Car Stereo features a 7-inch flip-out touchscreen. The unit is designed to fit into a standard single DIN slot. The screen can be manually extended or retracted.
Image: Detailed measurements of the car stereo unit, including the main body and the retractable screen, showing dimensions in both millimeters and inches.
4. Setup
Wiring Diagram
Refer to the following diagram for correct wiring connections. Incorrect wiring can cause damage to the unit or your vehicle's electrical system. It is recommended to have this installed by a qualified professional.
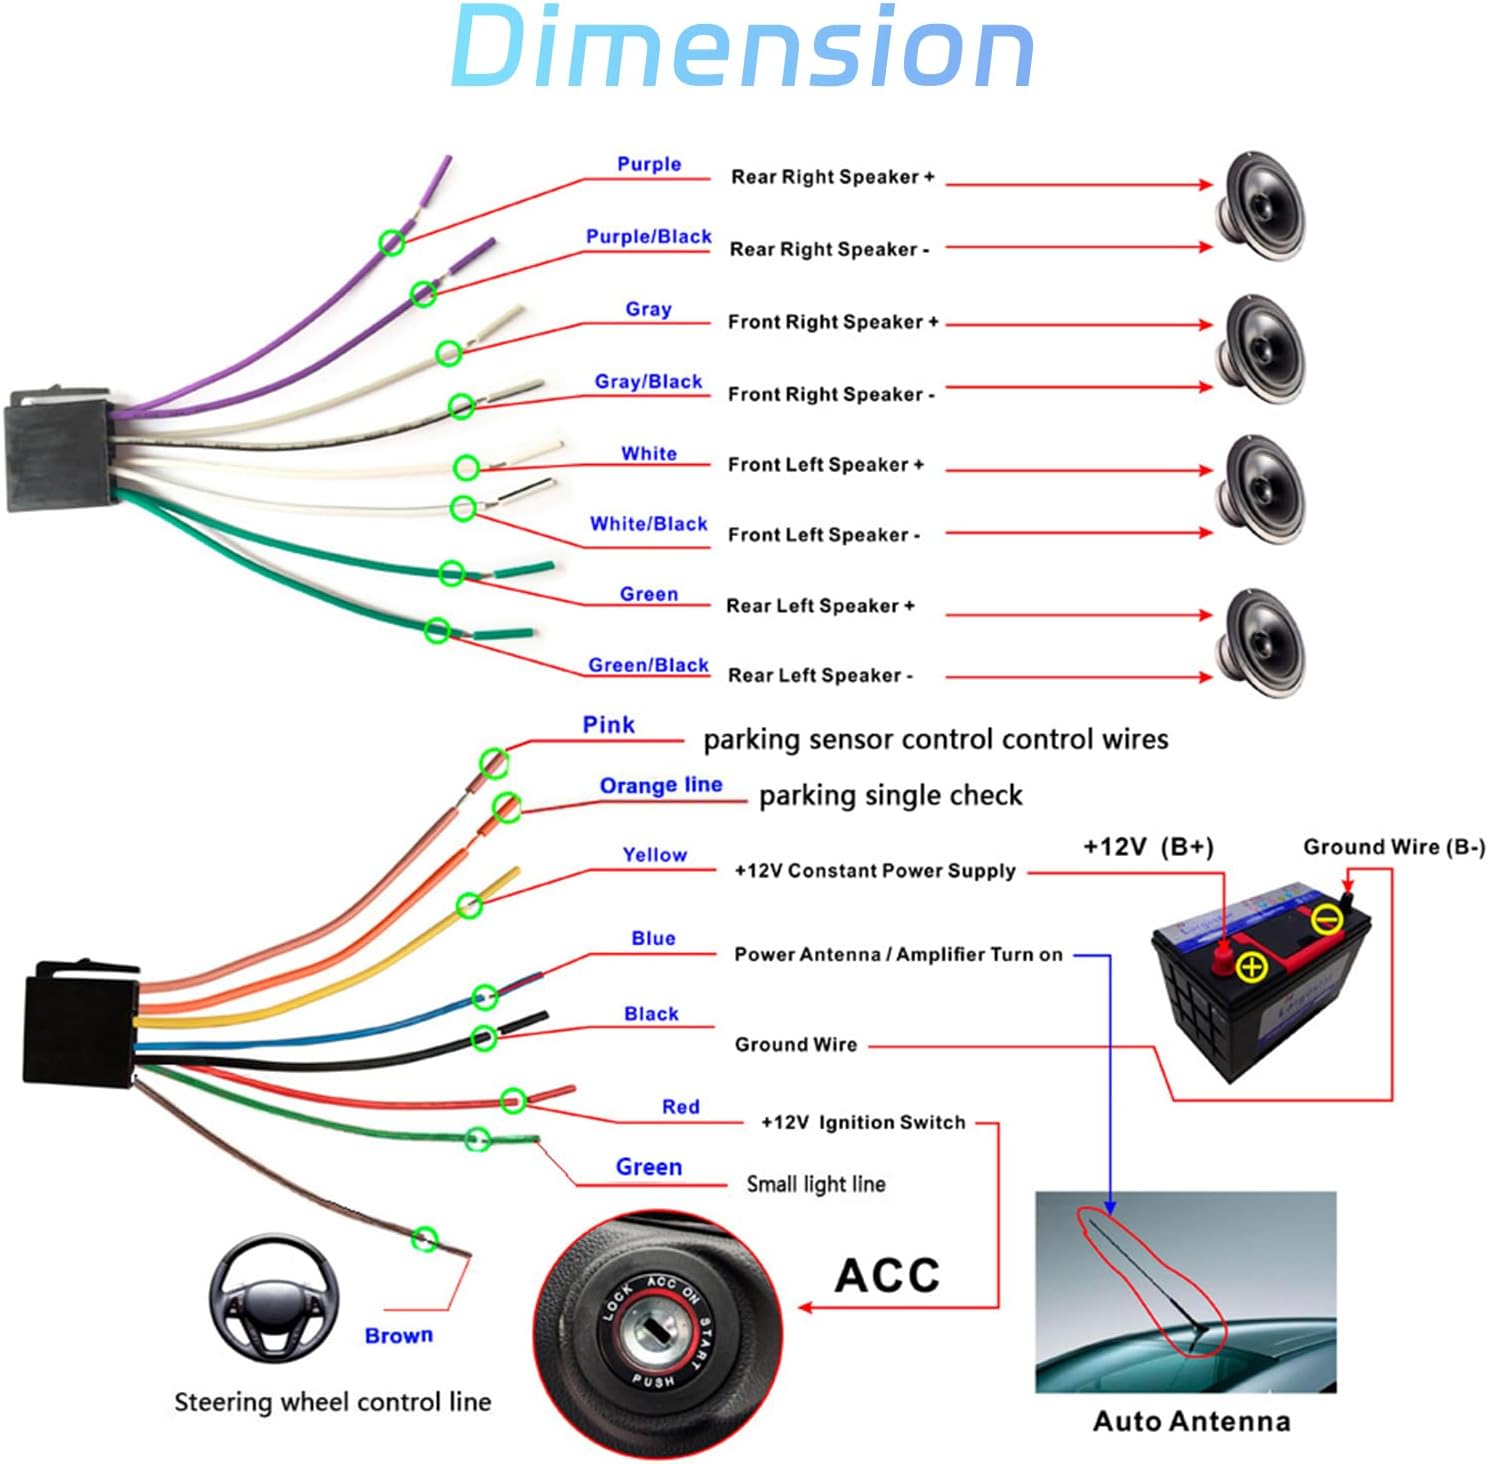
Image: Comprehensive wiring diagram illustrating connections for speakers (front/rear, left/right), power (constant, ignition, ground), antenna, steering wheel control, and parking sensor control wires.
Rear Camera Installation
The included rear camera provides a clear reversing image. Follow these steps for installation:
- Mount the camera in a suitable location, typically above the license plate.
- Connect the camera's power wire (red) to the positive terminal of the vehicle's reversing light.
- Connect the camera's video cable to the 'CVBS' input on the car stereo unit.
- Ensure the reversing input wire (usually pink or brown, labeled 'BACK' or 'REVERSE') from the stereo's power harness is connected to the vehicle's reverse light signal.
Video: A step-by-step guide demonstrating the installation process for the rear camera, including wiring connections to the vehicle's reversing light and routing the video cable.
5. Operating Instructions
Basic Operation
- Power On/Off: Press the power button (usually a knob or dedicated button) to turn the unit on or off.
- Volume Control: Rotate the volume knob or use the touchscreen controls to adjust the audio level.
- Screen Retraction: The 7-inch screen can be manually pushed in or pulled out to adjust viewing angle or to store it when not in use.
- EQ Sound Effect: Access the EQ settings via the touchscreen to customize audio output. Adjust bass, treble, and other sound parameters for optimal listening.

Image: Display showing the Equalizer (EQ) settings interface with various sound presets like Jazz, Classic, Rock, Pop, and User. Also illustrates the USB and AUX input ports and a phone charging via USB.
- Button Lights: The unit features marquee colorful lights for the buttons. These can be set to change colors or respond to voice control via the settings menu.

Image: Demonstrates the various colorful lighting options for the stereo's buttons, including voice-controlled illumination and a 7-color changing mode.
Radio (FM/AM/RDS)
The stereo supports FM, AM, and RDS frequencies. Use the radio function to listen to broadcasts, news, and weather updates.
- Automatic Search: Use the auto-search function to find available stations.
- Station Storage: Save your favorite stations for quick access.
- RDS Functionality: RDS (Radio Data System) displays station information, song titles, and other data where available.

Image: The radio interface showing FM frequency tuning, automatic search, and station storage options. Also depicts the Bluetooth function for hands-free calls and music playback.
Bluetooth 5.1
Connect your smartphone via Bluetooth 5.1 for hands-free calling and wireless music streaming.
- Pairing: Enable Bluetooth on your phone and search for 'SWL-BT'. Select it to pair.
- Hands-Free Calls: Make and receive calls directly through the stereo.
- Music Playback: Stream audio from your phone to the car stereo.
- Phone Book: Automatically load your phone's contact list for easy dialing.
Image: The Bluetooth interface displaying options for phone book access and Bluetooth music playback, indicating a successful connection.
Wireless CarPlay/Android Auto
Integrate your iPhone or Android phone for navigation, messaging, music, and voice control.
- Connection: Connect via Bluetooth or USB. On the stereo, select [Phonelink], then choose [Carplay] or [Auto].
- Functionality: Access phone messages, make calls, use mobile navigation software, and music applications.
- Voice Control: Utilize your phone's voice assistant for hands-free operation.
- Auto Connect: Set the [Auto Connect] option to default to CarPlay/Android Auto or Mirror Link upon startup.

Image: Demonstrates the user interfaces for Wireless CarPlay (left) and Android Auto (right) displayed on the 7-inch screen, showing typical app icons and phone integration.
Video: A demonstration of the single din car stereo with its touchscreen functionality, specifically highlighting the Apple CarPlay interface and its features.
Video: Illustrates the wireless Android Auto functionality on the car stereo, showing how to connect and use Android Auto features on the display.
Mirror Link
Project your smartphone screen onto the car stereo display for real-time navigation or video viewing.
- Connection: Connect your phone via USB.
- Activation: Select [Phonelink] on the stereo, then choose [Mirror] for both iPhone and Android devices.

Image: The Mirror Link function in action, showing a smartphone screen mirrored onto the 7-inch car stereo display, compatible with both iOS and Android devices.
Video: Demonstrates the Mirror Link feature on the single din car radio with a 7-inch touchscreen, showing how a smartphone's display is mirrored onto the stereo screen.
USB/AUX Input
The unit supports U disk (USB drive) and AUX input for media playback and fast charging.
- USB: Insert a U disk into the USB2.0 interface on the back of the radio for media playback. The USB port also supports fast charging for mobile phones.
- AUX: Connect external audio devices via the AUX input.
Image: Shows the USB port for U disk insertion and mobile phone fast charging, alongside the AUX input for connecting external audio sources.
Steering Wheel Control
Control the car stereo functions using your vehicle's existing steering wheel buttons for convenience and safety.
- Connection: Connect the steering wheel control wire (KEY) in the power cord to your vehicle's steering wheel control interface.
- Programming: Access the stereo's settings to program and map the steering wheel buttons to desired functions.

Image: Illustrates how to connect and configure steering wheel controls for the car stereo. Also shows the reversing display activated by a waterproof night vision camera.
Rear View Camera Display
The system automatically displays the rear camera feed when the vehicle is in reverse gear.
- Automatic Switching: When reversing, the stereo automatically switches to the rear camera view.
- Night Vision: The included waterproof night vision camera provides clear images even in low-light conditions, aiding in safe parking.
Image: Shows the car stereo screen displaying the rear camera feed with parking guidelines. A separate image of the waterproof night vision camera is also included.
6. Specifications
| Feature | Specification |
|---|---|
| Screen Size | 7.0 inches |
| Voltage | 12V |
| Bluetooth Version | 5.1 (BT Name: SWL-BT) |
| Screen Resolution | 1024*600 |
| Output Power | 4*60W |
| USB Interface | USB2.0 |
| Reversing Input | CVBS |
| Radio Range FM | 87.5~108.0MHz |
| Radio Range AM | 522-1620KHz |
| External Microphone | Supported |
| Marquee Colorful Lights | Supported |
| Working Temperature | -20℃ ~ 70℃ |
| Factory Settings Key | 113266 |
| Audio Format Support | MP3/WMA/WAV/APE/FLAC |
| Video Format Support | MKV/AVI/TS/TP/MP4/M4V (Max Bit Rate 50Mbps-80Mbps) |
| Supported Languages | English, French, Spanish, Russian, Italian, Portuguese, German, Polish, Chinese (simplified), Turkish, Arabic, Hebrew |
7. Maintenance
Proper maintenance ensures the longevity and optimal performance of your car stereo.
- Cleaning: Use a soft, dry cloth to clean the screen and unit. For stubborn marks, a slightly damp cloth with mild cleaner can be used, but avoid harsh chemicals.
- Screen Care: Avoid pressing the touchscreen with sharp objects. Use a screen protector if desired.
- Temperature: Do not leave the unit in direct sunlight or extreme heat for extended periods, as this can damage the screen and internal components.
- Software Updates: Check the manufacturer's website periodically for any available firmware updates to improve performance and add features.
8. Troubleshooting
If you encounter issues with your car stereo, refer to the following common problems and solutions:
| Problem | Possible Cause | Solution |
|---|---|---|
| No Power | Incorrect wiring; Blown fuse; Loose connection | Check power and ground connections. Inspect vehicle's fuse box and stereo's inline fuse. Ensure all wires are securely connected. |
| No Sound | Incorrect speaker wiring; Volume too low; Mute activated | Verify speaker connections. Increase volume. Check if the unit is muted. |
| Bluetooth Not Connecting | Bluetooth not enabled on phone/stereo; Incorrect pairing process | Ensure Bluetooth is active on both devices. Delete previous pairings and re-pair. Check for 'SWL-BT' on your phone. |
| CarPlay/Android Auto Not Working | Incorrect connection method; Phone software issue; Cable fault | Try both wired (USB) and wireless (Bluetooth) connections. Ensure your phone's OS is up to date. Use a high-quality USB cable. Restart phone and stereo. |
| Rear Camera Not Displaying | Incorrect camera wiring; Reverse trigger wire not connected | Check camera power and video input connections. Ensure the reverse trigger wire (BACK/REVERSE) is correctly connected to the vehicle's reverse light signal. |
| Touchscreen Unresponsive | Temporary software glitch; Screen damage | Restart the unit. If the problem persists, contact customer support. |
9. Warranty and Support
SIXTOP products are designed for reliability and performance. For any technical assistance or warranty claims, please refer to the following information.
Warranty Information
This product comes with a standard manufacturer's warranty. Please retain your proof of purchase for any warranty claims. The warranty typically covers manufacturing defects and malfunctions under normal use. Damage caused by improper installation, misuse, accidents, or unauthorized modifications is not covered.
Customer Support
For further assistance, troubleshooting not covered in this manual, or warranty inquiries, please contact SIXTOP customer support. You can typically find contact information on the product packaging or the official SIXTOP website.
Online Support: SIXTOP123@163.com
Please provide your model number (113266) and a detailed description of your issue when contacting support.