
ANDOLL HOME FT-3S
ANDOLL HOME 4L WiFi Automatic Cat Feeder (Model FT-3S) Instruction Manual
Your guide to setting up, operating, and maintaining your automatic pet feeder.
1. Introduction
Thank you for choosing the ANDOLL HOME 4L WiFi Automatic Cat Feeder. This device is designed to provide scheduled meals for your pet, ensuring a consistent and healthy feeding routine. It features a 4-liter food capacity, a 10-second voice recorder, and WiFi connectivity for convenient control via a mobile application. Please read this manual thoroughly before use to ensure proper operation and maintenance.
2. Safety Information
- This product is intended for indoor use only.
- Use with dry pet food only. Kibble size should range from 2-12mm (0.07-0.5 inches) in diameter. Do not use with wet food, canned food, or treats.
- Keep out of reach of children. Adult supervision is recommended if children are present.
- Ensure the power adapter is securely connected and placed where pets cannot chew on it.
- Do not immerse the main unit in water. The food tray and stainless steel bowl are washable.
- Always unplug the feeder before cleaning or performing maintenance.
- If using battery backup, ensure D-cell alkaline batteries are installed correctly.
3. Product Components
The ANDOLL HOME 4L WiFi Automatic Cat Feeder includes the following parts:
- Main Feeder Body (with control panel and food outlet)

Image: The complete automatic pet feeder, showing the main unit, food bowl, power adapter, and a cat. The feeder has a translucent food reservoir and a control panel with buttons.
- Food Storage Container (4L capacity)
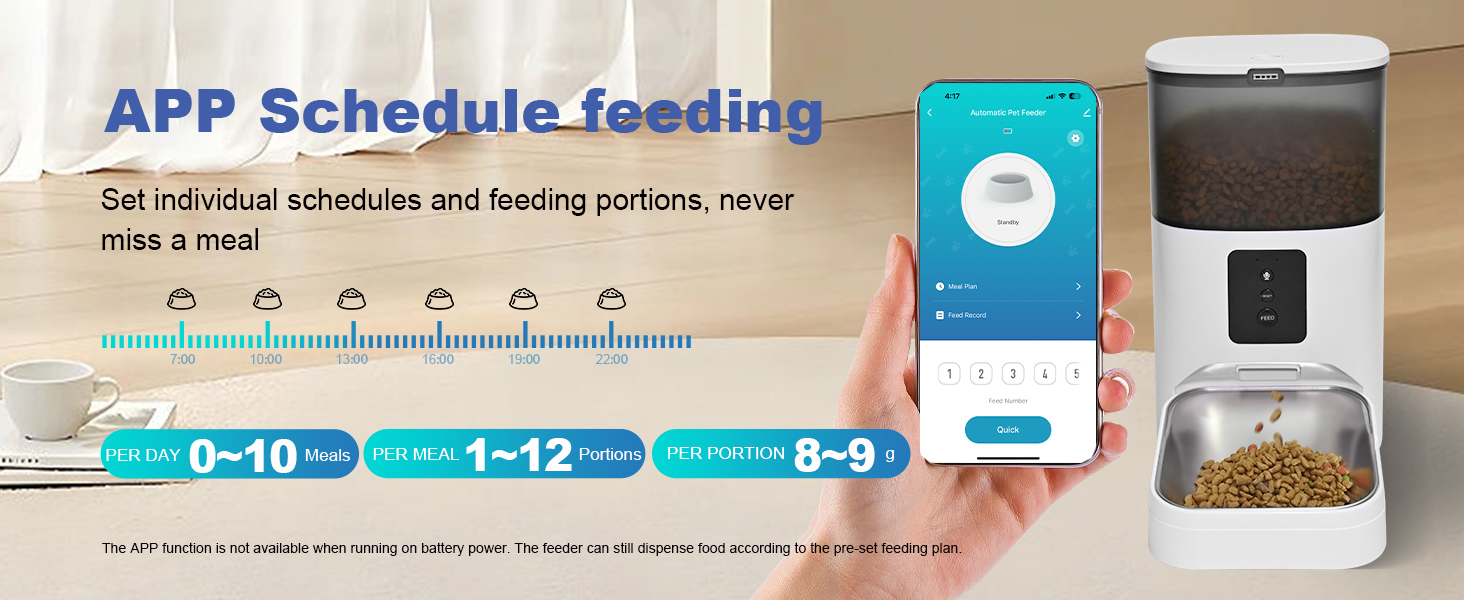
Image: A diagram illustrating the 4L food storage capacity of the feeder, highlighting that it is suitable for dry food only with kibble sizes between 2-12mm.
- Lid with Desiccant Box and 360° Sealing Ring

Image: An exploded view of the feeder's top section, showing the lid with a desiccant box and a 360-degree sealing ring designed to keep food fresh and prevent moisture.
- Stainless Steel Food Bowl

Image: A close-up view of the stainless steel food bowl, designed to be easily detachable for cleaning.
- 5V DC Power Adapter
Image: The power adapter included with the feeder, shown alongside the main unit and food bowl.
- Instruction Manual (this document)
4. Setup
4.1 Assembly
- Unpack all components and ensure all parts are present.
- Place the main feeder body on a flat, stable surface.
- Insert the stainless steel food bowl into the designated slot at the base of the feeder.
- Open the lid of the food storage container. If desired, place a desiccant pack (included) into the desiccant box located on the underside of the lid to maintain food freshness.
- Fill the food storage container with dry pet food. Ensure the kibble size is between 2-12mm (0.07-0.5 inches). Do not overfill.
- Close the lid securely to engage the sealing ring.
4.2 Power Options
The feeder can be powered by two methods:
- Primary Power (Recommended): Connect the 5V DC power adapter to the feeder's power port and plug it into a standard wall outlet.
- Battery Backup (Not Included): For uninterrupted feeding during power outages, install three (3) D-cell alkaline batteries (not included) into the battery compartment located at the bottom of the feeder. Ensure correct polarity.

Image: Illustration showing the two power options: a 5V DC/1A power adapter (included) and D alkaline batteries (not included) for backup power.
5. Operating Instructions
5.1 Control Panel Overview
The feeder features a simple control panel. (Note: Specific button functions may vary slightly based on model. Refer to the app for full control.)
- FEED Button: Press to dispense a single portion of food manually.
- RECORD Button: Press and hold to record a 10-second voice message.
- RESET Button: Used for resetting the device or initiating WiFi pairing.

Image: A close-up of the feeder's control panel, showing the FEED, RECORD, and RESET buttons.
5.2 App Setup and WiFi Connection
To utilize the full features of your WiFi automatic feeder, download the companion mobile application and connect the feeder to your 2.4G WiFi network.
- Download the "Automatic Pet Feeder" app from your smartphone's app store (iOS or Android).
- Register or log in to your account.
- Follow the in-app instructions to add a new device. This typically involves pressing and holding the RESET button on the feeder until an indicator light flashes, then entering your 2.4G WiFi network details in the app.
- Once connected, the app will display the feeder's status.

Image: Screenshot of the mobile application interface for scheduling meals, showing options for setting feeding times and portions per day.
5.3 Scheduling Meals
The app allows you to program up to 10 meals per day, with 1 to 12 portions per meal.
- Open the "Automatic Pet Feeder" app.
- Navigate to the "Meal Plan" or "Schedule" section.
- Add new feeding times. For each time, specify the hour and minute.
- Select the number of portions for each scheduled meal (1 portion is approximately 8-9 grams).
- Save your schedule. The feeder will automatically dispense food at the programmed times.
Note: The app function is not available when running on battery power. The feeder will still dispense food according to the pre-set feeding plan stored in its memory.
5.4 Voice Recording
Record a 10-second voice message to call your pet at meal times. The recording will play 3 times when food is dispensed.
- Press and hold the RECORD button on the feeder.
- Speak your message clearly into the microphone.
- Release the button to save the recording.
- You can also manage voice recordings through the mobile app.

Image: A cat approaching the feeder, with an illustration of a speaker icon and text indicating a 10-second custom voice recording playing 3 times at mealtime.
5.5 Manual Feeding
To dispense food immediately, press the FEED button on the control panel. One press will dispense one portion.
6. Maintenance and Cleaning
Regular cleaning ensures hygiene and proper functioning of your feeder.
- Disassembly:
- Unplug the power adapter and remove any backup batteries.
- Remove the food storage container lid.
- Empty any remaining food from the container.
- Detach the stainless steel food bowl.
- The food storage container can be separated from the main body for thorough cleaning.

Image: The feeder disassembled into its main components: the base unit, food reservoir, lid, and stainless steel bowl, illustrating ease of cleaning.
- Cleaning:
- The stainless steel food bowl and the food storage container are washable with mild soap and water. Rinse thoroughly and dry completely before reassembly.
- Wipe the main feeder body with a damp cloth. Do not submerge the main body in water.
- Ensure all parts are completely dry before reassembling and adding food.
7. Troubleshooting
| Problem | Possible Cause | Solution |
|---|---|---|
| Feeder not dispensing food. |
|
|
| WiFi connection issues. |
|
|
| Voice recording not playing. |
|
|
8. Specifications
- Model: FT-3S
- Capacity: 4 Liters
- Material: Stainless Steel (bowl), Plastic (body)
- Dimensions (LxWxH): 7 x 7 x 13 inches
- Item Weight: 4.93 pounds
- Power Supply: 5V DC/1A adapter (included), 3 x D-cell alkaline batteries (not included)
- WiFi Connectivity: 2.4G WiFi only
- Max Meals per Day: Up to 10
- Portions per Meal: 1-12 (approx. 8-9g per portion)
- Voice Recording: 10 seconds
- Recommended Kibble Size: 2-12mm (0.07-0.5 inches)
- Care Instructions: Hand Wash Only (detachable parts)
9. Warranty and Support
This ANDOLL HOME product comes with a 1-Year Manufacturer Warranty from the date of purchase.
For technical support, warranty claims, or any questions regarding your automatic pet feeder, please contact ANDOLL HOME customer service. Refer to the contact information provided on the product packaging or the official ANDOLL HOME website.
Please retain your proof of purchase for warranty service.
Ask a question about this manual
Ask about setup, troubleshooting, compatibility, parts, safety, or missing instructions. Manuals+ will review the question and use this page’s manual context to help answer it.