1. Introduction
Thank you for choosing the VEVOR SF-400D Analytical Lab Balance. This high-precision digital scale is designed for accurate and stable weighing results in various professional and personal settings. With a maximum capacity of 600g and a precision of 0.01g, it offers quick 3-second response times and multiple unit conversions. This manual provides essential information for the safe and efficient operation of your balance.

Image 1.1: VEVOR 0.01g High Precision Lab Scale, demonstrating its accuracy and quick response.
2. Safety Instructions
- Always operate the balance on a stable, level, and vibration-free surface.
- Avoid placing the balance near strong electromagnetic fields, heat sources, or direct sunlight.
- Do not overload the balance beyond its maximum capacity of 600g.
- Keep the balance clean and dry. Avoid exposure to liquids or corrosive substances.
- Use only the provided power adapter or recommended batteries.
- Do not attempt to disassemble or repair the balance yourself. Contact qualified personnel for service.
3. Package Contents
Verify that all items are present in the package:
- 1 x VEVOR Analytical Lab Balance (SF-400D)
- 1 x User Manual
- 1 x Power Adapter
- 1 x Metal Tray (Weighing Pan)
- 4 x Plastic Feet Pads
- 1 x USB to DC Cable (Note: May be included only for specific regions like AU)
4. Product Overview
Familiarize yourself with the main components and controls of your analytical balance.
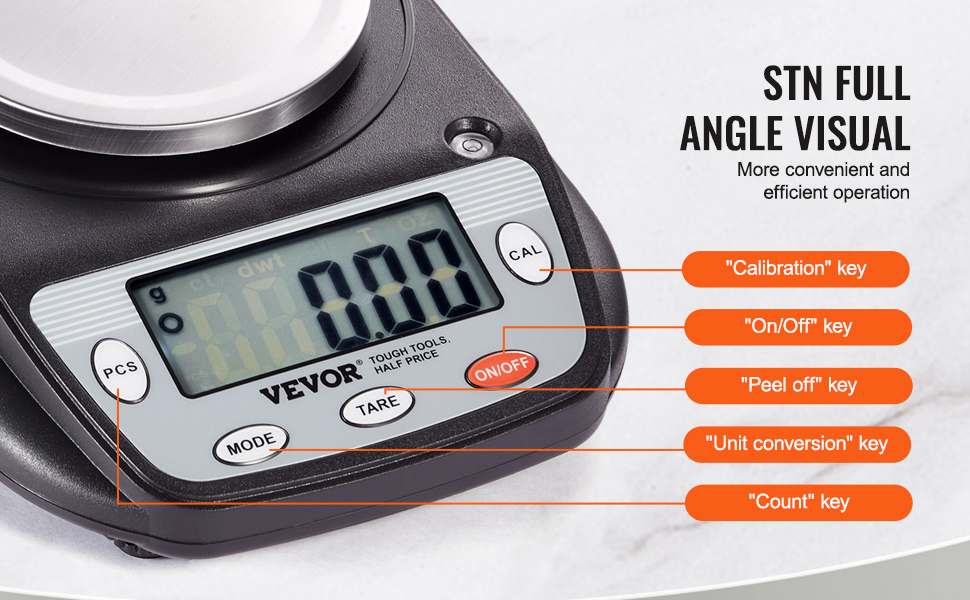
Image 4.1: LCD Display and Unit Conversion Options.

Image 4.2: Dual Power Modes and Key Features.
Control Panel:
- ON/OFF: Powers the balance on or off.
- MODE: Cycles through different weighing units (g, ct, dwt, GN, T, oz).
- TARE: Zeros the display, typically used to subtract the weight of a container.
- PCS (Count): Activates the counting function for uniform items.
- CAL (Calibration): Initiates the calibration process.
Other Features:
- LCD Display: Provides clear, easy-to-read weight data and unit indicators.
- 4.2" Round Weighing Pan: Made of stainless steel, designed to minimize airflow interference.
- Built-in Leveling Bubble: Helps ensure the balance is perfectly level for accurate readings.
- Adjustable Scale Feet: Used in conjunction with the leveling bubble to level the balance.
- RS232C Interface: For data transmission to printers or computers (cable not always included).
5. Setup
5.1 Unpacking
Carefully remove all components from the packaging. Retain the packaging for future storage or transport.
5.2 Placement
Place the balance on a firm, level, and stable surface, away from drafts, vibrations, and direct heat or cold sources. Ensure adequate space around the balance for operation.
5.3 Leveling the Balance
For accurate measurements, the balance must be perfectly level.
- Locate the built-in leveling bubble, usually found near the display or on the side of the balance.
- Adjust the four adjustable feet at the bottom of the balance until the air bubble is centered within the circle of the leveling bubble indicator.
Image 5.1: Leveling Bubble and Adjustable Feet for precise setup.
5.4 Power Connection
The balance supports dual power modes: AC adapter or batteries.
- AC Power: Connect the provided power adapter to the DC 5V input port on the balance and then plug it into a suitable wall outlet.
- Battery Power: If using batteries (not included), open the battery compartment and insert the required batteries, ensuring correct polarity.
6. Operating Instructions
6.1 Power On/Off
Press the ON/OFF button to turn the balance on. Press and hold the ON/OFF button for a few seconds to turn it off.
6.2 Unit Conversion
Press the MODE button repeatedly to cycle through the available weighing units: grams (g), carats (ct), pennyweights (dwt), grains (GN), taels (T), and ounces (oz).
6.3 Tare Function
The tare function allows you to subtract the weight of a container, so only the net weight of the contents is displayed.
- Place an empty container on the weighing pan.
- Wait for the reading to stabilize.
- Press the TARE button. The display will reset to zero.
- Add the items to be weighed into the container. The display will show the net weight of the items.

Image 6.1: Step-by-step guide for using the Tare Function.
6.4 Counting Function (PCS)
This function is useful for counting a large number of uniform items.
- Place a sample quantity of items (e.g., 10, 20, 50, or 100 pieces) on the weighing pan.
- Press and hold the PCS button until a sample size option appears (e.g., "10 PCS").
- Press the MODE button to select the sample size that matches the number of items you placed.
- Press PCS again to confirm. The display will now show the count of the sample.
- Add more items to the pan, and the balance will display the total count.
6.5 Calibration (CAL)
Regular calibration ensures the accuracy of your balance. A calibration weight (not included) is required.
- Ensure the balance is on a level surface and nothing is on the weighing pan.
- Press and hold the CAL button until "CAL" appears on the display, followed by the required calibration weight (e.g., "600.00g").
- Carefully place the specified calibration weight onto the center of the weighing pan.
- The display will show "PASS" or a similar indication when calibration is complete. Remove the weight.
- The balance will return to normal weighing mode.
7. Maintenance
7.1 Cleaning
To maintain accuracy and prolong the life of your balance:
- Wipe the balance with a soft, damp cloth. Do not use abrasive cleaners or immerse the unit in water.
- The stainless steel weighing pan can be removed for separate cleaning. Ensure it is dry before reattaching.
- Keep the display and buttons free from dust and debris.

Image 7.1: High-Quality Materials for durability and easy cleaning.
7.2 Storage
When not in use, store the balance in a clean, dry, and stable environment. If storing for an extended period, remove batteries to prevent leakage.
8. Troubleshooting
If you encounter issues with your balance, refer to the following common problems and solutions:
- No Display/Power:
- Check if the power adapter is securely connected and the outlet is functional.
- If using batteries, ensure they are correctly inserted and not depleted. Replace if necessary.
- Inaccurate Readings:
- Ensure the balance is on a stable, level surface and properly leveled using the bubble indicator.
- Perform a calibration using a known calibration weight.
- Avoid drafts, vibrations, or sudden temperature changes during weighing.
- Ensure nothing is touching the weighing pan or the balance body during measurement.
- "EEEE" or Overload Indication:
- The balance is overloaded. Remove items immediately to prevent damage.
If the problem persists after attempting these solutions, please contact VEVOR customer support for assistance.
9. Specifications
Detailed technical specifications for the VEVOR SF-400D Analytical Lab Balance:

Image 9.1: VEVOR Lab Balance Specifications.
| Feature | Specification |
|---|---|
| Model Number | SF-400D |
| Rated Voltage | 5V |
| Power Source | AC Adapter + Battery Supported |
| Unit Types | 6 (g, ct, dwt, GN, T, oz) |
| Display | LCD |
| Error / Precision | ±0.01g |
| Response Time | 3 Seconds |
| Max Weighing Capacity | 0.6 kg (600g) |
| Display Accuracy | 0.01g |
| Product Weight | 1.26 lb / 0.57 kg |
| Product Dimensions (L x W x H) | 8.07 x 6.30 x 2.36 in / 205 x 160 x 60 mm |
| Material | Plastic, Stainless Steel, Metal |
10. Warranty and Support
For warranty information, technical support, or service inquiries, please refer to the warranty card included with your product or visit the official VEVOR website. Keep your purchase receipt as proof of purchase.


