1. Introduction
Thank you for choosing the Dripex Makeup Vanity Desk D001. This manual provides essential information for the safe assembly, operation, and maintenance of your new vanity desk. Please read these instructions carefully before beginning assembly and retain them for future reference.
2. Safety Information
- Always assemble the product on a soft, clean surface to prevent scratches.
- Ensure all parts are securely fastened before use. Loose connections can lead to instability.
- Do not overload drawers or shelves. Distribute weight evenly.
- Keep small parts and packaging materials away from children to prevent choking hazards.
- Use the included anti-tipping device to secure the vanity to a wall, especially if children are present.
- Disconnect the LED mirror from the power source before cleaning or maintenance.
3. Package Contents
Verify that all components are present before assembly. The vanity desk is shipped in 2 separate packages.

Image: Overview of the vanity desk with key dimensions and an illustration of the two shipping packages.
Refer to the included parts list for detailed identification of each component and hardware.
4. Setup and Assembly
Assembly of the Dripex Makeup Vanity Desk D001 has been optimized for ease. Follow the steps below carefully.
4.1 Assembly Overview
Video: Detailed installation guide for the Dripex Makeup Vanity Desk with Lighted Mirror, demonstrating each step of the assembly process.
4.2 Step-by-Step Assembly
- Prepare the Base: Attach the drawer rails to the side panels (parts 3 and 5). Ensure the two holes are above the wheels on the rails.
- Assemble the Cabinet Section: Connect the bottom panel (part 2) and back support (part 9) to the side panels (parts 4 and 5) using wooden pegs (A).
- Attach the Desk Top: Secure the main desktop panel (part 1) to the assembled base using wooden pegs (A).
- Install the Mirror and Shelves: Attach the mirror unit (part 17) and the side shelves (parts 18, 19, 22) to the desktop.
- Assemble the Drawer: Construct the drawer using parts 13, 14, 15, 16, and 17. Attach the drawer rails (0-3/4) to the drawer.
- Install the Cabinet Door: Attach hinges (G) to the cabinet door (part 11) and then to the cabinet section. Install the door handle (H).
- Connect LED Power: Plug the LED mirror's power adapter into the designated port and then into a power outlet.
- Secure Anti-Tipping Device: Attach the anti-tipping straps (D, L) to the back of the vanity and to the wall.

Image: Illustration highlighting the simplified assembly process of Dripex products compared to others.
5. Operating Instructions
5.1 LED Mirror Operation
The integrated LED mirror offers adjustable lighting to suit various makeup requirements.
- Power On/Off: Lightly touch the sensor on the mirror to turn the LED lights on or off.
- Change Light Color: With the lights on, touch the sensor repeatedly to cycle through three light colors: white light, natural light, and warm light.
- Adjust Brightness: Long press the sensor to adjust the brightness level of the selected light color. Release when the desired brightness is achieved.
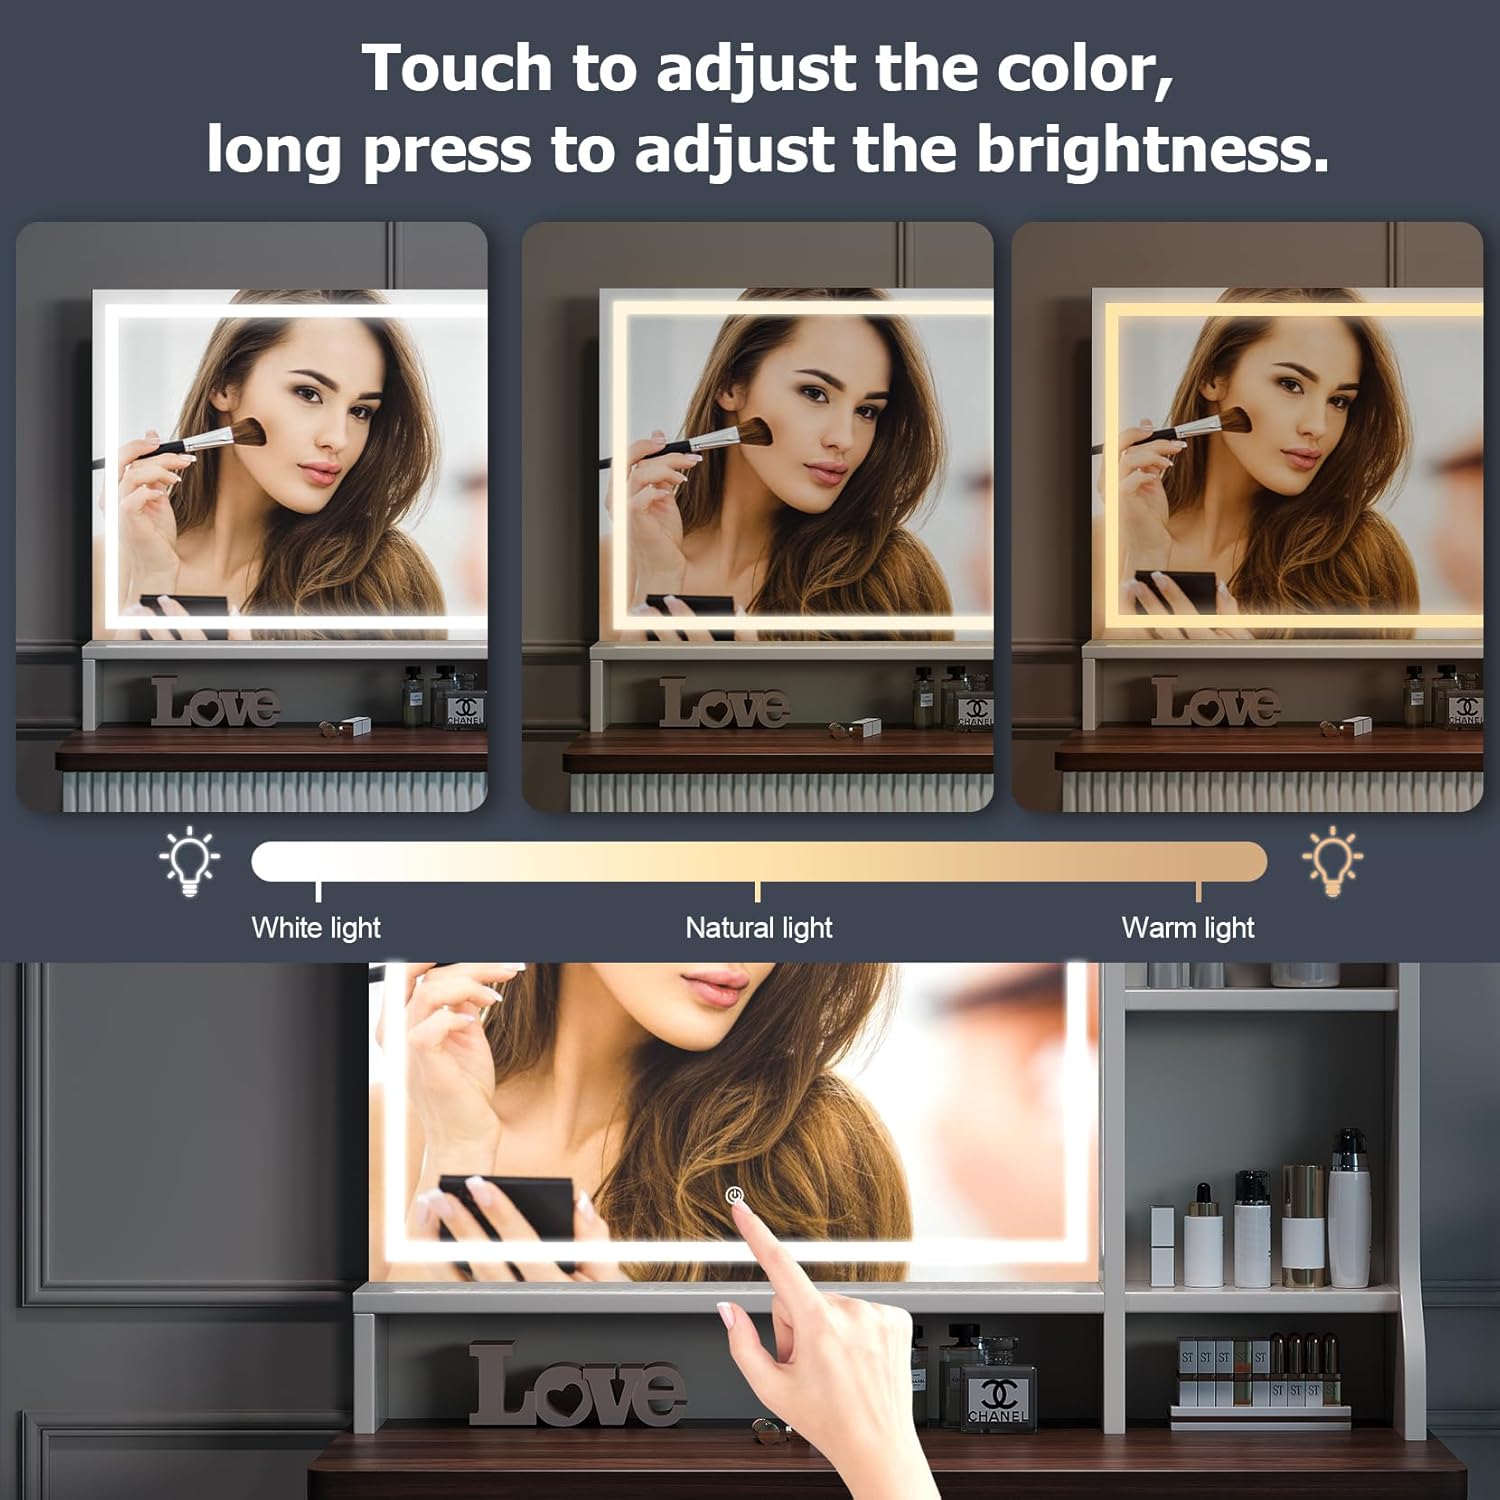
Image: Visual guide demonstrating the three adjustable light colors and brightness control of the LED mirror.
5.2 Storage Features
The vanity desk is designed with ample storage options:
- Drawer: A large drawer with a wave-patterned front provides concealed storage for cosmetics and accessories. It features a smooth slide rail design for easy opening and closing.
- Cabinet: An enclosed cabinet with adjustable shelves allows for customized storage of taller items or personal belongings.
- Open Shelves: Open shelves on the sides of the mirror provide convenient access and display space for frequently used items.
Video: A short demonstration showcasing the storage features of the Dripex Makeup Vanity Desk, including the drawer and cabinet.

Image: Detail of the side open shelves, ideal for organizing smaller items.

Image: The spacious drawer, shown with organizers for jewelry and cosmetics.

Image: The cabinet with three adjustable shelves, providing flexible storage for different sized items.
6. Maintenance
- Cleaning: Wipe surfaces with a soft, damp cloth. Avoid abrasive cleaners or harsh chemicals that may damage the finish.
- Mirror Care: Use a glass cleaner specifically designed for mirrors. Spray onto a cloth, not directly onto the mirror, to avoid liquid seeping into the LED components.
- Hardware: Periodically check all screws and fasteners to ensure they remain tight. Tighten as needed.
7. Troubleshooting
| Problem | Possible Cause | Solution |
|---|---|---|
| LED mirror lights do not turn on. | Power adapter not connected or faulty. | Ensure the power adapter is securely plugged into the mirror and a working electrical outlet. Check the power outlet with another device. |
| Lights are dim or flickering. | Brightness setting is low or power supply issue. | Long press the touch sensor to increase brightness. Check power connections. |
| Drawer does not slide smoothly. | Rails are misaligned or obstructed. | Check that the drawer rails are correctly installed and free from obstructions. Ensure screws are tight. |
| Vanity feels unstable. | Loose connections or uneven surface. | Verify all assembly screws are tightened. Place the vanity on a flat, level surface. Utilize the anti-tipping device. |
8. Specifications
- Model: D001
- Brand: Dripex
- Color: Beige Brown
- Material: Wood
- Product Dimensions: 15.7"D x 35.4"W x 54.6"H (40cm D x 90cm W x 138.7cm H)
- Item Weight: 67.2 pounds (30.5 kg)
- Assembly Required: Yes
- Special Features: Adjustable LED Mirror (3 light colors, adjustable brightness), Curved Edges, Ample Storage (drawer, adjustable cabinet shelves, open shelves), Anti-tipping Design.
- UPC: 840325690605
9. Warranty and Support
For customer support, please refer to the contact information provided at the point of purchase or visit the official Dripex store. Keep your purchase receipt for any warranty claims.


