1. Introduction
This manual provides comprehensive instructions for the installation, operation, and maintenance of your Hertz HMD1 Marine Mono Amplifier and HMS 10 S2-LD-SW Marine Subwoofer System. Please read this manual thoroughly before attempting installation or operation to ensure proper function and safety. This system is designed for marine environments, offering high-power audio performance and durability.
2. Safety Information
Always observe the following safety precautions to prevent injury or damage to the equipment:
- Power Supply: Ensure the power supply voltage matches the specified requirements (11-15 VDC). Incorrect voltage can damage the amplifier.
- Wiring: Use appropriate gauge wiring for power, ground, and speaker connections. Improper wiring can lead to overheating or electrical fire.
- Fuses: The amplifier is equipped with dual 30A fuses. Always replace fuses with the same type and rating. Never bypass fuses.
- Mounting: Securely mount all components in a location that is protected from direct water exposure, excessive heat, and vibration. Ensure adequate ventilation for the amplifier.
- Water Exposure: While designed for marine use, avoid submerging components. Ensure all connections are watertight.
- Professional Installation: If you are unsure about any aspect of installation, consult a qualified marine audio technician.
3. Product Overview
The Hertz HMD1 Marine Mono Amplifier and HMS 10 S2-LD-SW Marine Subwoofer System is engineered for robust audio performance in marine applications.
Hertz HMD1 Marine Mono Amplifier
The HMD1 is a compact, high-power mono amplifier designed to deliver consistent performance. It features a robust power output, low distortion, and a high signal-to-noise ratio, making it suitable for driving subwoofers in marine environments.

Figure 1: Angled view of the Hertz HMD1 Marine Mono Amplifier, showing its compact design and heat sink fins.

Figure 2: Rear panel of the Hertz HMD1 amplifier, detailing power, speaker, and input connections, along with control switches.
Hertz HMS 10 S2-LD-SW Marine Subwoofer
The HMS 10 S2-LD-SW subwoofers are engineered for high-power, infinite-baffle operation, eliminating the need for a dedicated enclosure. They feature durable polypropylene cones with UV inhibitors, high-density flux ferrite magnets, and integrated RGB LEDs for customizable lighting effects. The white sport grilles are paintable to match your vessel's aesthetics.

Figure 3: Hertz HMS 10 S2-LD-SW Marine Subwoofer featuring a white sport grille and integrated RGB LEDs.
4. Setup and Installation
Careful installation is crucial for optimal performance and longevity of your marine audio system.
4.1 Amplifier Mounting
Choose a mounting location that is dry, well-ventilated, and protected from direct sunlight and excessive heat. Ensure there is sufficient space around the amplifier for air circulation. Secure the amplifier using appropriate fasteners to a solid surface.
4.2 Wiring Connections (HMD1 Amplifier)
Refer to Figure 2 for connection points.
- Power (POWER - 12V): Connect the positive (+) terminal to the boat's 12V battery via a fused power cable. Connect the negative (-) terminal to a solid ground point on the boat's chassis or battery negative. Use heavy-gauge wire suitable for the current draw.
- Fuses (FUSE 2x30A): The amplifier is protected by two 30A blade fuses. Ensure these are correctly installed.
- Speaker Out (SPEAKER OUT 1, 2): Connect your subwoofers to these terminals. The HMD1 is a mono amplifier, so both subwoofers should be wired in parallel to achieve a 1-Ohm or 2-Ohm load, depending on the subwoofer impedance. For two 2-Ohm subwoofers, wiring them in parallel will result in a 1-Ohm load.
- SPK IN / REM IN / MUTE: These terminals are for speaker-level inputs and remote turn-on/mute functions.
- PRE IN (RCA): Connect your head unit's RCA pre-out to this input for a low-level signal.
- SENSITIVITY (H, M, L): This switch adjusts the input sensitivity. Set it to match the output level of your head unit.
- ART ON/OFF: Automatic Remote Turn-on. When ON, the amplifier will turn on automatically when it detects an audio signal on the speaker-level inputs. When OFF, a remote turn-on wire is required.
- LINK ON/OFF: Used for linking multiple amplifiers. Refer to advanced wiring diagrams if using this feature.
4.3 Subwoofer Installation (HMS 10 S2-LD-SW)
The HMS 10 S2-LD-SW subwoofers are designed for infinite-baffle applications, meaning they do not require a sealed enclosure. They can be mounted directly into a panel or bulkhead, using the boat's interior volume as the 'enclosure'.
- Mounting Location: Choose a sturdy, flat surface with sufficient depth clearance (refer to specifications for dimensions). Ensure the mounting surface is rigid enough to prevent vibrations.
- Cutout: Carefully cut the mounting hole according to the specified diameter.
- Wiring: Connect the subwoofer's terminals to the amplifier's speaker outputs. Ensure correct polarity (+ to + and - to -). For two 2-Ohm subwoofers, wire them in parallel to the HMD1 amplifier for a 1-Ohm load.
- RGB LED Wiring: Connect the RGB LED wires to a compatible RGB controller (not included) for customizable lighting effects. Follow the controller's instructions for wiring.
- Grille Installation: Secure the white sport grille over the subwoofer. The grille can be painted to match your vessel's color scheme.
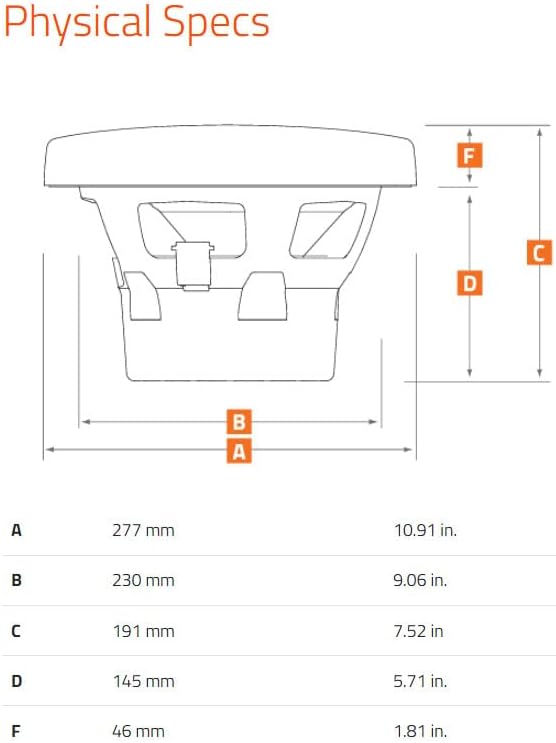
Figure 4: Physical dimensions diagram for the Hertz HMS 10 S2-LD-SW Subwoofer, showing measurements A, B, C, D, and F.
5. Operating Instructions
5.1 Powering On/Off
The amplifier will power on when a remote turn-on signal is received (either from the head unit's remote output or via the ART function if enabled). It will power off when this signal is removed.
5.2 Adjusting Sensitivity (Gain)
The SENSITIVITY switch on the HMD1 amplifier allows you to match the amplifier's input level to the output level of your head unit. Start with the switch in the 'L' (Low) position and gradually increase it to 'M' (Medium) or 'H' (High) if needed. Adjust the gain control on the amplifier (if present, not explicitly detailed in provided data) to achieve maximum clean output without distortion. It is recommended to set the head unit volume to about 75% of maximum, then adjust the amplifier gain until the sound is loud and clear without audible distortion. If distortion occurs, reduce the gain.
5.3 RGB LED Control
The integrated RGB LEDs in the HMS 10 S2-LD-SW subwoofers require an external RGB controller (not supplied) for operation. Connect the subwoofer's RGB wiring to the controller according to the controller's instructions. This allows for customization of color and lighting effects.
6. Maintenance
Regular maintenance ensures the longevity and optimal performance of your marine audio system.
- Cleaning: Periodically clean the amplifier and subwoofers with a soft, damp cloth. Avoid using harsh chemicals or abrasive cleaners. Ensure all components are dry before operation.
- Connection Inspection: Annually inspect all power, ground, speaker, and signal connections for corrosion, looseness, or damage. Tighten any loose connections and clean any corrosion.
- Fuse Replacement: If the amplifier fails to power on, check the 30A fuses. Replace blown fuses only with fuses of the same type and rating.
- Environmental Checks: Ensure the amplifier's mounting area remains well-ventilated and free from obstructions. Verify that subwoofers are securely mounted and grilles are intact.
7. Troubleshooting
If you experience issues with your system, refer to the following common problems and solutions:
| Problem | Possible Cause | Solution |
|---|---|---|
| Amplifier does not power on | Blown fuse Loose power/ground connection No remote turn-on signal Low battery voltage | Check and replace fuses Verify and tighten all power/ground connections Check remote wire connection or ART setting Charge or check boat battery |
| No sound from subwoofers | Loose speaker wires Incorrect input sensitivity Head unit not sending signal Amplifier in protection mode | Check and secure speaker connections Adjust SENSITIVITY switch and gain Verify head unit output Check for overheating or short circuits |
| Distorted sound | Gain set too high Poor quality input signal Damaged speaker wire or subwoofer | Reduce amplifier gain Check RCA cables and head unit output Inspect speaker wires and subwoofer cone for damage |
| Subwoofer RGB LEDs not working | Incorrect wiring to controller Faulty RGB controller Damaged LED strip | Verify RGB wiring connections Test with a known good controller Contact support if LEDs are damaged |
8. Specifications
Hertz HMD1 Marine Mono Amplifier
| Feature | Specification |
|---|---|
| Power Output (RMS) | 800 W x 1 at 2-Ohm Up to 1000 W x 1 at 1-Ohm |
| Distortion (THD) | 0.1% |
| Signal-to-Noise Ratio (S/N) | 110 dBA |
| Damping Factor | 140 at 100 Hz |
| Power Supply Voltage | 11-15 VDC |
| Fuses | Dual 30A |
| Inputs | Pre-in RCA, Wired Speaker Inputs |
| Features | Mute Function, Automatic Remote Turn On/Off |
| Item Weight | 26.9 pounds (System Weight) |
| Package Dimensions | 19 x 15 x 9 inches (System Dimensions) |
| Model Number | HertzBDL240610-03 |
Hertz HMS 10 S2-LD-SW Marine Subwoofer
| Feature | Specification |
|---|---|
| Size | 10 inches |
| Impedance | 2-Ohm |
| Power Handling (Continuous/Peak) | 250W / 500W |
| Voice Coil | 50 mm (2 in.) |
| Magnet Size | 140 x 60 x 30 mm (5.51 x 2.36 x 1.18 in.) |
| SPL Rating | 88.5 dB |
| Fs (Resonant Frequency) | 43 Hz |
| Qts (Total Q Factor) | 0.60 |
| Xmech (Mechanical Excursion) | ±16.3 mm (0.64 in.) |
| Depth | 191 mm (7.52 in.) |
| Features | RGB LEDs, White Sport Grille (paintable), UV Inhibitors |
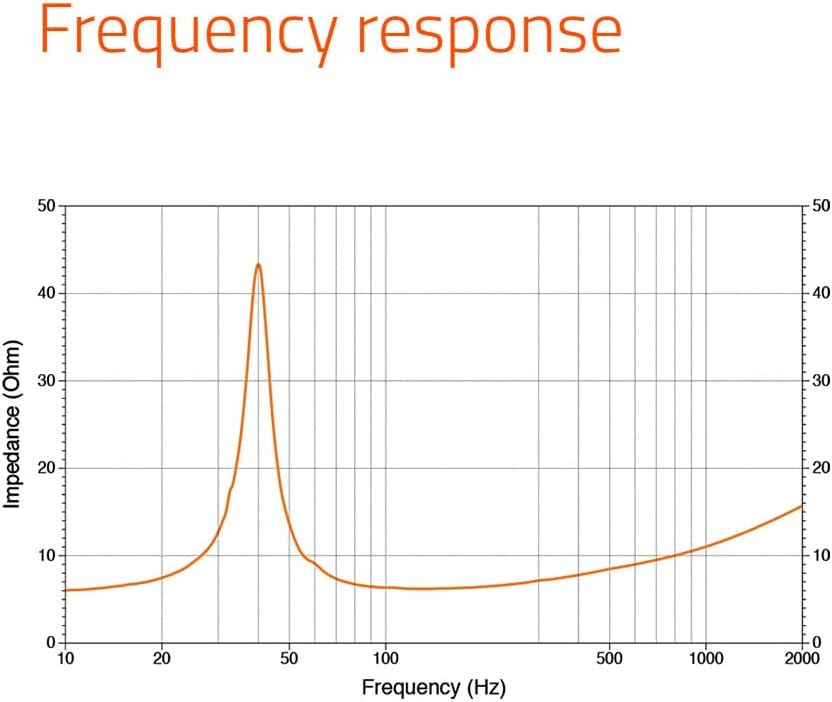
Figure 5: Frequency response graph for the Hertz HMS 10 S2-LD-SW Subwoofer, showing impedance (Ohm) versus frequency (Hz).
9. Warranty Information
This Hertz product is covered by a 1-Year Manufacturer Warranty from the date of purchase. This warranty covers defects in materials and workmanship under normal use. It does not cover damage resulting from improper installation, accident, misuse, abuse, neglect, unauthorized modification, or normal wear and tear. Please retain your proof of purchase for warranty claims.
10. Support
For technical assistance, troubleshooting beyond this manual, or warranty inquiries, please contact Hertz customer support or your authorized Hertz dealer. Refer to the official Hertz website for contact information and additional resources.


