
UBeesize UB-XBD10BK
UBeesize 10" Key Light Instruction Manual
Model: UB-XBD10BK
Product Overview
The UBeesize 10" Key Light is designed to provide soft, bright, and even illumination for various applications such as video conferencing, streaming, gaming, podcasting, and video recording. It features advanced side-lighting technology to enhance facial contours and reduce glare, along with a stable and flexible adjustable arm for optimal positioning.
Key features include:
- Side-Lighting Technology: Produces soft, bright illumination, enhancing facial features and reducing glare.
- Stable and Flexible Arm: Multi-position rotation with a control knob for stability and optimal lighting angles.
- Convenient Timer Functions: Includes 2-hour, 4-hour, and 8-hour timer options.
- Stable and Space-Saving Design: Metal C-clamp with adjustable stand and non-slip silicone base.
- Versatile Application: Suitable for home office, gaming setups, live streams, and commercial photography.
What's in the Box
Please check the package contents to ensure all items are present:
- 10'' Light
- Articulating Arm
- Desk Clamp
- Power Adapter
- User Manual
Setup Instructions
Follow these steps to set up your UBeesize Key Light:
1. Attach the Desk Clamp:
Unscrew the locking bolt counter-clockwise on the metal C-clamp. Position the clamp on your desk (maximum thickness 3 inches) and tighten the screws to secure it firmly. Ensure the non-slip silicone base is in contact with the desk surface to prevent scratches.

Image: The metal C-clamp securely attached to a desk, providing a stable base for the light.
2. Insert the Articulating Arm:
Insert the tripod arm into the desk clamp. Tighten the bolt clockwise to secure the arm in place. The arm's rod length is 13.5 inches, allowing for flexible height adjustments.

Image: The articulating arm being inserted into the desk clamp, ready for the light head attachment.
3. Attach the Light Head:
Align the lamp's bottom hole to the tripod arm's thread. Tighten the locking screw clockwise to firmly attach the 10" light head to the articulating arm.

Image: The circular light head being screwed onto the top of the articulating arm.
4. Adjust Light Angle and Position:
Adjust the lamp to your desired angle using the multi-axis adjustment points on the arm. Tighten the knob clockwise to secure the light head's position. The arm allows for 360° full rotation and various bends for optimal lighting effects.

Image: A diagram illustrating the various articulation points and 360-degree rotation of the light arm.
5. Connect Power:
Plug the power adapter into the light and then into a standard electrical outlet. The light is now ready for operation.
Note: To detach the tripod arm, first loosen the locking bolt by turning counter-clockwise.
Operating Instructions
The UBeesize Key Light features intuitive button controls for easy adjustment of light settings.

Image: Close-up of the light's control panel, showing buttons for power, color temperature, brightness, and timer.
- Power On/Off: Press the Power button (usually indicated by a circle with a vertical line) to turn the light on or off.
- Adjust Brightness: Use the '+' and '-' buttons to increase or decrease the light intensity. There are 10 brightness levels available.
- Change Color Temperature: Press the Color Conversion button (often indicated by a sun or color palette icon) to cycle through three color modes: Warm Light, Natural Light, and Cold Light.
- Set Timer: Press the Timer button (indicated by a clock icon or 'H' symbols) to set the light to automatically turn off after 2 hours, 4 hours, or 8 hours.

Image: Visual representation of the three distinct color temperature modes: Warm, Natural, and Cold Light.
Maintenance
To ensure the longevity and optimal performance of your UBeesize Key Light, follow these simple maintenance guidelines:
- Cleaning: Gently wipe the light panel and arm with a soft, dry, or slightly damp cloth. Avoid using abrasive cleaners or solvents, as they may damage the surface.
- Storage: When not in use, especially for extended periods, store the light in a cool, dry place away from direct sunlight and extreme temperatures. The light can be folded neatly for space-saving convenience.
- Cable Care: Do not bend or crimp the power cable excessively. Ensure it is not placed under heavy objects or in areas where it could be tripped over.
- Joints and Knobs: Periodically check the tightness of all knobs and joints on the articulating arm to maintain stability. Do not overtighten.
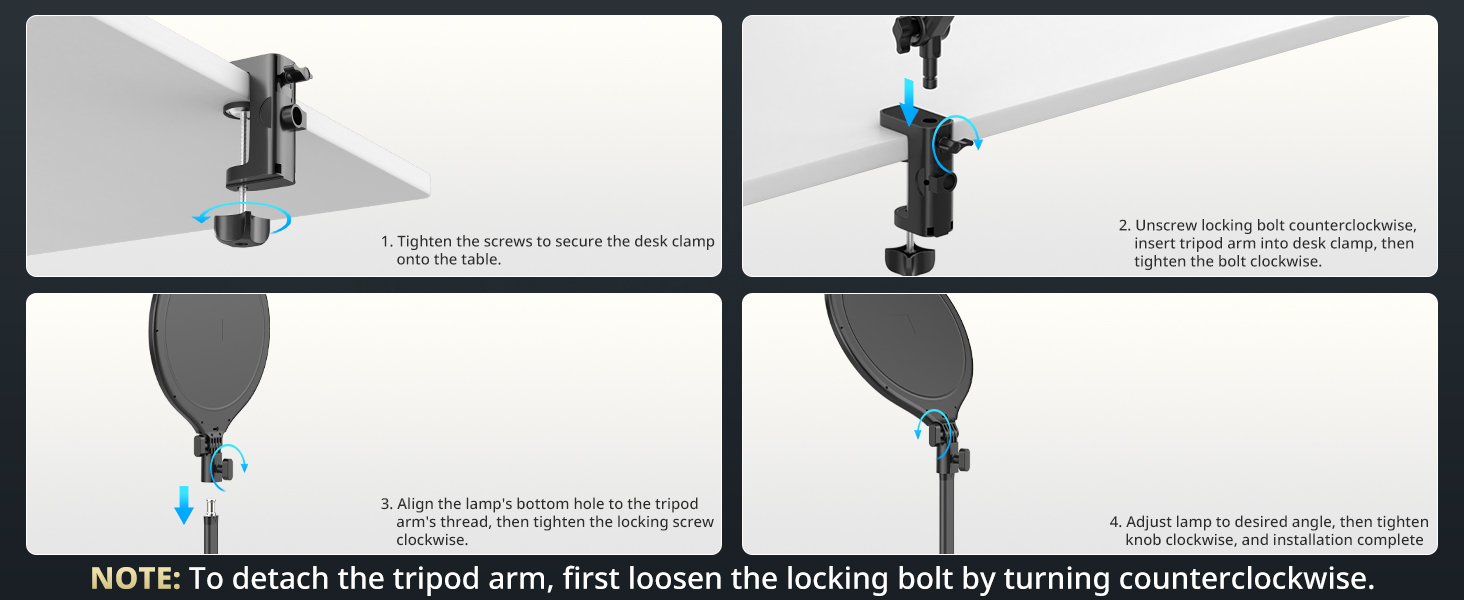
Image: The UBeesize Key Light folded compactly against a desk, demonstrating its space-saving design.
Troubleshooting
If you encounter any issues with your UBeesize Key Light, please refer to the following common problems and solutions:
| Problem | Possible Cause | Solution |
|---|---|---|
| Light does not turn on or blinks when plugged in. |
|
|
| Light is not bright enough or flickers. |
|
|
| Arm is not stable or sags. |
|
|
Troubleshooting Video Example:
Video: A customer demonstrates an issue where the light's power indicator blinks and the light does not turn on, suggesting a potential power or internal fault. (Duration: 1:06)
Specifications
| Feature | Detail |
|---|---|
| Product Dimensions | 2 x 12 x 39 inches |
| Item Weight | 2.55 pounds |
| Model Number | UB-XBD10BK |
| Brand | UBeesize |
| Connectivity Technology | Bluetooth (for potential future features or accessories, not directly for light control as per current understanding) |
| Flash Modes Description | Constant illumination |
| Hardware Interface | Bluetooth 4.0 |
| Batteries | 1 Lithium Metal battery required (included) |
| Date First Available | October 9, 2024 |
Warranty and Support
For information regarding product warranty, returns, or technical support, please refer to the official UBeesize website or contact their customer service directly. Details are typically provided on the product packaging or through the retailer where the product was purchased.
You may also visit the UBeesize Store on Amazon for additional product information and support resources.
Ask a question about this manual
Ask about setup, troubleshooting, compatibility, parts, safety, or missing instructions. Manuals+ will review the question and use this page’s manual context to help answer it.