
Introduction
This manual provides detailed instructions for the installation, operation, and maintenance of your Desktronic Dual Monitor Support. Please read this manual thoroughly before installation to ensure correct setup and safe use of the product. Keep this manual for future reference.
Safety Information
- Ensure all components are present and undamaged before assembly.
- Do not exceed the maximum weight capacity of 8 kg (17.6 lbs) per monitor.
- Do not exceed the maximum monitor size of 34 inches.
- Ensure the desk surface is stable and strong enough to support the combined weight of the monitor arm and monitors.
- Tighten all screws firmly, but do not overtighten.
- Keep children and pets away during installation.
- Always use two people for lifting and positioning heavy monitors.
- Adjust the gas spring tension carefully to match your monitor's weight.
Package Contents
Please verify that all parts are included in your package:
- Monitor Arm Assembly (2 arms, 1 base)
- Desk Clamp
- Grommet Base
- VESA Plates (2)
- Hardware Kit (screws, washers, Allen keys)
- Cable Management Clips

Image: All components of the Desktronic Dual Monitor Support, including the base, two arms, VESA plates, desk clamp, grommet mount, and various screws and tools.
Setup Instructions
The Desktronic Dual Monitor Support offers two installation methods: Desk Clamp and Grommet Mount.
1. Choose Your Mounting Method
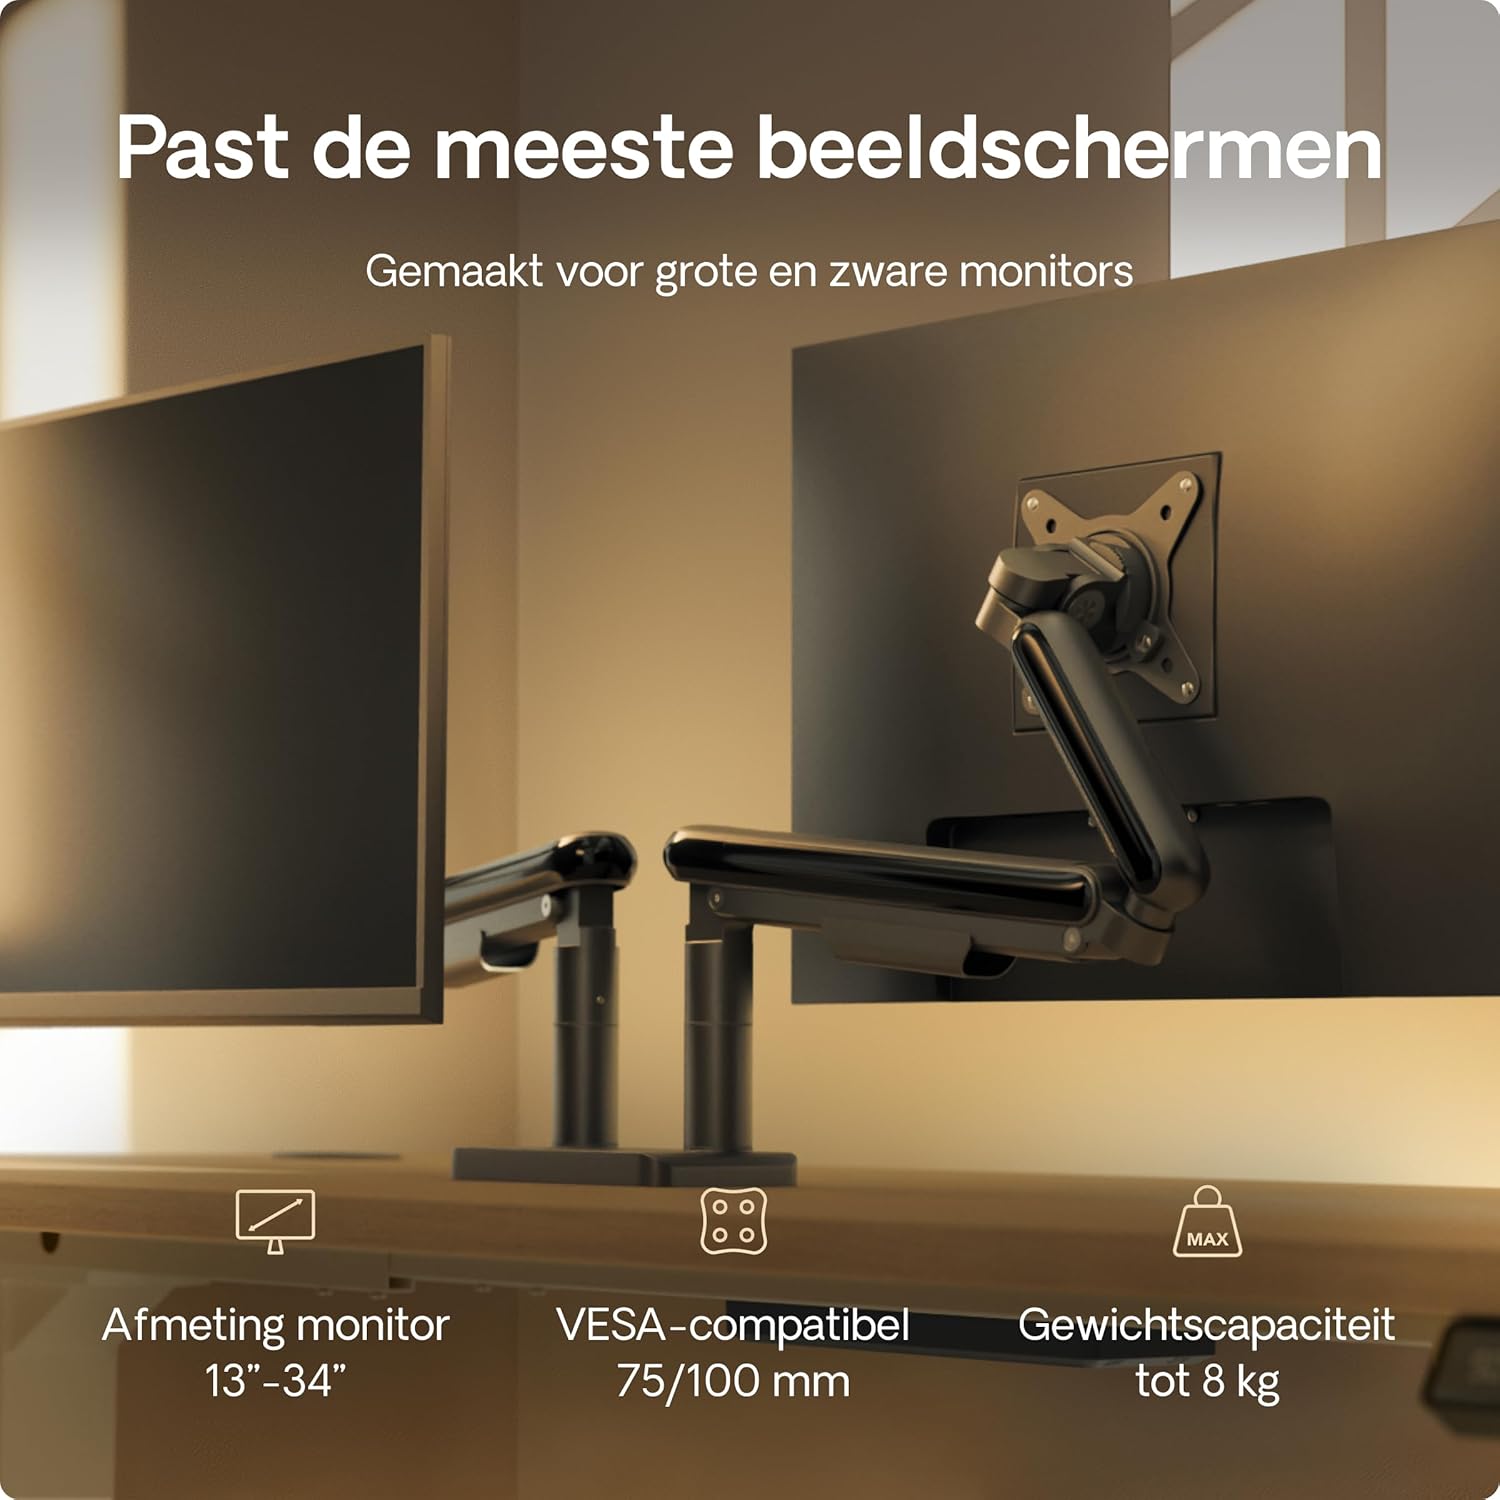
Image: Illustration showing the two installation options: a desk clamp for the edge of a desk and a grommet mount for desks with a pre-drilled hole. The desk thickness range of 10-40mm is indicated.
Desk Clamp Installation (for desk edges 10-40mm thick)
- Attach the desk clamp to the main pole using the provided screws.
- Position the monitor arm base on the edge of your desk.
- Tighten the clamp screw until the arm is securely fastened to the desk.
Grommet Mount Installation (for desks with a hole)
- If your desk has a grommet hole, insert the grommet base through the hole.
- Secure the grommet base from underneath the desk using the provided plate and screw.
- Attach the monitor arm base to the grommet base.
2. Attach Monitor Arms to Base
Slide the monitor arms onto the central pole of the base. Ensure they are at the desired height before tightening the locking mechanism.
3. Attach VESA Plates to Monitors
- Locate the VESA mounting holes on the back of your monitors (75x75mm or 100x100mm).
- Attach the VESA plates to the back of each monitor using the appropriate screws from the hardware kit. Do not overtighten.

Image: A VESA plate being attached to the back of a monitor using screws, demonstrating the connection point for the monitor arm.
4. Mount Monitors to Arms
- Carefully lift each monitor (preferably with assistance) and slide the VESA plate attached to the monitor onto the VESA head of the monitor arm.
- Ensure the monitor is securely locked in place.
5. Cable Management
Route your monitor cables through the integrated cable management channels on the arms and central pole to maintain a tidy workspace.
Operating Instructions and Adjustments
The Desktronic Dual Monitor Support offers extensive adjustability for an ergonomic setup.

Image: A diagram illustrating the range of motion for the monitor arm, including 360-degree rotation at the base and VESA plate, 180-degree swivel, and 90-degree tilt for optimal positioning.
Height Adjustment
The gas spring mechanism allows for smooth vertical adjustment. Gently push or pull the monitor to the desired height. If the monitor sags or springs up, adjust the gas spring tension using the provided Allen key (refer to the tension adjustment screw on the arm).
Tilt Adjustment
Tilt your monitor up or down to reduce glare and optimize viewing angles. Loosen the tilt screw, adjust the monitor, and then retighten the screw.
Swivel Adjustment
Swivel your monitor left or right to share your screen with others or to find your preferred viewing angle.
Rotation (Landscape/Portrait)
Rotate your monitor 360 degrees to switch between landscape and portrait orientations as needed for different tasks.
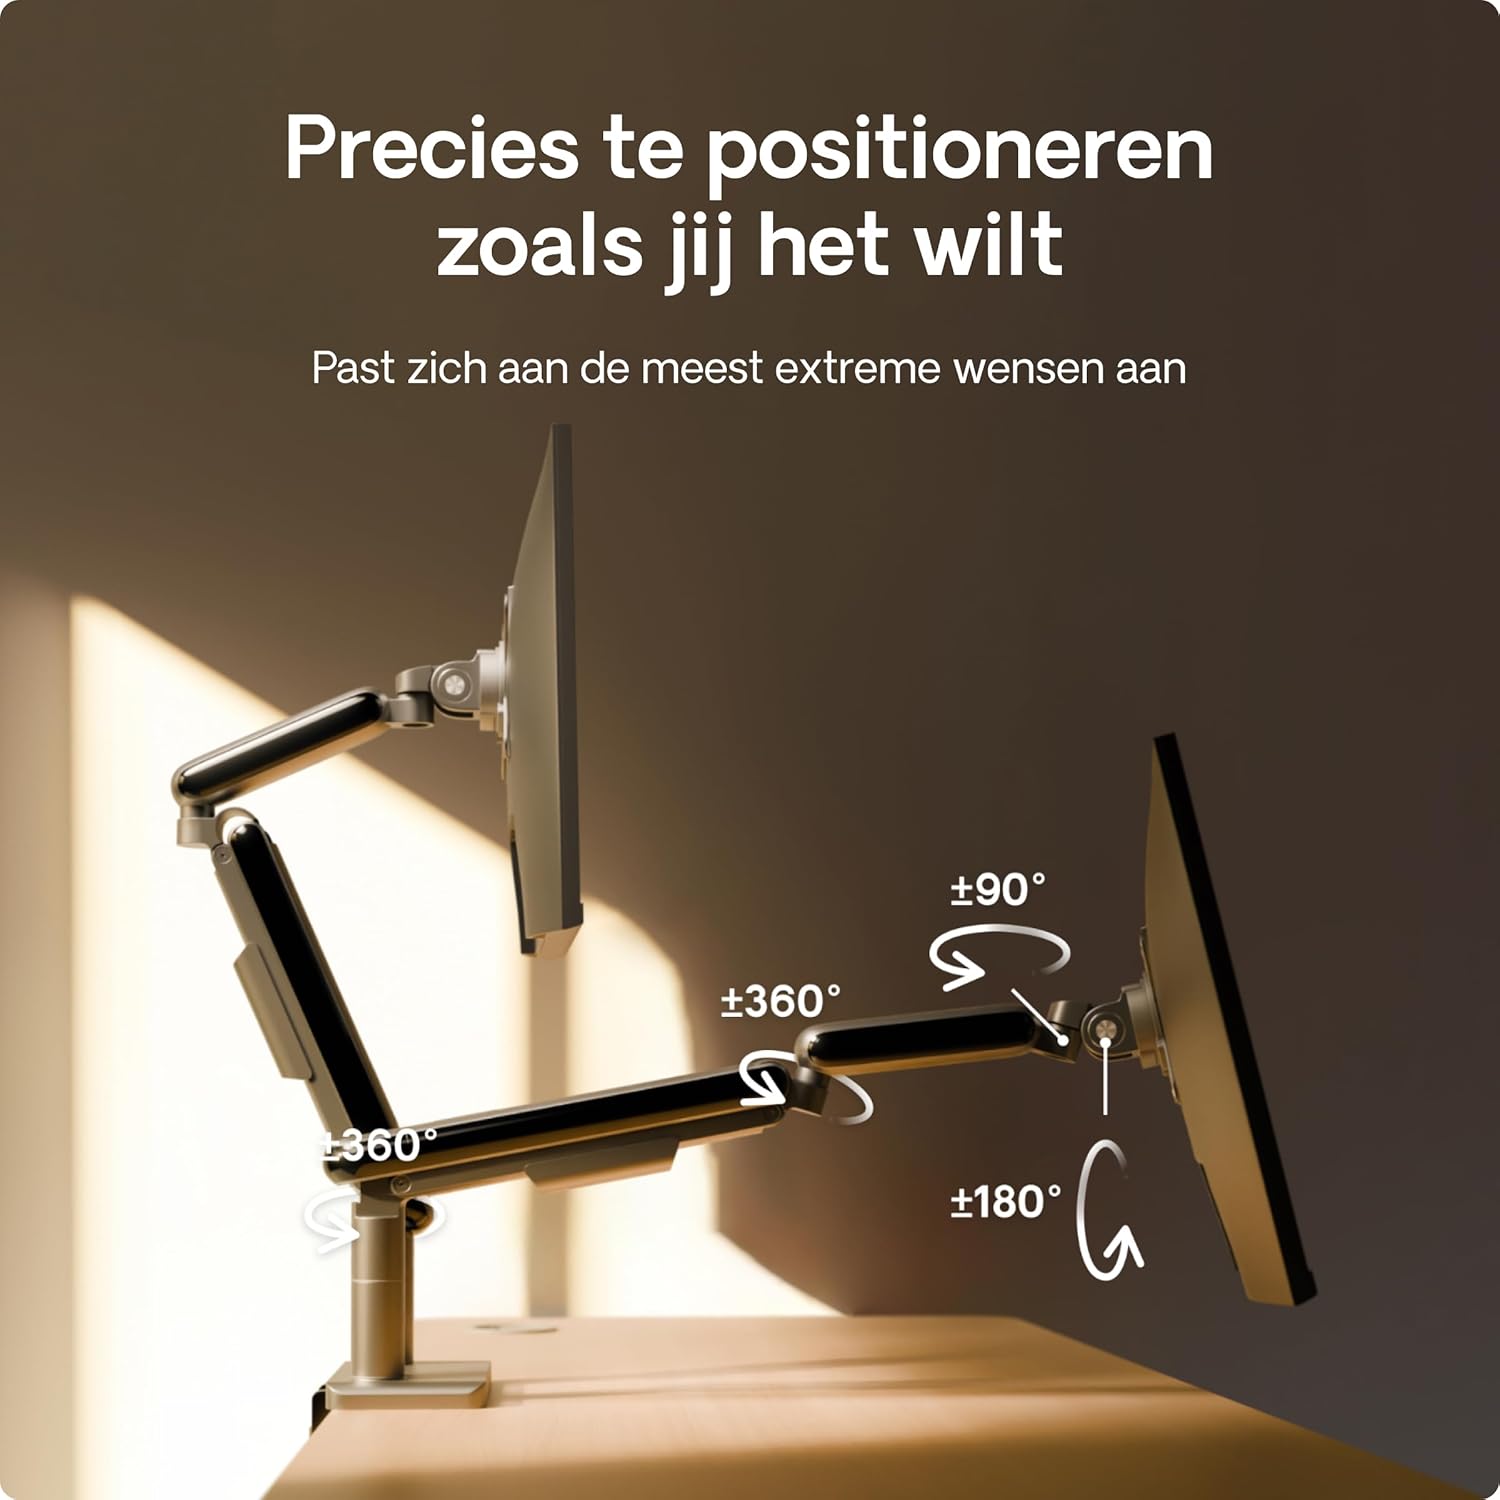
Image: A user effortlessly switching a monitor from a horizontal (landscape) orientation to a vertical (portrait) orientation, highlighting the flexibility of the monitor arm.
Ergonomic Positioning
Position your monitors so that the top of the screen is at or slightly below eye level, and your arms are comfortable when typing. This helps reduce neck and eye strain.

Image: A person working comfortably at a desk with two monitors mounted on the Desktronic arm, illustrating the ergonomic benefits of proper monitor positioning.
Maintenance
To ensure the longevity and optimal performance of your Desktronic Dual Monitor Support:
- Cleaning: Wipe the surface with a soft, damp cloth. Avoid abrasive cleaners or solvents.
- Periodic Checks: Regularly check all screws and connections to ensure they remain tight and secure.
- Gas Spring Adjustment: If your monitor's weight changes, or if the arm starts to sag or rise unexpectedly, re-adjust the gas spring tension.
Troubleshooting
- Monitor Sags or Does Not Stay at Desired Height:
- The gas spring tension may be too low for your monitor's weight. Use the provided Allen key to increase the tension (turn clockwise). Test the adjustment until the monitor stays in place.
- Monitor Springs Upwards:
- The gas spring tension may be too high. Use the provided Allen key to decrease the tension (turn counter-clockwise). Test the adjustment until the monitor stays in place.
- Monitor is Not Level:
- Check the VESA plate attachment to the monitor and the arm. Ensure all screws are tightened evenly. Some VESA heads allow for minor leveling adjustments.
- Arm Feels Unstable:
- Ensure the desk clamp or grommet mount is securely tightened to the desk. Verify that the desk itself is stable and not wobbling.

Image: A visual comparison highlighting the stability of the Desktronic monitor arm against a less stable competitor, emphasizing the robust design.
Specifications
| Feature | Detail |
|---|---|
| Brand | Desktronic |
| Model Number | DUAL |
| Color | Black |
| Compatible Devices | Monitors |
| Material | Metal (High-strength steel, Aircraft-grade aluminum) |
| Mounting Type | Table Mount (Clamp or Grommet) |
| Movement Type | Rotational, Tilt, Swivel, Height Adjustable (Gas Spring) |
| Max Tilt Angle | 90 degrees |
| VESA Compatibility | 75x75mm, 100x100mm |
| Monitor Size Compatibility | 13 - 34 inches |
| Weight Capacity (per arm) | Up to 8 kg (17.6 lbs) |

Image: A visual summary of the monitor arm's compatibility, indicating support for monitors between 13 and 34 inches, VESA standards of 75/100mm, and a maximum weight capacity of 8 kg per arm.
Warranty and Support
For warranty information or technical support, please contact Desktronic directly through their official website or the retailer where the product was purchased. Please have your purchase receipt and product model number (DUAL) ready when contacting support.