
1. Introduction
This manual provides detailed instructions for the installation, operation, and maintenance of your AQQA Dual-Use Aquarium Filter and Water Pump, Model AQ126. This versatile device is designed to enhance your aquarium's environment through efficient water filtration, circulation, oxygenation, and wave-making functions. It can also be used as a standalone water pump for various tasks.
2. Product Features
- Powerful Performance: 18W motor suitable for 40-80 gallon aquariums, delivering a flow rate of 260 GPH (1200 L/H). Constructed with high-quality ABS material and a pure copper motor for durability.
- Multi-functional Design: Integrates water filtration, rain shower, wave generation, oxygen dissolution, and water circulation capabilities.
- Advanced Filtration System: Features built-in biochemical sponge, activated carbon, and bacterial ceramic balls for comprehensive water purification and odor removal.
- Adjustable Flow Rate: Easily control water output by rotating the switch on the unit.
- Versatile Water Pump: Can be converted into a small side suction pump for water changes, refilling, or fountain applications.
- Easy Assembly and Maintenance: Designed for straightforward installation and disassembly for routine cleaning.

Figure 1: The AQQA Dual-Use Aquarium Filter and Water Pump installed in an aquarium, demonstrating its primary function of water filtration and circulation.
3. Package Contents
Please verify that all components are present before proceeding with installation:
- Main Filter Unit (Water Pump)
- Filter Box
- Filter Sponge
- Activated Carbon Media
- Bioceramic Balls
- Rain Shower Bar
- Air Tube with Air Stone
- Water Outlet Nozzles (various sizes)
- Connector for Rain Shower Pipe
- Suction Cups (for mounting)

Figure 2: A comprehensive diagram displaying all individual parts of the AQQA filter, including accessories like the rain shower and air tube, along with key product specifications.
4. Safety Information
- Always ensure the pump is fully immersed in water before connecting to power. Dry burning will damage the pump and void the warranty.
- Disconnect power before performing any maintenance, cleaning, or assembly.
- Do not operate the pump if the power cord or plug is damaged.
- Keep out of reach of children.
5. Setup Instructions
5.1. Filter Assembly
- Carefully unpack all components.
- Insert the filter sponge, activated carbon, and bioceramic balls into the filter box in the correct order (refer to Figure 3).
- Attach the filter box to the main pump unit by twisting until secure.
- Connect the desired water outlet nozzle or the rain shower bar to the pump's outlet.
- If using for oxygenation, connect the air tube and air stone to the designated port.

Figure 3: A visual guide illustrating the assembly process of the filter, from connecting the main pump unit to inserting the filter media and securing the filter box.
5.2. Aquarium Placement
- Attach the suction cups to the main filter unit.
- Submerge the entire filter unit into your aquarium, ensuring it is fully underwater.
- Press the suction cups firmly against the inner glass wall of the aquarium to secure the filter.
- Position the water outlet (nozzle or rain shower) to achieve desired water flow and surface agitation.
6. Operating Instructions
6.1. Powering On
Once the filter is fully assembled and submerged in water, connect the power plug to a suitable electrical outlet. The pump will begin operating immediately.
6.2. Adjusting Flow Rate
The water flow rate can be adjusted by rotating the switch located on the top half of the main unit. Rotate towards 'MIN' for reduced flow and 'MAX' for increased flow. Note that the flow cannot be completely turned off. Continuous use at the minimum flow rate is not recommended as it may overload the pump and reduce its lifespan.

Figure 4: This image demonstrates how to adjust the water flow rate using the integrated switch on the filter unit, showing the difference between minimum and maximum output.
6.3. Using as a Water Pump
To use the device as a standalone water pump for tasks like water changes or refilling, remove the middle cartridge section (filter box) and install a water nozzle directly onto the pump outlet. Ensure the pump is submerged at least 2.4 inches (6 cm) for proper operation.
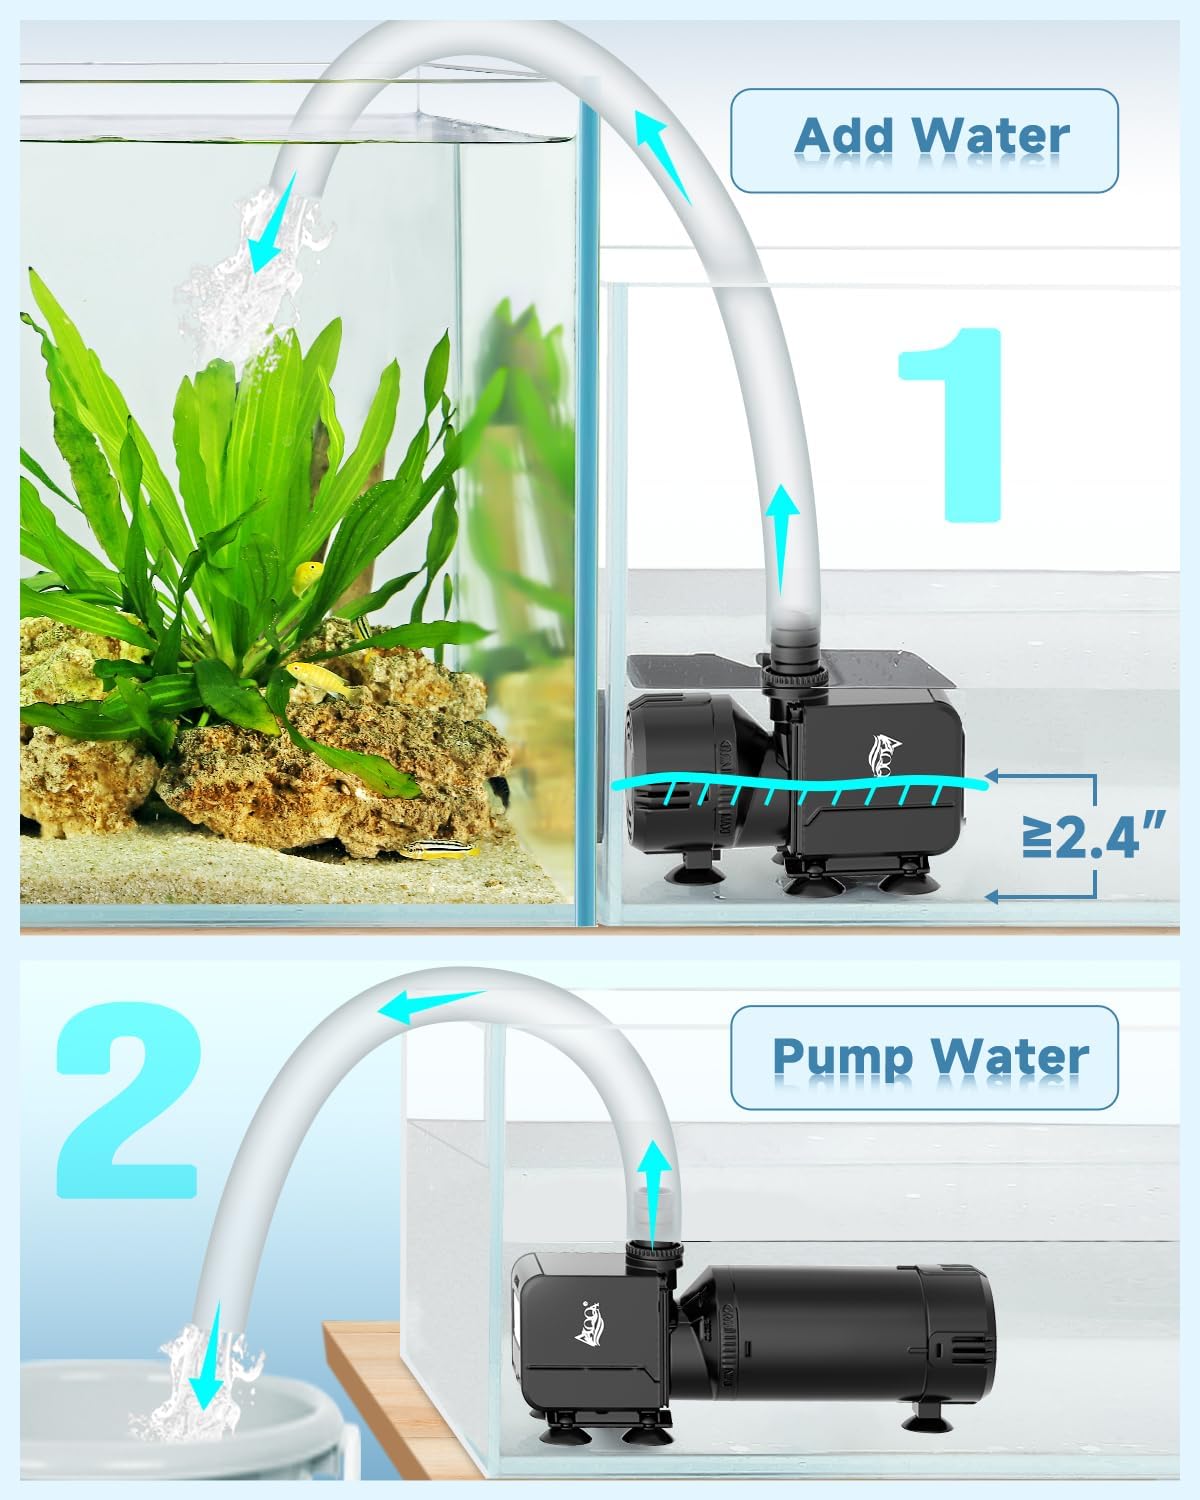
Figure 5: Instructions for using the device as a separate water pump, detailing its application for adding water to the tank and pumping water out, with a minimum water level indication.
7. Maintenance
Regular maintenance is crucial for the optimal performance and longevity of your AQQA filter. Always unplug the unit before performing any maintenance.
7.1. Cleaning the Filter
- Disconnect the power supply.
- Carefully remove the filter unit from the aquarium.
- Disassemble the filter box from the main pump unit by twisting.
- Remove the filter media (sponge, activated carbon, bioceramic balls).
- Rinse the filter sponge and bioceramic balls thoroughly with old aquarium water (to preserve beneficial bacteria) or dechlorinated tap water.
- Clean the activated carbon if reusable, or replace it as needed (typically every 2-4 weeks).
- Clean the impeller and impeller housing of the main pump unit. Ensure no debris is obstructing the impeller's movement. Be careful not to lose the small rubber caps on either side of the impeller.
- Reassemble all components in reverse order.

Figure 6: This image sequence demonstrates how to safely disassemble the filter to access and maintain the internal filter media, such as the sponge, activated carbon, and bioceramic balls, ensuring proper cleaning and replacement.
8. Troubleshooting
- Pump Not Starting: Ensure the power cord is securely plugged in. Verify that the pump is fully submerged in water. Check for any obstructions in the impeller.
- Reduced Flow: Check if the filter media is clogged and requires cleaning or replacement. Ensure the flow adjustment switch is set to the desired level. Inspect the impeller for debris.
- Unusual Noise/Rattling: Disconnect power and inspect the impeller for any foreign objects or damage. Ensure the impeller is properly seated and lubricated with water. Clean the impeller housing.
- Water Not Clear: Ensure all filter media is correctly installed and not expired. Perform regular water changes and avoid overfeeding fish.
9. Specifications
| Specification | Value |
|---|---|
| Model Number | AQ126 |
| Power | 18W |
| Flow Rate | 260 GPH (1200 L/H) |
| Recommended Aquarium Size | 40-80 Gallons (150-300 L) |
| Voltage/Frequency | AC110-120V/60Hz (US Standard) |
| Item Weight | 1.1 Pounds |
| Product Dimensions (LxWxH) | 3.5 x 3.5 x 9.5 inches |
| Material | High-quality ABS |
| Motor Type | Pure Copper Motor with Ceramic Shaft |
| Color | Black |
10. Warranty and Support
The AQQA Dual-Use Aquarium Filter and Water Pump (Model AQ126) comes with a 2-year manufacturer's warranty from the date of purchase. This warranty covers defects in materials and workmanship under normal use.
For warranty claims, technical support, or any inquiries regarding your product, please contact AQQA customer service through the retailer where the product was purchased or visit the official AQQA website for contact information.
Please retain your proof of purchase for warranty validation.

