
1. Product Overview
The Nilight Rear Step Bumper, Model JT-103A, is designed to provide enhanced rear-end protection and utility for 2020-2025 Jeep Gladiator JT models. Constructed from durable alloy steel, this bumper features an off-road design with integrated corner steps, dual D-ring shackle mounts, and two upgraded LED lights. It is engineered for a direct bolt-on installation, retaining the factory hitch receiver.
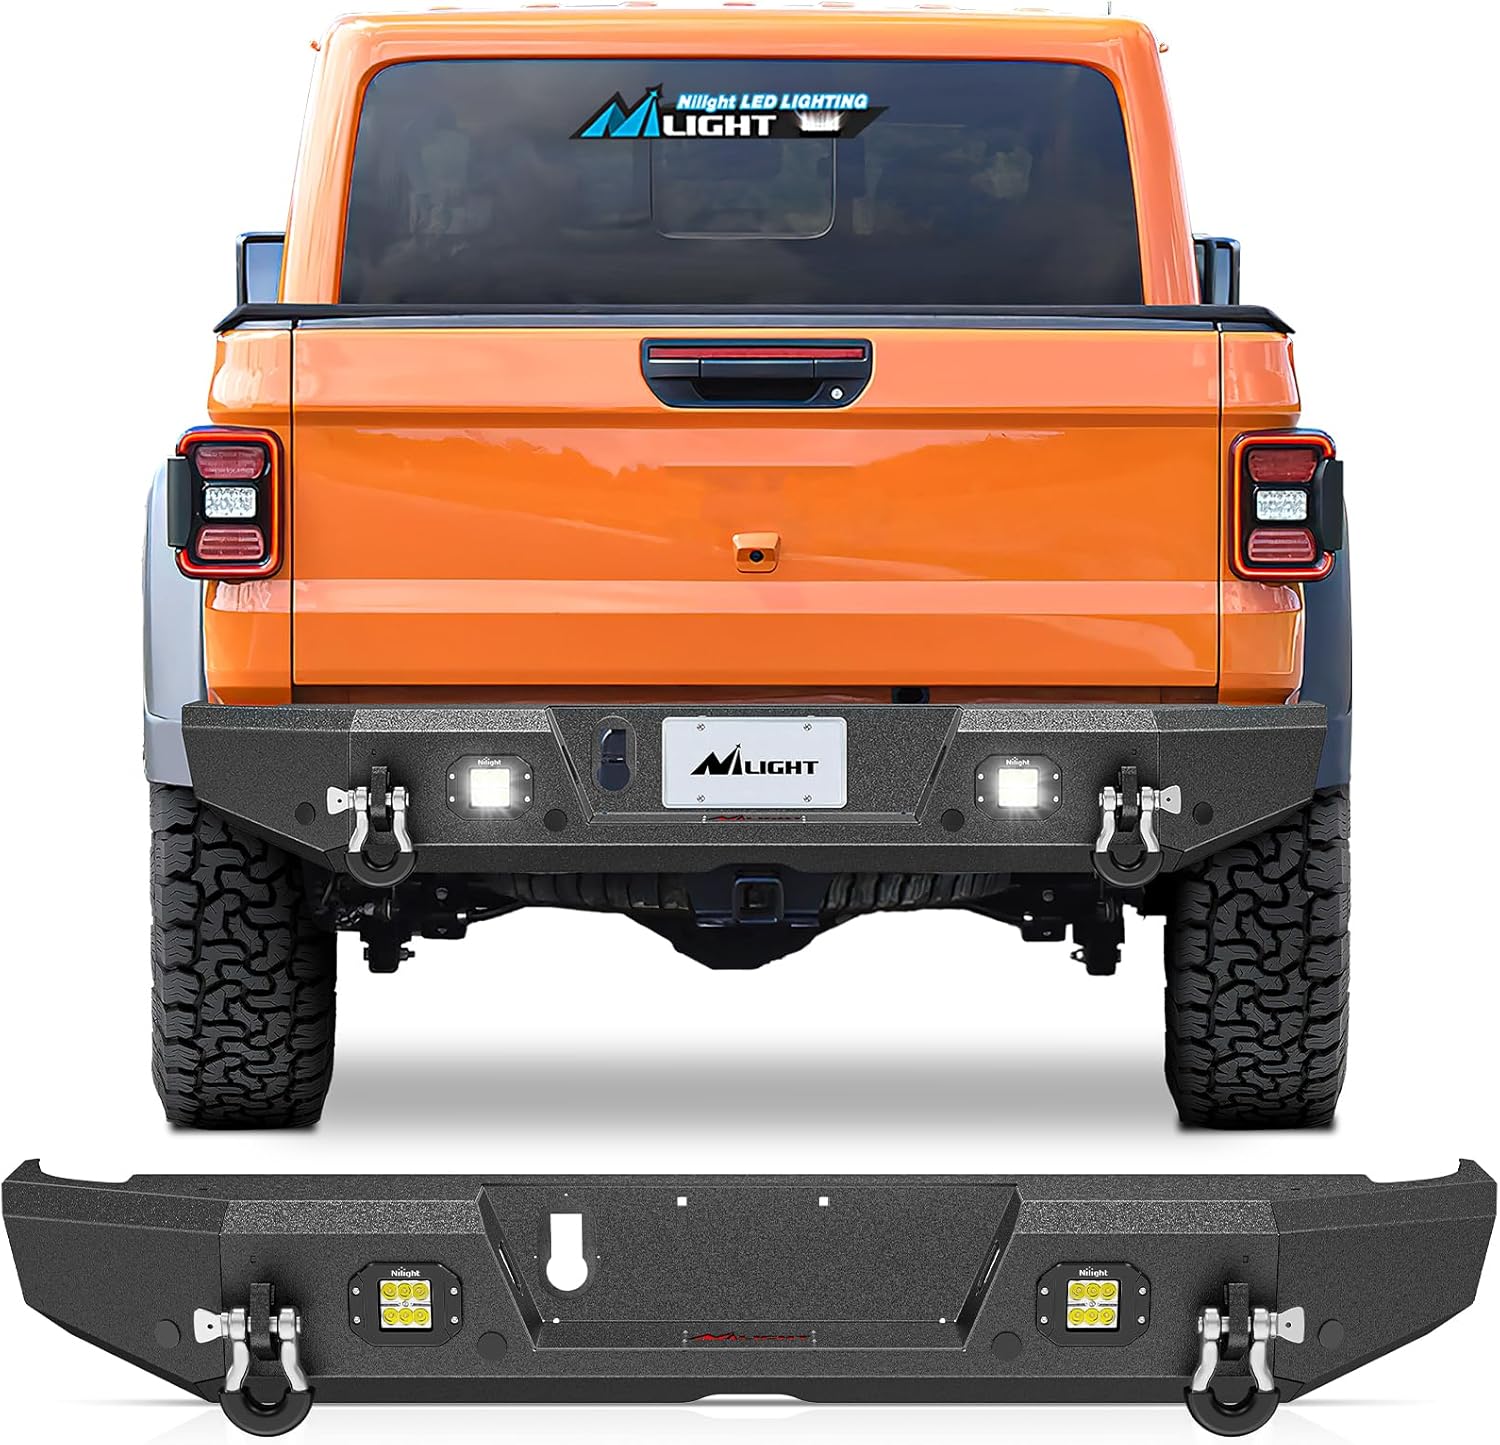
Image: The Nilight Rear Step Bumper shown installed on a Jeep Gladiator JT, highlighting its robust design and integrated features. A separate view of the bumper is also displayed, showcasing its structure and components.
2. Specifications
| Attribute | Detail |
|---|---|
| Brand | Nilight |
| Model | JT-103A |
| Auto Part Position | Rear |
| Material | Alloy Steel |
| Color | Black (Rear Bumper) |
| Item Weight | 56.9 Pounds |
| Vehicle Service Type | Trucks (Jeep Gladiator JT) |
| Exterior Finish | Alloy Steel |
| Product Dimensions | 66"D x 10"W x 14"H |
| UPC | 840323922845 |

Image: Detailed product dimensions of the Nilight Rear Step Bumper, indicating its length and height for accurate fitment assessment.
3. What's in the Box
The Nilight Rear Step Bumper package includes the following components:
- One (1) Rear Bumper Assembly
- Necessary Hardware for Installation (bolts, nuts, washers)
- Two (2) D-ring Shackles (rated at 9500lbs)
- Two (2) Upgraded LED Lights

Image: All components included in the Nilight Rear Step Bumper package, illustrating the main bumper unit, D-ring shackles, mounting hardware, and LED lights.
4. Vehicle Compatibility
This Nilight Rear Step Bumper (Model JT-103A) is specifically designed for and compatible with the following vehicle models:
- Jeep Gladiator JT: 2020, 2021, 2022, 2023, 2024, 2025 models.
Important: Before proceeding with installation, verify that your vehicle's make, model, and year match the compatibility list to ensure proper fitment and function.
5. Key Features
- Off-road Design: The one-piece structure provides robust rear-end protection, ideal for challenging terrains. It integrates seamlessly with the vehicle's aesthetics while offering enhanced durability.
- Integrated Corner Steps: Designed with built-in corner steps to facilitate easier access to the truck bed, improving convenience and safety.
- Heavy-Duty D-Ring Shackle Mounts: Equipped with sturdy dual D-ring shackle mounts, rated at 9500 lbs, providing reliable recovery points for off-road adventures. These mounts are welded on both the inside and outside for maximum strength.
- Upgraded LED Lights: Includes two 18W flush mount LED work lights with a flood beam pattern, significantly improving rear visibility and illumination during nighttime operations or off-road use.
- Sensor Holes: Features pre-drilled holes compatible with factory backup sensors, ensuring that existing vehicle safety features remain functional.
- License Plate Mounting: Includes pre-drilled holes for easy mounting of the license plate.
- Durable Construction: Manufactured from alloy steel with a multi-layer coating process, including a carbon steel layer, electro-galvanized "E-Coat" layer, and powder-coated layer, ensuring corrosion resistance and long-lasting performance even if the powder coat is scratched.
- Retains Factory Hitch Receiver: Designed to allow continued use of the vehicle's original hitch receiver.

Image: An exploded view of the bumper highlighting key features such as the D-ring shackle mounts, integrated steps, and provisions for factory backup sensors and license plate.
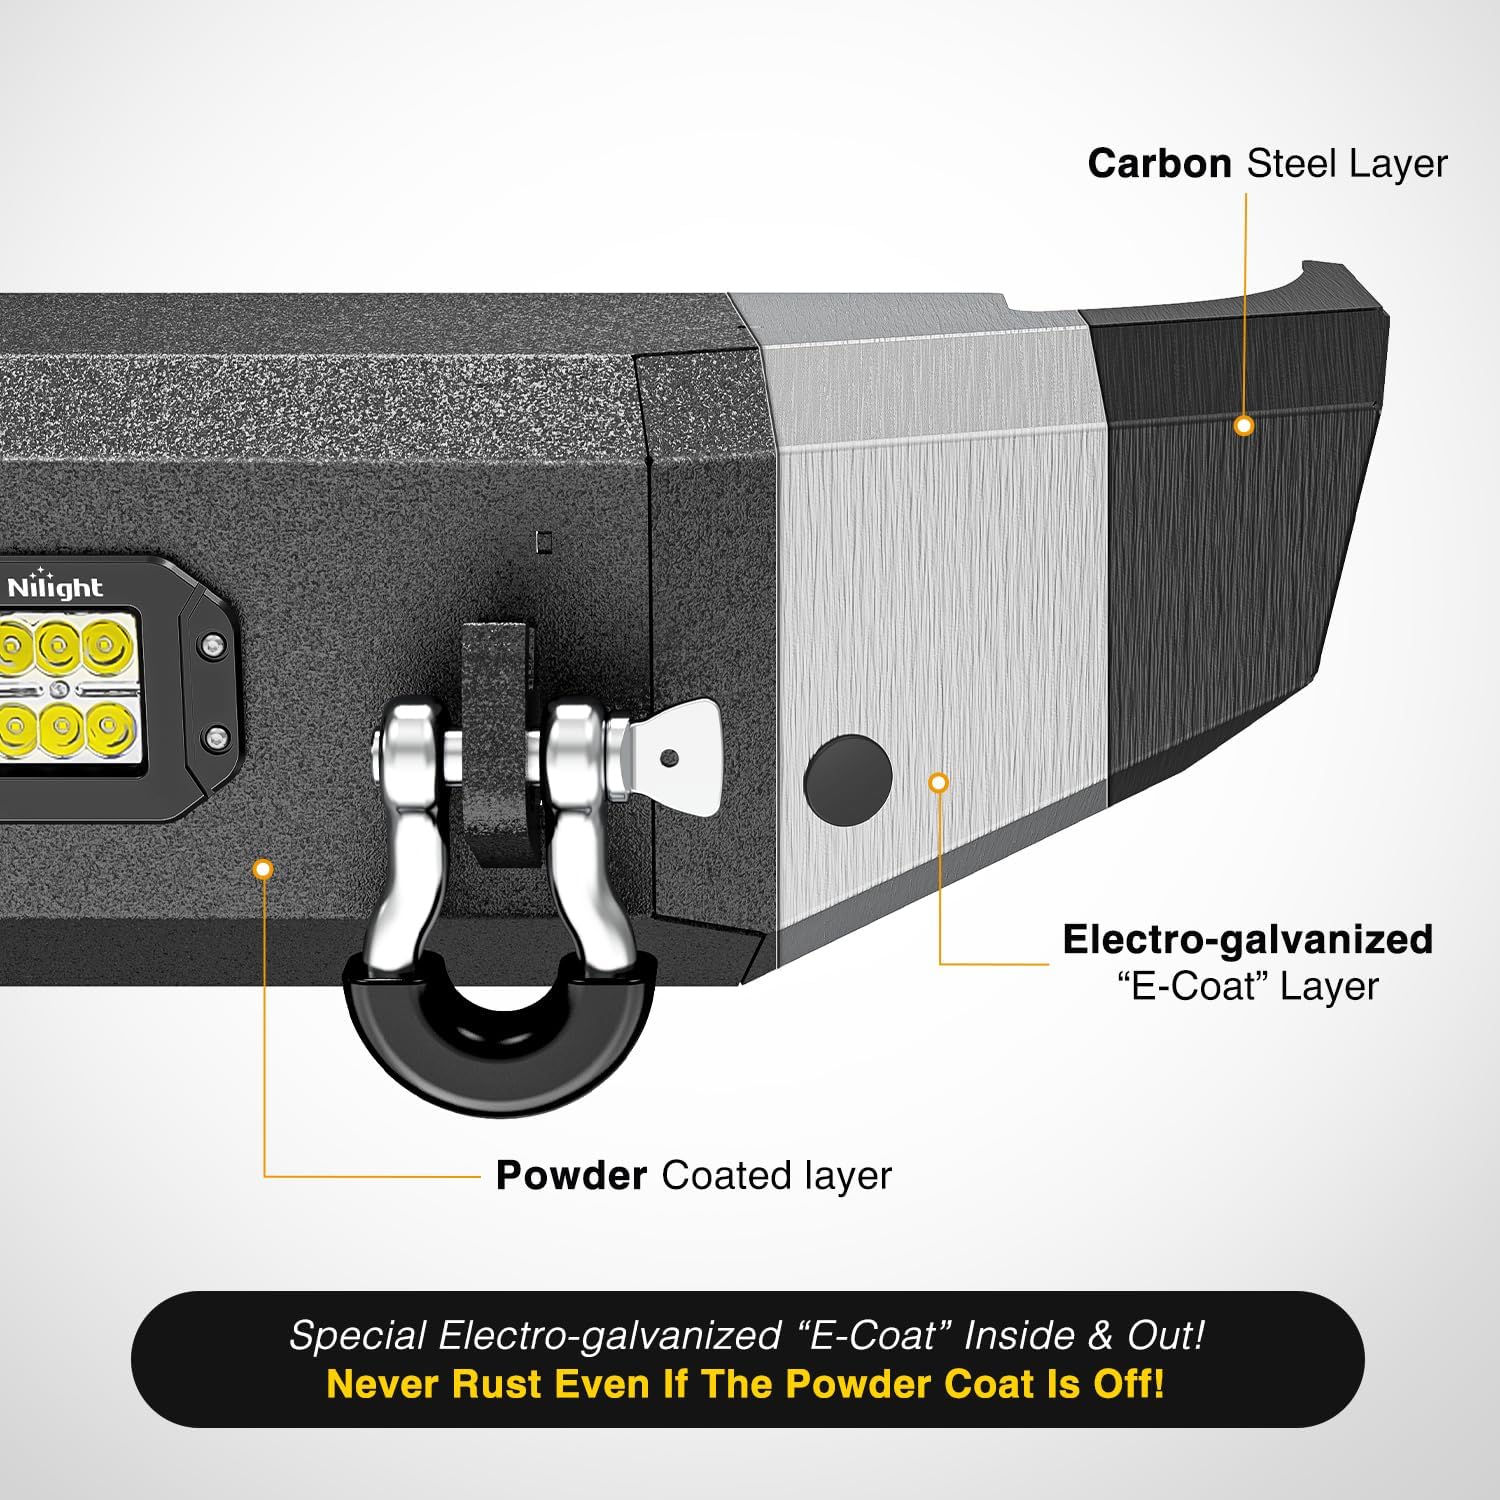
Image: A visual representation of the bumper's material composition, showing the carbon steel, electro-galvanized 'E-Coat', and powder-coated layers for superior protection.
6. Installation Instructions (Bolt-On)
The Nilight Rear Step Bumper is designed for a straightforward bolt-on installation. While no modifications are typically required for the basic process, some mechanical experience is beneficial. Always ensure the vehicle is on a stable, level surface and properly supported before beginning work.
Required Tools (Not Included):
- Socket Wrench Set
- Torque Wrench
- Safety Glasses
- Gloves
- Jack Stands (if lifting vehicle)
Installation Steps:
- Preparation: Park the vehicle on a flat, stable surface. Engage the parking brake. If necessary, lift the rear of the vehicle using a jack and secure it with jack stands.
- Disconnect Wiring: Carefully disconnect any wiring harnesses connected to the factory bumper, such as those for license plate lights or parking sensors.
- Remove Factory Bumper: Locate and remove all bolts and fasteners securing the original rear bumper to the vehicle frame. With assistance, carefully remove the factory bumper.
- Transfer Components (if applicable): If your factory bumper has components like parking sensors that need to be reused, carefully remove them and install them into the designated holes on the new Nilight bumper.
- Position New Bumper: With assistance, carefully lift the Nilight Rear Step Bumper into position, aligning the mounting holes on the bumper with the vehicle's frame mounting points.
- Secure Bumper: Insert the provided bolts, nuts, and washers through the aligned mounting holes. Hand-tighten all fasteners to ensure proper alignment before fully tightening.
- Tighten Fasteners: Once the bumper is properly aligned, progressively tighten all fasteners to the manufacturer's specified torque settings. Ensure even tightening to prevent stress points.
- Connect Wiring: Reconnect any wiring harnesses for the license plate lights and parking sensors. For the integrated LED lights, connect them to a suitable power source (e.g., reverse lights or an auxiliary switch, following local regulations and vehicle wiring diagrams).
- Final Check: Verify that the bumper is securely mounted and all components are properly connected. Test all lights and sensors. Lower the vehicle if it was lifted.

Image: The Nilight Rear Step Bumper seamlessly integrated onto a grey Jeep Gladiator, demonstrating the final installed appearance.
7. Operation
Using D-Ring Shackles:
The integrated D-ring shackle mounts are designed for vehicle recovery. Always use appropriate recovery straps or ropes with the D-rings. Ensure the shackle pin is fully threaded and secure before applying tension. Never exceed the rated capacity of 9500 lbs per shackle. Use both D-rings for balanced pulling when possible.
Operating LED Lights:
The two integrated 18W LED lights are designed to provide additional illumination. Depending on how they are wired during installation, they can function as auxiliary reverse lights, work lights, or be controlled by an independent switch. Ensure proper wiring to avoid draining the vehicle's battery or interfering with other electrical systems.

Image: A visual comparison demonstrating the superior light output of Nilight's 18W flush mount LED work lights, emphasizing their effectiveness for enhanced visibility.
8. Maintenance
Regular maintenance will help preserve the appearance and functionality of your Nilight Rear Step Bumper.
- Cleaning: Wash the bumper regularly with mild automotive soap and water to remove dirt, salt, and other debris. Avoid abrasive cleaners or harsh chemicals that could damage the powder coat finish.
- Inspection: Periodically inspect all mounting bolts and fasteners to ensure they remain tight. Re-tighten if necessary, using a torque wrench to the specified settings.
- Finish Protection: While the bumper features a durable multi-layer coating, minor scratches can occur. Touch up any deep scratches or chips in the powder coat with appropriate automotive paint to prevent rust, especially in areas exposed to harsh conditions.
- D-Rings: Keep D-ring shackles clean and free of debris. Lubricate the pins periodically to ensure smooth operation.
- LED Lights: Check the LED lights periodically for proper function. Clean the light lenses as needed to maintain optimal light output.
9. Troubleshooting
This section addresses common issues that may arise during or after the installation of your Nilight Rear Step Bumper.
- Issue: Bumper does not align correctly during installation.
Solution: Ensure all factory mounting points are clear of debris or obstructions. Loosely attach all bolts before tightening any one bolt fully. This allows for minor adjustments to achieve proper alignment. Some persuasion may be needed to align holes. - Issue: Parking sensors are not functioning or are incompatible.
Solution: The bumper is designed with holes for factory sensors. Ensure sensors are correctly transferred and seated. If issues persist, verify that the sensor wiring is properly connected and undamaged. Note that some aftermarket bumpers may require specific adapters or recalibration for optimal sensor performance, which may not be included. - Issue: No license plate lights are included or functioning.
Solution: This bumper features a custom cutout for license plate lights. If lights were not included in your package, you will need to source compatible license plate lights separately to ensure legal operation, especially at night. Consult the manufacturer or a qualified automotive electrician for suitable options and wiring instructions. - Issue: Tailgate clearance is minimal after installation.
Solution: During installation, carefully check the clearance between the tailgate and the top edge of the bumper. Minor adjustments to the bumper's position before final tightening may improve clearance. - Issue: LED lights are not working.
Solution: Check all electrical connections to the LED lights. Ensure the wiring is correctly connected to a power source and ground. Verify that fuses are intact and the switch (if installed) is functioning.
10. Warranty and Support
For information regarding product warranty, returns, or technical support, please refer to the official Nilight website or contact Nilight customer service directly. Keep your purchase receipt and product model number (JT-103A) handy when contacting support.
Nilight Official Website: www.nilight.com (Please note: This is a placeholder URL. Refer to your product packaging or official documentation for the correct support contact information.)
