
SeeYing HP-H0056
SeeYing Turntable with Belt Drive User Manual
Model: HP-H0056
1. Introduction
Thank you for purchasing the SeeYing Turntable with Belt Drive. This manual provides essential information for the proper setup, operation, and maintenance of your new turntable. Please read this manual thoroughly before use to ensure optimal performance and longevity of the product.
The SeeYing Turntable is designed to deliver a high-fidelity audio experience from your vinyl records, featuring a belt-drive system, a high-quality magnetic cartridge, and versatile connectivity options including Bluetooth wireless output and USB recording to PC.
2. Important Safety Instructions
- Read these instructions.
- Keep these instructions.
- Heed all warnings.
- Follow all instructions.
- Do not use this apparatus near water.
- Clean only with a dry cloth.
- Do not block any ventilation openings. Install in accordance with the manufacturer's instructions.
- Do not install near any heat sources such as radiators, heat registers, stoves, or other apparatus (including amplifiers) that produce heat.
- Protect the power cord from being walked on or pinched, particularly at plugs, convenience receptacles, and the point where they exit from the apparatus.
- Only use attachments/accessories specified by the manufacturer.
- Unplug this apparatus during lightning storms or when unused for long periods of time.
- Refer all servicing to qualified service personnel. Servicing is required when the apparatus has been damaged in any way, such as power-supply cord or plug is damaged, liquid has been spilled or objects have fallen into the apparatus, the apparatus has been exposed to rain or moisture, does not operate normally, or has been dropped.
3. Package Contents
Ensure all items listed below are present in the package:
- SeeYing Turntable Unit
- Dust Cover
- Platter
- Belt
- Counterweight
- Slip Mat
- Power Adapter
- USB Cable
- User Manual (this document)
4. Product Overview
4.1 Main Components

Figure 4.1: SeeYing Turntable with dust cover open, showing the platter, tonearm, and controls.
- Platter: The rotating platform where the vinyl record is placed. Made of aluminum die-cast for reduced vibration.
- Tonearm: Holds the cartridge and stylus, allowing it to track the grooves of the record.
- Cartridge & Stylus: The component that reads the grooves of the record. This model features a high-quality AT-3600L diamond-tipped stylus for precise audio reproduction. It is detachable for easy replacement.
- Counterweight: Adjustable weight on the tonearm to balance the tracking force of the stylus.
- Dust Cover: Protects the turntable from dust and debris when not in use.
4.2 Controls and Connections

Figure 4.2: Rear panel connections and controls.
- Ground Connector: For connecting a ground wire to an amplifier or receiver to reduce hum.
- Phono/Line-Out Jacks (RCA): Audio output for connecting to an amplifier, receiver, or powered speakers.
- Phono/Line-Out Switch: Selects between Phono (for amplifiers with a built-in phono stage) and Line (for amplifiers without a phono stage, using the turntable's internal preamplifier).
- USB Port for PC Link: Connects the turntable to a computer for digitizing vinyl records.
- 12V Adapter DC Jacks: Power input for the included 12V DC power adapter.
- Wireless Output Connectivity (Bluetooth): Activates Bluetooth pairing for wireless audio output to compatible speakers or headphones.

Figure 4.3: Speed and Start/Stop controls.
- Speed Button (33/45 RPM): Selects the playback speed for your vinyl records (33 1/3 RPM or 45 RPM).
- Start/Stop Button: Initiates or stops the platter rotation.
5. Setup Guide
Follow these steps to set up your SeeYing Turntable:
5.1 Unpacking and Placement
- Carefully remove all components from the packaging.
- Place the turntable on a stable, level surface away from direct sunlight, heat sources, and excessive vibration.
- Ensure adequate ventilation around the unit.
5.2 Platter and Belt Installation
- Place the platter onto the center spindle.
- Locate the drive belt and carefully stretch it around the motor pulley and the inner rim of the platter. Ensure the belt is not twisted.
- Place the slip mat on top of the platter.
5.3 Tonearm and Counterweight Adjustment
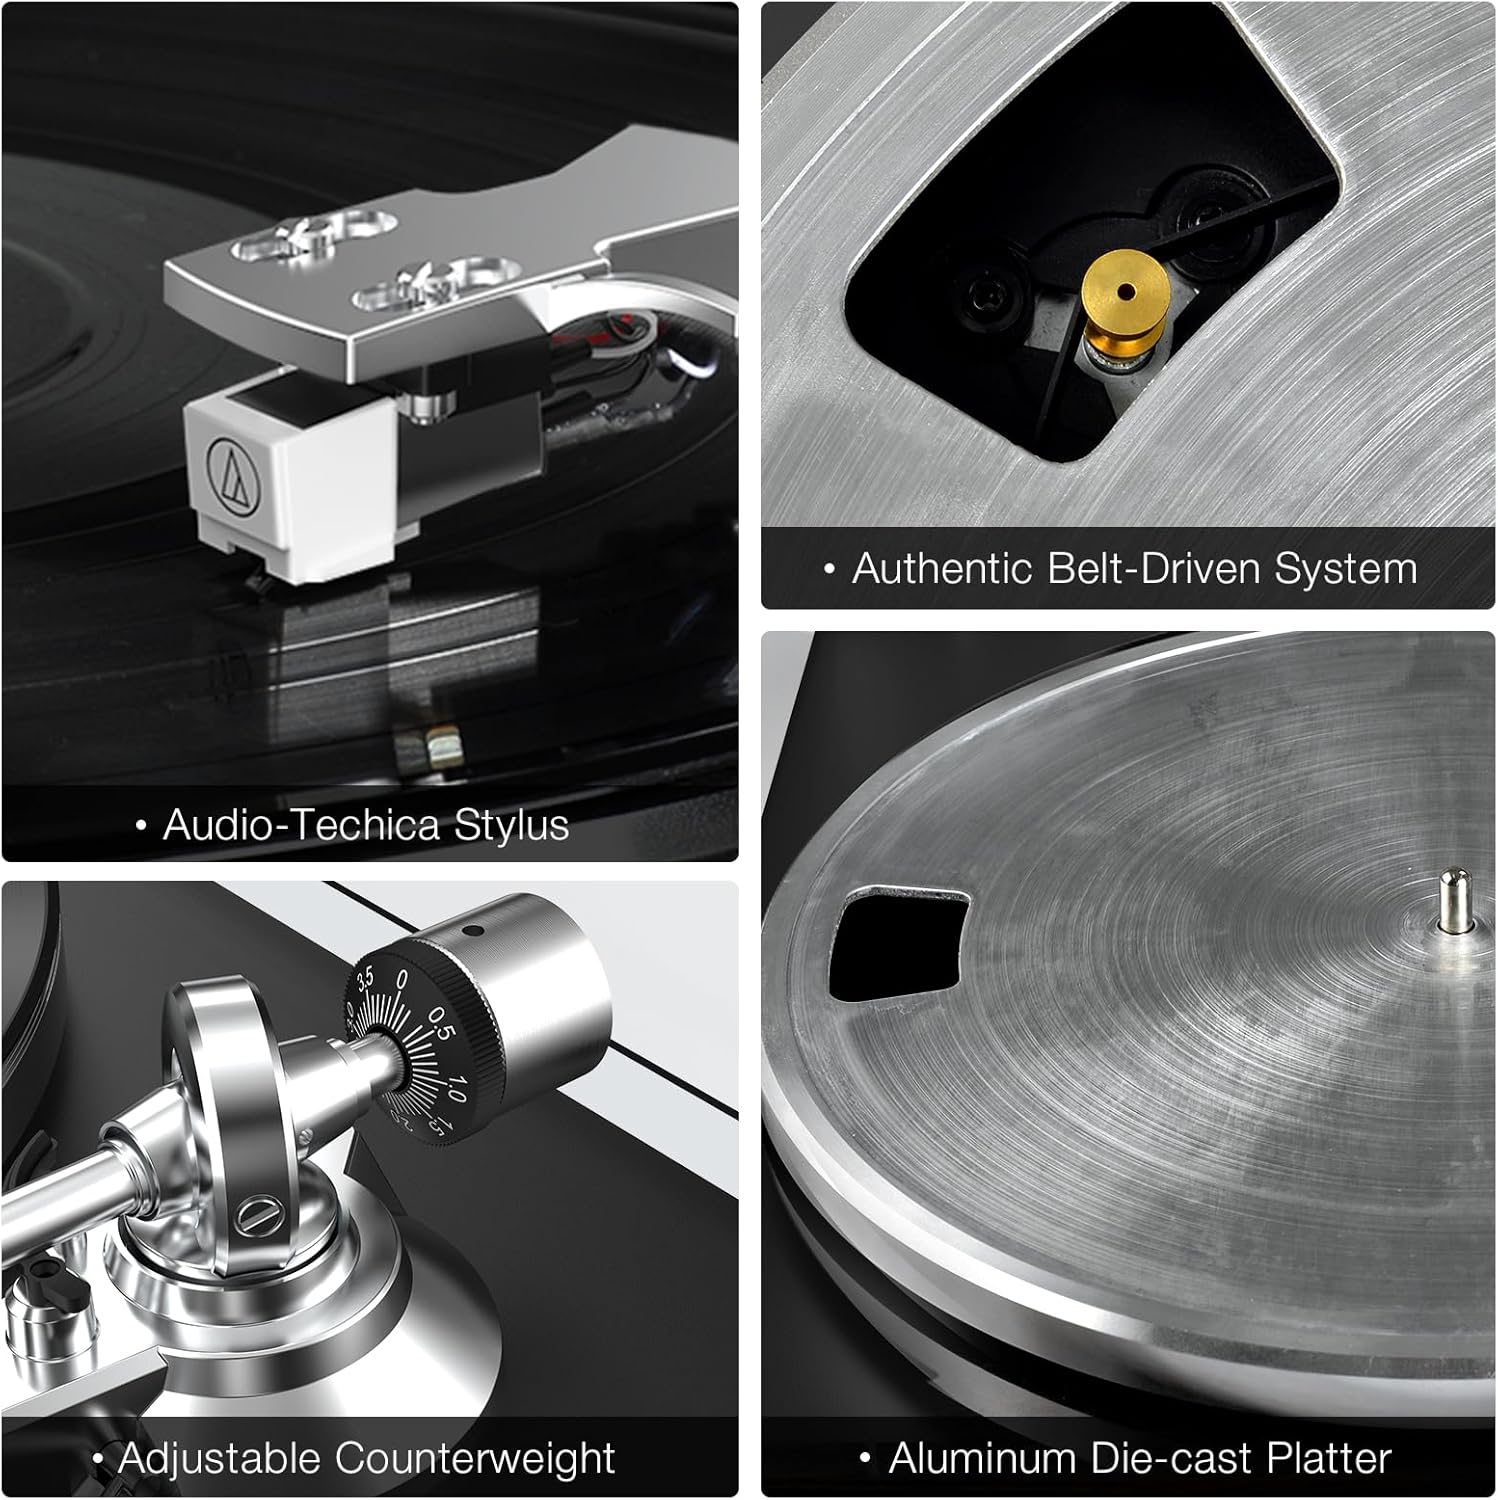
Figure 5.1: Detail of the adjustable counterweight and stylus.
Proper counterweight adjustment is crucial for optimal sound quality and to prevent damage to your records and stylus.
- Remove the stylus protector.
- Gently release the tonearm clamp.
- Rotate the counterweight onto the rear of the tonearm until it is approximately balanced and the tonearm floats freely.
- Once balanced, hold the counterweight steady and rotate the numbered ring to '0'.
- Rotate the entire counterweight counter-clockwise to the recommended tracking force (typically 2.5-3.5 grams for the AT-3600L stylus). Refer to the stylus manufacturer's specifications for precise values.
- Lower the tonearm lift lever.
5.4 Power Connection
- Connect the power adapter to the 12V DC Jacks on the rear of the turntable.
- Plug the power adapter into a suitable wall outlet.
6. Operating Instructions
6.1 Playing a Record
- Place a vinyl record on the platter.
- Select the correct speed (33 or 45 RPM) using the Speed Button.
- Press the Start button to begin platter rotation.
- Lift the tonearm using the tonearm lift lever.
- Carefully position the stylus over the desired track on the record.
- Gently lower the tonearm lift lever to allow the stylus to descend onto the record.
- To stop playback, lift the tonearm using the lever, return it to the tonearm rest, and press the Stop button.

Figure 6.1: The detachable high-end stylus ensures precise tracking and high-resolution audio.
Note: The diamond-tipped stylus precisely tracks the grooves of your record for detailed and high-resolution sound. The aluminum platter helps attenuate unwanted vibrations, contributing to a more three-dimensional sound with firmer bass and improved clarity.
7. Connectivity Options
7.1 Wired Connection (RCA Output)

Figure 7.1: Turntable connected to external speakers via RCA.
The turntable can be connected to an external amplifier, receiver, or powered speakers using the RCA output jacks.
- Connect RCA cables (not included) from the Phono/Line-Out Jacks on the turntable to the corresponding input on your audio system.
- Set the Phono/Line-Out Switch on the turntable according to your audio system's input:
- PHONO: If your amplifier has a dedicated "PHONO" input.
- LINE: If your amplifier has a standard "AUX" or "LINE" input (uses the turntable's internal preamplifier).
- Connect the ground wire (if applicable) from the turntable to the ground terminal on your amplifier to minimize hum.
7.2 Wireless Connection (Bluetooth Output)

Figure 7.2: Turntable wirelessly connected to a Bluetooth speaker.
The turntable can connect wirelessly to Bluetooth-enabled speakers or headphones for a cable-free listening experience.
- Ensure your Bluetooth speaker or headphones are in pairing mode.
- Turn on the Wireless Output Connectivity (Bluetooth) switch on the turntable's rear panel.
- The turntable will automatically search for and attempt to pair with nearby Bluetooth devices.
- Once connected, audio from the turntable will be streamed to your Bluetooth device.
Note: This turntable is compatible with Bluetooth protocols HFPV1.5, A2DPV1.2, AVRCPV1.4, HSP1.2, GAVDP1.2, IOP. Some Bluetooth speakers, particularly large soundbars, may not connect properly due to protocol differences.
7.3 USB Recording to PC
You can digitize your vinyl collection by connecting the turntable to a computer via USB.
- Connect the USB cable from the USB Port for PC Link on the turntable to an available USB port on your computer.
- Install audio recording software on your computer (e.g., Audacity, available for free online).
- Follow the instructions of your chosen software to record the audio from the turntable. This allows you to convert your vinyl tracks into digital MP3 files for playback on various devices.
8. Maintenance
Regular maintenance ensures the longevity and optimal performance of your turntable.
- Cleaning the Stylus: Gently brush the stylus from back to front using a soft stylus brush or a specialized stylus cleaning fluid. Do this regularly to remove dust and debris.
- Cleaning the Record: Use a carbon fiber brush or a record cleaning solution to remove dust and static from your vinyl records before each play.
- Cleaning the Turntable: Wipe the turntable's surface and dust cover with a soft, dry, lint-free cloth. Avoid using harsh chemicals or abrasive cleaners.
- Dust Cover: Keep the dust cover closed when the turntable is not in use to prevent dust accumulation.
- Stylus Replacement: The stylus has a limited lifespan. Replace it when you notice a degradation in sound quality or visible wear. The AT-3600L stylus is detachable for easy replacement.
9. Troubleshooting
If you encounter issues with your turntable, refer to the following table for common problems and solutions.
| Problem | Possible Cause | Solution |
|---|---|---|
| No power | Power adapter not connected; Power outlet not working. | Ensure power adapter is securely connected to the turntable and a working power outlet. |
| No sound or low volume | Incorrect Phono/Line switch setting; Cables not connected properly; Amplifier/speakers off or volume low; Stylus damaged or dirty. | Check Phono/Line switch setting; Ensure RCA cables are securely connected; Turn on amplifier/speakers and adjust volume; Clean or replace stylus. |
| Skipping or distorted sound | Improper counterweight adjustment; Dirty or damaged record; Dirty or worn stylus; Turntable not level. | Re-adjust counterweight; Clean record; Clean or replace stylus; Ensure turntable is on a level surface. |
| Humming noise | Ground wire not connected; Interference from other electronics. | Connect ground wire to amplifier; Move turntable away from other electronic devices. |
| Bluetooth pairing issues | Bluetooth device not in pairing mode; Incompatible Bluetooth protocol; Too far from device. | Ensure Bluetooth device is in pairing mode; Check device compatibility; Move turntable closer to the Bluetooth device. |
10. Specifications
| Feature | Description |
|---|---|
| Brand | SeeYing |
| Model Name | Plattenspieler mit Riemenantrieb Bluetooth (HP-H0056) |
| Color | Black |
| Motor Type | Belt Drive |
| Max Rotation Speed | 45 RPM (supports 33 1/3 RPM) |
| Special Features | Adjustable Counterweight, Built-in Phono Preamp, Bluetooth Output, USB Recording |
| Compatible Devices | Bluetooth Speaker, Personal Computer, Bluetooth Headphones |
| Signal Format | Analog (Phono) |
| Power Source | Corded Electric (12V DC Adapter) |
11. Warranty and Support
SeeYing is committed to product quality and customer satisfaction. For any issues or inquiries regarding your turntable, please contact SeeYing customer support.
While specific warranty details are not provided in this manual, please retain your proof of purchase for any warranty claims. SeeYing aims to provide excellent after-sales support for all customers.
For further assistance, please refer to the contact information provided with your purchase or visit the official SeeYing website.
Related documentsHP-H0056


Ask a question about this manual
Ask about setup, troubleshooting, compatibility, parts, safety, or missing instructions. Manuals+ will review the question and use this page’s manual context to help answer it.