
Bluefin Fitness Tour 5.0
Bluefin Fitness TOUR 5.0 Exercise Bike User Manual
Model: Tour 5.0 (16027095677)
1. Important Safety Information
Please read this entire manual carefully before assembling or operating your Bluefin Fitness TOUR 5.0 Exercise Bike. Keep this manual for future reference.
- Consult your physician before starting any exercise program.
- Keep children and pets away from the equipment during use.
- Place the exercise bike on a flat, stable surface. Ensure adequate space around the bike.
- Inspect the equipment for loose or worn parts before each use. Do not use if damaged.
- Wear appropriate exercise attire and footwear.
- The maximum user weight for this product is 120 Kilograms.
- Only one person should use the equipment at a time.
2. Product Overview
The Bluefin Fitness TOUR 5.0 is a compact and commercial-grade exercise bike designed for effective low-impact cardio workouts at home. It features a silent drive system, magnetic braking, and smart app integration.
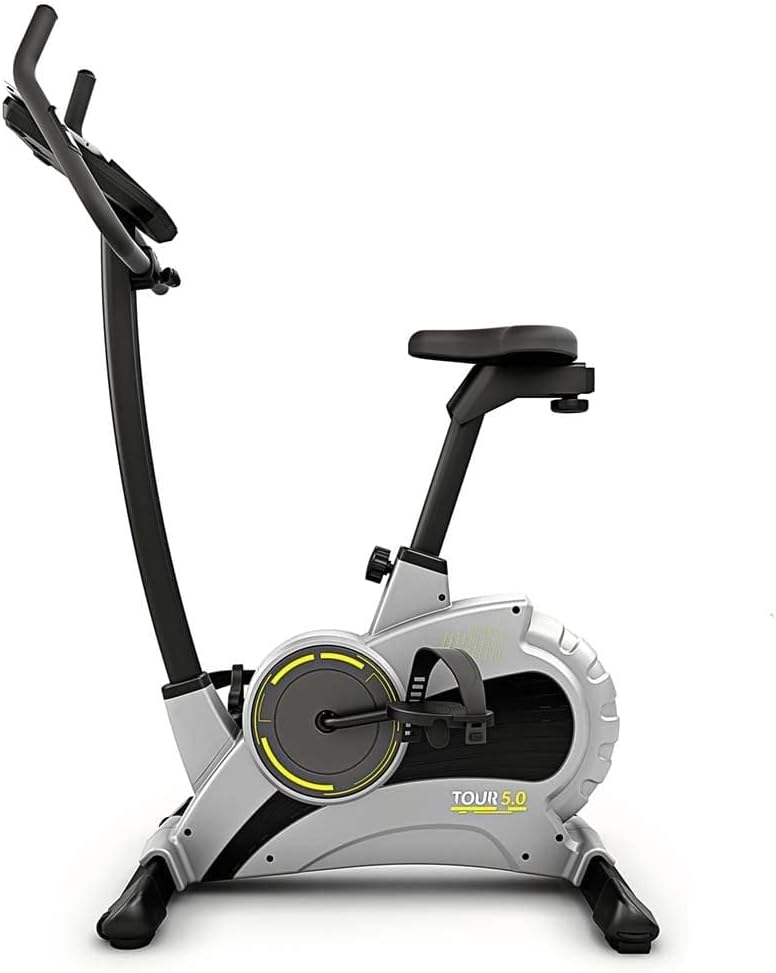
Image: Side view of the Bluefin Fitness TOUR 5.0 Exercise Bike, showcasing its sleek design and compact footprint.
Key Components:
- Handlebars: Ergonomic grip handlebars for comfortable use.
- LCD Display Console: Backlit display for tracking workout data.
- Seat: Horizontally and vertically adjustable for optimal positioning.
- Pedals: Anti-slip secure foot pedals.
- Flywheel: Heavy-duty 12kg flywheel mass for smooth operation.
- Resistance System: Magnetic braking for quiet and precise resistance changes.
- Transportation Wheels: Built-in wheels for easy movement.

Image: The exercise bike with key dimensions highlighted: 101cm (depth), 50cm (width), and 126cm (height).
3. Setup and Assembly
The Bluefin Fitness TOUR 5.0 Exercise Bike arrives partly assembled. Follow these steps to complete the setup.
Included in the Box:
- Bluefin Fitness Tour 5.0 Exercise Bike (main unit)
- Instruction Manual (this document)
- EU Power Adapter
- UK Power Adapter
- Tool Kit for set up & maintenance
Assembly Steps:
- Unpacking: Carefully remove all components from the packaging. Place them on a clean, flat surface.
- Stabilizer Installation: Attach the front and rear stabilizers to the main frame using the provided bolts and tools. Ensure they are securely fastened.
- Pedal Attachment: Identify the left (L) and right (R) pedals. Thread the pedals into the crank arms. Note that the left pedal threads counter-clockwise. Tighten securely.
- Seat Post and Seat Installation: Insert the seat post into the main frame. Adjust the height to your preference and secure it with the locking pin. Attach the seat to the seat post.
- Handlebar Post and Console Installation: Connect the sensor cables from the main frame to the handlebar post. Carefully insert the handlebar post into the main frame. Attach the console to the handlebar post, ensuring all cables are properly connected.
- Power Connection: Connect the appropriate power adapter (EU or UK) to the exercise bike and then to a power outlet.

Image: Illustration showing the horizontal and vertical adjustment mechanisms for the seat, allowing users to find their optimal riding position.
4. Operating Instructions
Using the LCD Display Console:
The backlit LCD display provides real-time workout data. It measures time, distance, calories burned, and pulse rate.

Image: Close-up of the LCD display console, showing various metrics like time, distance, and pulse, along with control buttons and a tablet shelf.
- Power On/Off: The console typically powers on automatically when you start pedaling or press any button. It will power off after a period of inactivity.
- Mode Button: Press to cycle through different display modes (Time, Distance, Calories, Pulse, Scan).
- Reset Button: Press and hold to clear all workout data.
- Pulse Monitors: Grip the pulse sensors on the handlebars to display your heart rate on the console.
Adjusting Resistance:
The TOUR 5.0 features 24 manual levels of magnetic resistance. Turn the resistance knob located below the console to increase or decrease the intensity of your workout. Turn clockwise for more resistance, counter-clockwise for less.

Image: Detail of the 12kg heavy-duty flywheel and the magnetic resistance braking system, highlighting the whisper-quiet operation.
Integrated Kinomap App:
Enhance your workout experience by connecting your exercise bike to the Kinomap fitness app via Bluetooth. The app offers thousands of training videos, coaching classes, structured workouts, and social features.

Image: Visual representation of the Kinomap app integration, showing a tablet mounted on the bike displaying a virtual ride, with a smartphone also connected.
- Download Kinomap: Download the Kinomap app from your device's app store.
- Enable Bluetooth: Ensure Bluetooth is enabled on your smartphone or tablet.
- Connect Device: Open the Kinomap app and follow the in-app instructions to connect to your Bluefin Fitness TOUR 5.0 Exercise Bike. The bike should appear as a discoverable device.
- Start Workout: Once connected, select a program or video within the app. The app will control the bike's resistance to simulate terrain or follow structured workouts.
Pre-loaded Training Programs:
The exercise bike computer is pre-loaded with 12 automatic programs. These programs vary in intensity and duration, providing diverse workout options. Refer to the console's specific instructions for navigating and selecting these programs.
5. Maintenance
Regular maintenance ensures the longevity and optimal performance of your exercise bike.
- Cleaning: Wipe down the bike with a damp cloth after each use to remove sweat and dust. Avoid abrasive cleaners.
- Inspection: Periodically check all bolts, nuts, and moving parts for tightness. Tighten any loose fasteners.
- Lubrication: The magnetic resistance system requires minimal lubrication. If you notice any unusual noises from moving parts, consult a qualified technician.
- Storage: Store the bike in a dry, cool place away from direct sunlight and extreme temperatures. Use the built-in wheels to easily move the bike for storage.
Image: The exercise bike being tilted and moved using its built-in transportation wheels, demonstrating its easy portability.
6. Troubleshooting
If you encounter any issues with your Bluefin Fitness TOUR 5.0 Exercise Bike, refer to the following common problems and solutions:
| Problem | Possible Cause | Solution |
|---|---|---|
| Console not displaying data. | Loose cable connection, no power, or batteries (if applicable) are dead. | Check all cable connections. Ensure power adapter is securely plugged in. |
| Resistance not changing. | Resistance knob not properly engaged or internal mechanism issue. | Ensure the resistance knob is fully engaged. If issue persists, contact customer support. |
| Unusual noise during operation. | Loose parts, friction, or internal component issue. | Check all bolts and nuts for tightness. Ensure the bike is on a level surface. If noise continues, discontinue use and contact support. |
| Kinomap app not connecting. | Bluetooth off, app permissions, or bike not discoverable. | Ensure Bluetooth is on. Restart the app and bike. Check app permissions. Try reconnecting manually within the app. |
7. Specifications
| Feature | Detail |
|---|---|
| Brand | Bluefin Fitness |
| Model Name | Tour 5.0 |
| Model Number | 16027095677 |
| Color | Black |
| Material | Alloy Steel |
| Resistance Mechanism | Magnetic |
| Flywheel Mass | 12 Kilograms |
| Product Dimensions (D x W x H) | 49.6"D x 19.6"W x 39.7"H (approx. 126cm x 50cm x 101cm) |
| Item Weight | 12 Kilograms |
| Maximum Weight Recommendation | 120 Kilograms |
| Power Source | Corded Electric |
| Special Feature | Heavy Duty |
| Recommended Uses | Indoor |
8. Warranty and Support
Bluefin Fitness products are designed for durability and performance. For information regarding your product's warranty, please refer to the warranty card included with your purchase or visit the official Bluefin Fitness website.
If you require technical assistance, have questions about assembly, operation, or maintenance, please contact Bluefin Fitness customer support. Contact details can typically be found on the product packaging, the official website, or your purchase documentation.
Note: Keep your proof of purchase for warranty claims.
Related documentsTour 5.0


Ask a question about this manual
Ask about setup, troubleshooting, compatibility, parts, safety, or missing instructions. Manuals+ will review the question and use this page’s manual context to help answer it.