
CYCLAMI A2S-US
CYCLAMI A2S Mini Electric Bicycle Air Pump
User Manual
1. Introduction
Thank you for choosing the CYCLAMI A2S Mini Electric Bicycle Air Pump. This compact and powerful inflator is designed for convenient and efficient tire inflation for various bicycles, motorcycles, and sports equipment. Featuring a digital display, auto-stop function, and compatibility with both Presta and Schrader valves, the A2S pump ensures precise and hassle-free operation. Please read this manual thoroughly before use to ensure proper operation and maintenance.

Image 1.1: The compact CYCLAMI A2S Mini Electric Bicycle Air Pump.
2. Package Contents
Verify that all items listed below are included in your package. If any items are missing or damaged, please contact customer support.
- CYCLAMI A2S Mini Electric Bicycle Air Pump
- Silicone Protective Cover
- SV (Schrader Valve) Adapter
- FV (Presta Valve) Adapter
- Ball Needle
- Inflatable Hose (with SV connection)
- Type-C USB Charging Cable
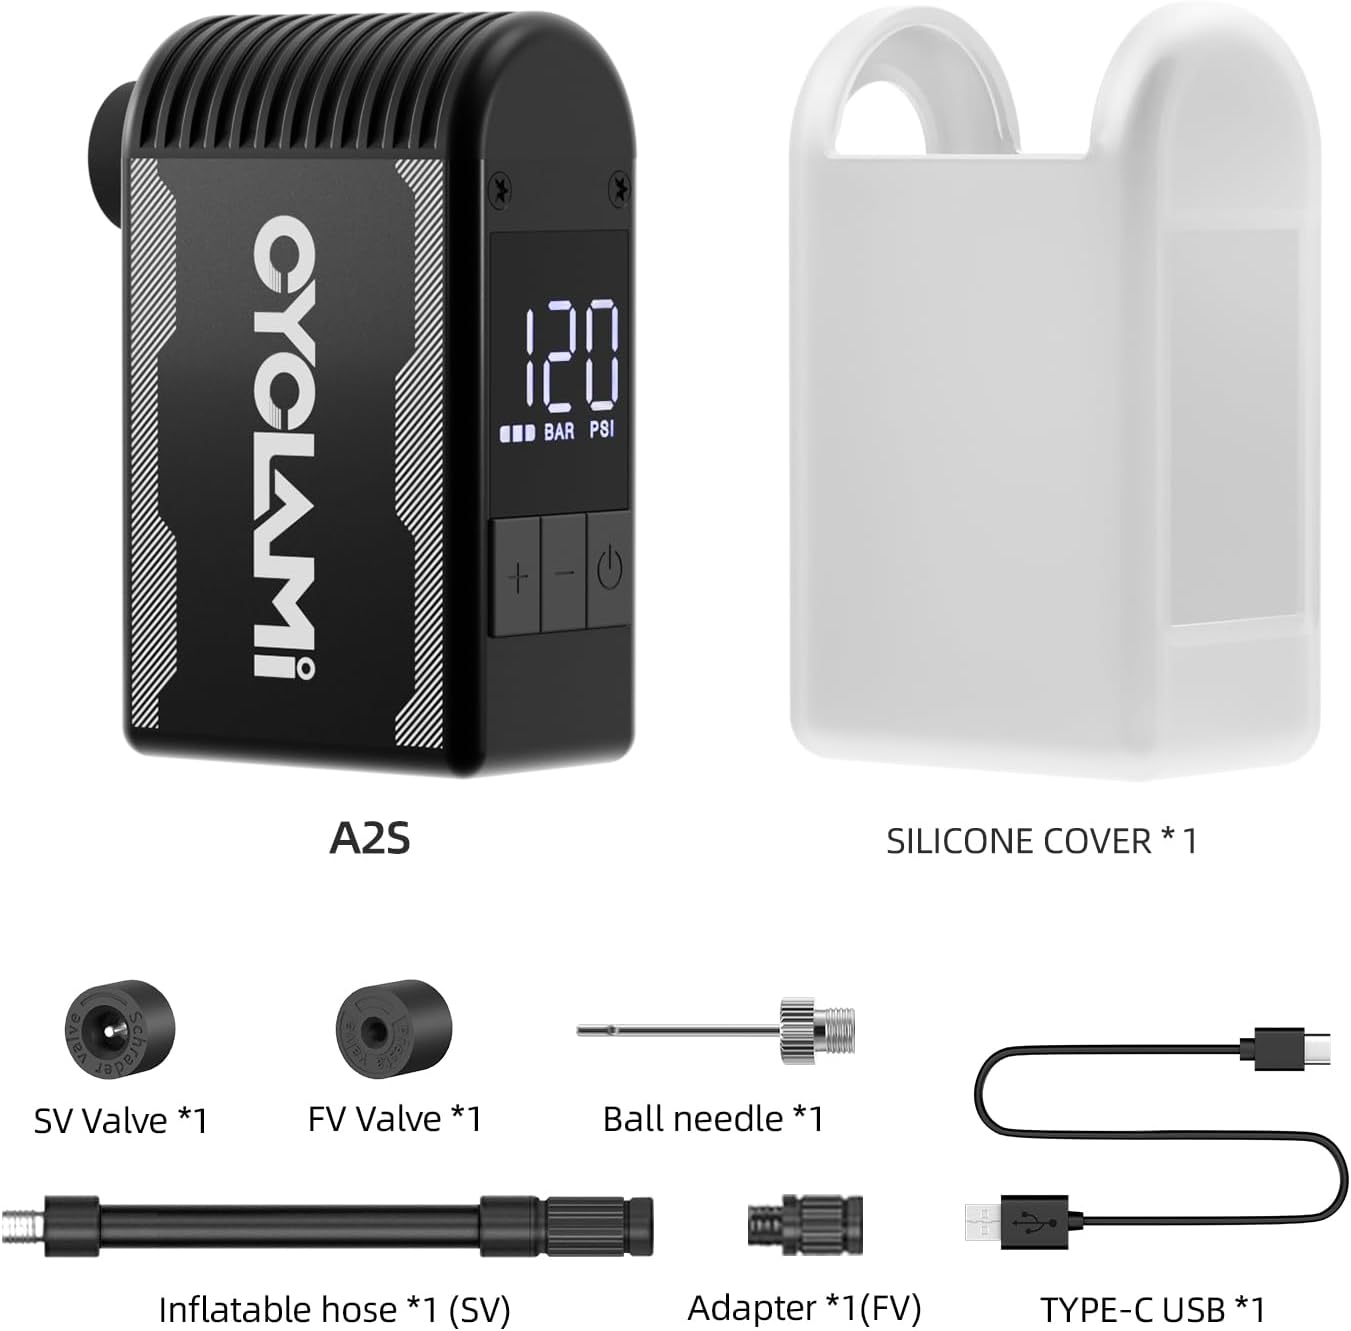
Image 2.1: All included accessories with the CYCLAMI A2S pump.
3. Product Features
- High Inflation Speed: Delivers up to 120 PSI, inflating a 700C road bike tire from 0 to 120 PSI in under 100 seconds.
- Compact and Lightweight Design: Measures approximately 2.87 x 1.7 x 1.1 inches and weighs only 4.8 ounces (136 grams), making it highly portable.
- Durable Construction: Features a hard and lightweight aluminum alloy casing with an additional silicone protective case for drop-proof and heat-resistant properties.
- Universal Valve Compatibility: Supports both Presta and Schrader valves, suitable for road bikes, mountain bikes, motorcycles, and e-riders. Also inflates basketballs, volleyballs, and soccer balls.
- Accurate Digital Display: Equipped with an LED digital display for real-time tire pressure readings and precise preset pressure settings.
- Long-lasting Battery: Built-in 2*500mAh battery capacity (total 1000mAh) provides multiple inflations on a single charge.
- Fast Charging: Fully recharges via Type-C USB in approximately 45 minutes.
4. Setup
4.1 Charging the Pump
- Locate the Type-C charging port on the side of the pump.
- Connect the provided Type-C USB cable to the pump and a compatible USB power adapter (not included).
- The LED display will indicate charging status. A full charge takes approximately 45 minutes.

Image 4.1: Charging the pump via its Type-C USB port.
4.2 Attaching the Valve Adapter
The pump comes with an inflatable hose and various adapters for different valve types.
- Identify the valve type on your tire (Presta or Schrader).
- Screw the appropriate adapter (SV for Schrader, FV for Presta) onto the end of the inflatable hose.
- Screw the other end of the inflatable hose onto the pump's inflation port.
- For Schrader valves, you can directly screw the hose onto the tire valve. For Presta valves, you may need to use the FV adapter first.
5. Operating Instructions
5.1 Powering On/Off and Display Overview
- Power On: Long-press the power button (⏻) to turn on the digital display.
- Power Off: Long-press the power button (⏻) again to turn off the unit. The pump will also automatically power down after approximately 60 seconds of inactivity to conserve battery.
- The display shows the current pressure, unit of pressure (PSI/BAR), and battery level.

Image 5.1: Digital display and button functions.
5.2 Setting Desired Pressure
- After powering on, the display will show the current pressure (or 0 if not connected).
- Use the '+' and '-' buttons to adjust the desired target pressure. Long-press for quick adjustment.
- To switch between PSI and BAR units, press the '+' and '-' buttons simultaneously.
5.3 Inflation Process
- Connect the assembled inflatable hose to your tire valve. Ensure a secure connection to prevent air leakage.
- The display will show the current tire pressure.
- Set your desired target pressure using the '+' and '-' buttons.
- Short-press the power button (⏻) to start inflation. The pump will begin to inflate the tire.
- The pump will automatically stop once the preset pressure is reached.
- To stop inflation manually, short-press the power button (⏻) again.
- Carefully disconnect the hose from the tire valve.

Image 5.2: Inflating a tire with preset pressure and auto-stop.
Important Note:
- Avoid continuous operation for more than 3 minutes to prevent overheating. If the unit overheats, it may display 'HOT' and shut down automatically. Allow it to cool before resuming use.
- It is recommended to have the unit running (pushing air) when connecting to a tire that already has some air pressure. This helps prevent air from escaping while securing the connection.
6. Maintenance
- Cleaning: Wipe the pump with a soft, dry cloth. Do not use harsh chemicals or abrasive cleaners.
- Storage: Store the pump and its accessories in a cool, dry place, away from direct sunlight and extreme temperatures.
- Battery Care: For optimal battery life, charge the pump fully every 3-6 months if not in regular use.
- Silicone Cover: Keep the silicone protective cover on during use to protect against drops and manage heat dissipation.
7. Troubleshooting
| Problem | Possible Cause | Solution |
|---|---|---|
| Pump does not turn on | Low battery; Unit is off | Charge the pump fully; Long-press the power button to turn on. |
| Pump does not inflate / Error E3 displayed | Hose not securely connected; Valve blocked; Internal malfunction | Ensure hose is tightly screwed onto both pump and tire valve. Check for obstructions in the valve. If error persists, contact customer support. |
| Pump stops during inflation / 'HOT' displayed | Overheating due to prolonged use | Allow the pump to cool down for several minutes before resuming operation. Avoid continuous use for more than 3 minutes. |
| Inaccurate pressure reading | Loose connection; Sensor calibration variance | Ensure a tight connection to the tire valve. Note that a 1-2 PSI variance is normal for compact digital gauges. |
| Air leaks during inflation | Loose connection; Damaged valve adapter/hose | Tighten all connections. Inspect hose and adapters for damage and replace if necessary. |
8. Specifications
| Feature | Detail |
|---|---|
| Model Name | A2S-US |
| Brand | CYCLAMI |
| Color | Black |
| Material | Aluminum |
| Item Weight | 136 Grams (4.8 ounces) |
| Product Dimensions (LxWxH) | 1" x 1.1" x 2.8" (73.6 x 45 x 28.6mm) |
| Power Source | Battery Powered (2*500mAh, 7.4V) |
| Maximum Pressure | 120 PSI (8.3 BAR) |
| Operation Mode | Automatic (with auto-stop) |
| Charging Port | Type-C USB |
| Charge Time | Approx. 45 minutes |
| Included Components | Bike pump, silicone cover, SV valve, FV valve, ball needle, inflatable hose, Type-C USB cable |

Image 8.1: Battery capacity details for the A2S model.
9. Warranty and Support
9.1 Warranty Information
The CYCLAMI A2S Mini Electric Bicycle Air Pump comes with a 1-year warranty from the date of purchase. This warranty covers manufacturing defects and workmanship under normal use. It does not cover damage caused by misuse, accidents, unauthorized modifications, or normal wear and tear.
9.2 Customer Support
For technical assistance, warranty claims, or any questions regarding your CYCLAMI A2S pump, please contact our customer support team. Refer to your purchase documentation or the retailer's website for specific contact details.
When contacting support, please have the following information ready:
- Product Model: A2S-US
- Date of Purchase
- Place of Purchase
- Detailed description of the issue
Related documentsA2S-US

Ask a question about this manual
Ask about setup, troubleshooting, compatibility, parts, safety, or missing instructions. Manuals+ will review the question and use this page’s manual context to help answer it.