1. Introduction
This manual provides essential information for the safe and efficient operation, installation, and maintenance of your Hisense WD5Q1542BB Washer and Dryer. Please read this manual thoroughly before using the appliance and retain it for future reference.
The Hisense WD5Q1542BB is a fully automatic washer and dryer combination unit designed for household use, featuring a 15 kg washing capacity and 10 kg drying capacity, Inverter Technology, and a Steam Function for enhanced fabric care.
2. Safety Information
Always follow basic safety precautions when using electrical appliances to reduce the risk of fire, electric shock, or injury to persons.
- Ensure the appliance is properly grounded.
- Do not operate the appliance if it is damaged or malfunctioning.
- Keep children and pets away from the appliance during operation.
- Do not wash or dry articles that have been cleaned in, washed in, soaked in, or spotted with combustible or explosive substances.
- Unplug the appliance before cleaning or performing any maintenance.
- Refer to the installation instructions for proper water and electrical connections.
3. Product Overview
The Hisense WD5Q1542BB is a versatile appliance combining washing and drying functions in a single unit. Key features include:
- All-in-One Washer Dryer: Conveniently wash and dry your clothes in one appliance.
- Steam Function: Refreshes clothes, reduces wrinkles, and eliminates 99.9% of bacteria and allergens.
- Inverter Technology: Ensures durability, quiet operation, and energy efficiency.
- Quick Wash 15': A rapid 15-minute wash cycle for small loads (1 kg).
- Pause & Add: Allows you to pause the cycle and add or remove items.
- Auto Diagnostic: Displays error codes to facilitate quick troubleshooting.
- Drum Clean: A dedicated cycle for maintaining drum hygiene.

Figure 3.1: Front view of the Hisense WD5Q1542BB Washer and Dryer, showcasing its sleek black design and control panel.

Figure 3.2: Close-up of the control panel, featuring a rotary dial for program selection and a digital display for cycle information.
4. Setup
4.1 Unpacking and Inspection
- Carefully remove all packaging materials, including the polystyrene base and any protective films.
- Inspect the appliance for any damage incurred during transit. Report any damage immediately to your retailer.
- Remove the transit bolts from the rear of the machine. These bolts secure the drum during transport and must be removed before operation. Refer to the user manual for detailed instructions on transit bolt removal.
4.2 Location and Leveling
- Place the appliance on a firm, level surface.
- Adjust the leveling feet to ensure the machine is stable and perfectly level. An unlevel machine can cause excessive vibration and noise.
4.3 Water Connection
- Connect the supplied fill hose to the water inlet valve(s) on the back of the machine and to your household water supply. Ensure connections are tight to prevent leaks.
- Position the drain hose into a suitable drain or standpipe, ensuring it is securely fastened and not kinked.
4.4 Electrical Connection
- Plug the power cord into a grounded 127 Volt electrical outlet.
- Do not use extension cords or adapters.
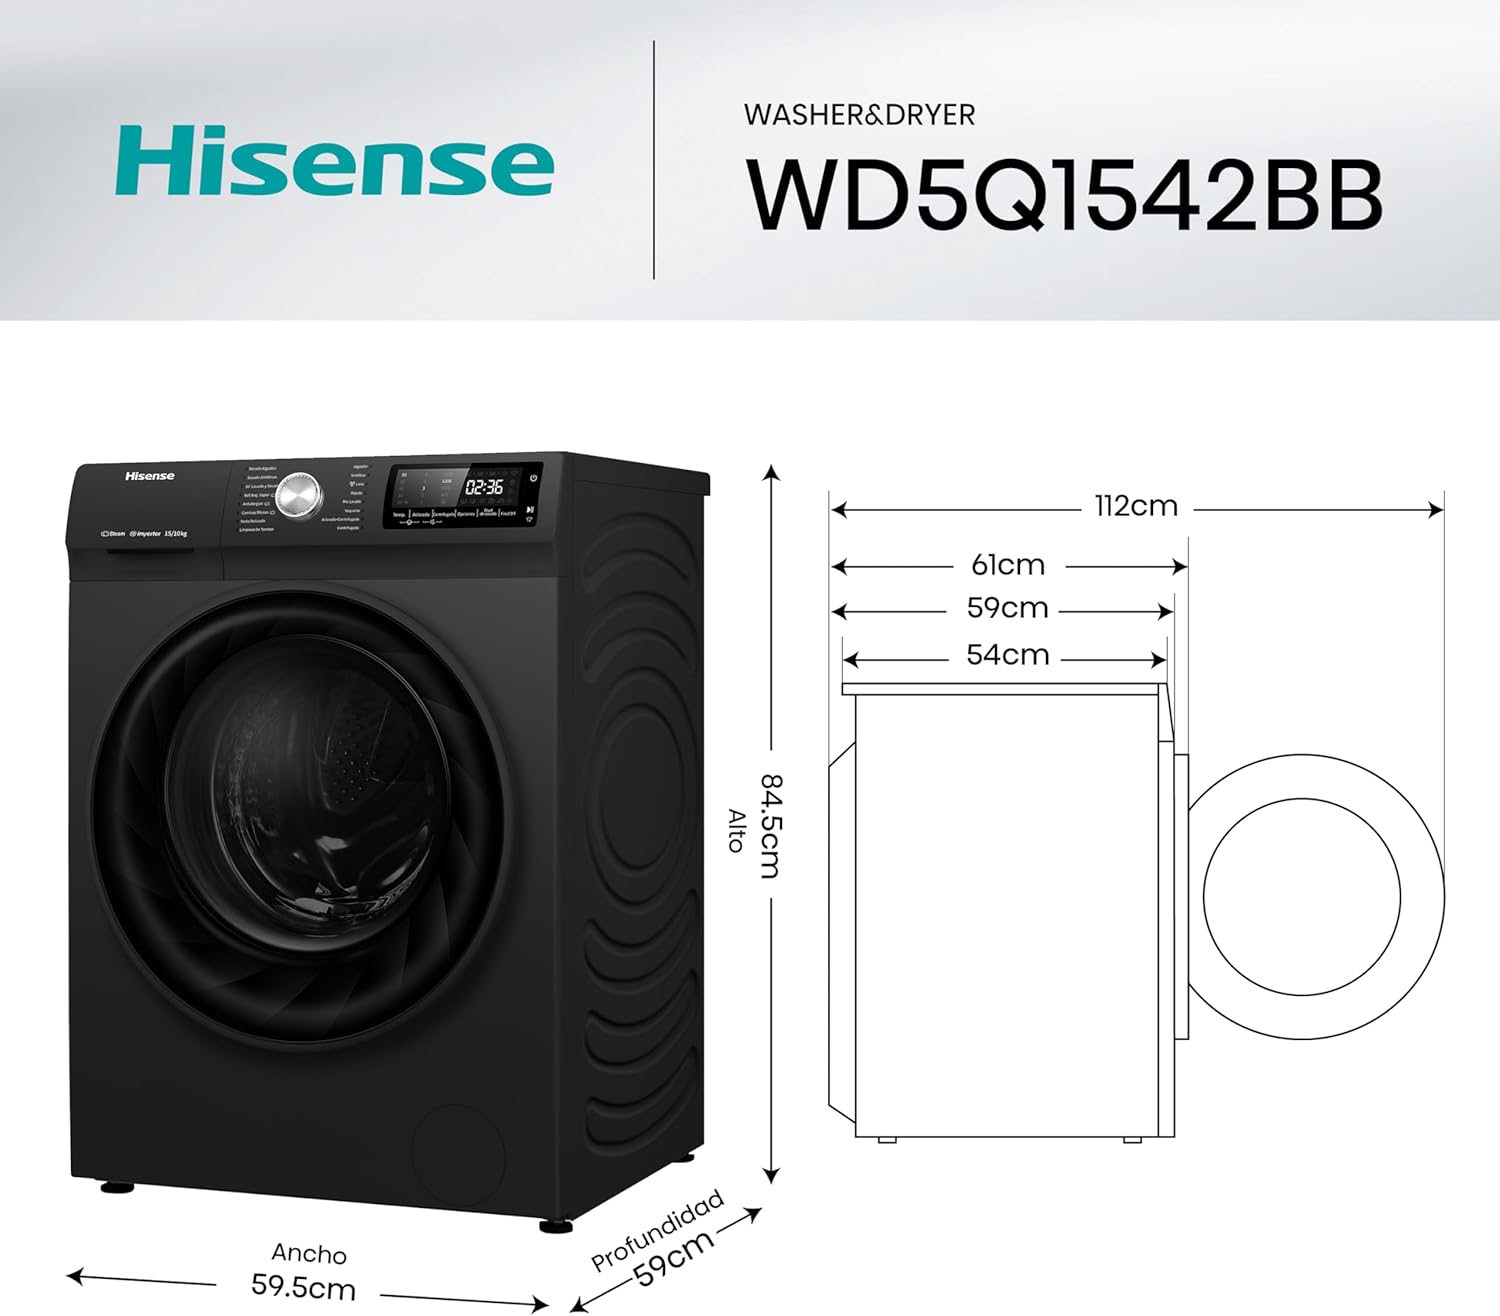
Figure 4.1: Dimensional diagram of the appliance, indicating height (84.5 cm), width (59.5 cm), and depth (59 cm) for installation planning.
5. Operating Instructions
5.1 Loading Laundry
- Open the front door and load laundry into the drum. Do not overload the machine.
- Close the door firmly.

Figure 5.1: The washer and dryer with its front door open, revealing the stainless steel drum ready for loading laundry.
5.2 Adding Detergent and Additives
- Pull out the dispenser drawer.
- Add appropriate amounts of detergent, fabric softener, and bleach to their respective compartments.
- Close the dispenser drawer gently.
5.3 Selecting a Program
- Turn the program selector dial to choose the desired wash or wash & dry cycle (e.g., Cotton, Synthetics, Quick Wash 15', Steam Function).
- Adjust additional options such as temperature, spin speed, or drying level using the control panel buttons.

Figure 5.2: Illustration of the Quick Wash 15' cycle, ideal for lightly soiled items requiring a fast wash.

Figure 5.3: The Steam Function in action, releasing steam into the drum to refresh fabrics and reduce allergens.
5.4 Starting the Cycle
- Press the Start/Pause button to begin the selected cycle.
- To use the Pause & Add function, press the Start/Pause button during the initial stages of a wash cycle. The door will unlock, allowing you to add or remove items. Press Start/Pause again to resume.

Figure 5.4: Demonstrating the Pause & Add feature, allowing users to conveniently add forgotten garments during a cycle.
6. Maintenance
6.1 Cleaning the Exterior
- Wipe the exterior surfaces with a soft, damp cloth. Do not use abrasive cleaners or solvents.
6.2 Cleaning the Detergent Dispenser
- Regularly remove and clean the detergent dispenser drawer to prevent residue buildup. Rinse under running water.
6.3 Drum Cleaning
- Utilize the dedicated Drum Clean cycle periodically to remove detergent residue and bacteria from the drum.
6.4 Filter Cleaning
- Clean the lint filter (for drying) and drain pump filter regularly as instructed in the full user manual to ensure optimal performance and prevent blockages.
7. Troubleshooting
If you encounter issues with your appliance, refer to the following common troubleshooting steps. For more complex problems, consult the full user manual or contact customer support.
| Problem | Possible Cause | Solution |
|---|---|---|
| Appliance does not start | No power, door not closed, Start/Pause not pressed | Check power supply, ensure door is latched, press Start/Pause button. |
| Excessive vibration/noise | Transit bolts not removed, machine not level, uneven load | Remove transit bolts, adjust leveling feet, redistribute laundry. |
| Water leakage | Loose hose connections, clogged drain filter | Tighten hose connections, clean drain pump filter. |
| Clothes not drying properly | Overloaded, clogged lint filter, incorrect program | Reduce load size, clean lint filter, select appropriate drying program. |

Figure 7.1: The Auto Diagnostic feature helps identify issues by displaying error codes, simplifying troubleshooting.
8. Specifications
| Feature | Specification |
|---|---|
| Model Number | WD5Q1542BB |
| Brand | Hisense |
| Washing Capacity | 15 Kilograms |
| Drying Capacity | 10 Kilograms |
| Dimensions (D x W x H) | 61 x 59.5 x 84.5 cm |
| Product Weight | 74 Kilograms |
| Voltage | 127 Volts |
| Maximum Spin Speed | 1400 RPM |
| Control Type | Push button, Rotary Dial |
| Access Location | Front Load |
| Drum Material | Stainless Steel |
| Dispenser Options | Bleach, Detergent, Fabric Softener |
| Special Features | Drum Clean, Steam Function, Quick Wash 15', All-in-One Washer Dryer, Inverter Technology |
| Included Components | Drain Hose, Fill Hose, User Manual, Warranty Card |

Figure 8.1: Illustration highlighting the Inverter Technology motor, which contributes to the appliance's efficiency and quiet operation.
9. Warranty and Support
Your Hisense WD5Q1542BB Washer and Dryer comes with a warranty. Please refer to the included Warranty Card for specific terms, conditions, and duration of coverage.
For technical assistance, service requests, or to obtain a replacement user manual, please contact Hisense customer support. Contact information can typically be found on the Warranty Card or the official Hisense website.
When contacting support, please have your model number (WD5Q1542BB) and serial number ready.


