
1. Introduction
This manual provides comprehensive instructions for the installation, operation, and maintenance of your Uniclife 70-Position Key Cabinet with Electronic Digital Lock. This key cabinet is designed to securely store and organize up to 70 keys, making it ideal for various indoor environments such as schools, offices, real estate agencies, and homes. It features dual unlocking methods: an electronic digital keypad and a traditional key lock.
Important: This key cabinet is designed for INDOOR USE ONLY.

Image: The Uniclife 70-Position Key Cabinet, shown open with keys neatly organized on adjustable racks. The electronic keypad and key lock mechanism are visible on the door.
2. Setup
2.1 Unpacking and Included Components
Carefully unpack the key cabinet and verify that all components are present. The package should include:
- Uniclife 70-Position Key Cabinet
- 2 Spare Keys
- 40 Rectangular Key Tags (in 5 colors)
- 30 White Slotted Key Tags
- 4 Adjustable Metal Racks
- Screwdriver
- Permanent Marker Pen
- Numbered Log Sheet
- 4 Expansion Bolts for mounting
- User Guide (this document)

Image: A visual representation of the Uniclife key cabinet alongside all its included accessories, such as key tags, spare keys, mounting hardware, and user guide.
2.2 Battery Installation
The electronic digital lock requires 4 AA alkaline batteries (not included). To install the batteries:
- Locate the battery compartment on the inside of the cabinet door, typically behind a small cover.
- Open the battery compartment cover.
- Insert 4 AA alkaline batteries, ensuring correct polarity (+/-).
- Close the battery compartment cover.
Note: If batteries run out or are removed, the existing digital code will become invalid. It is recommended to replace batteries promptly when low or to reset the code after removal.
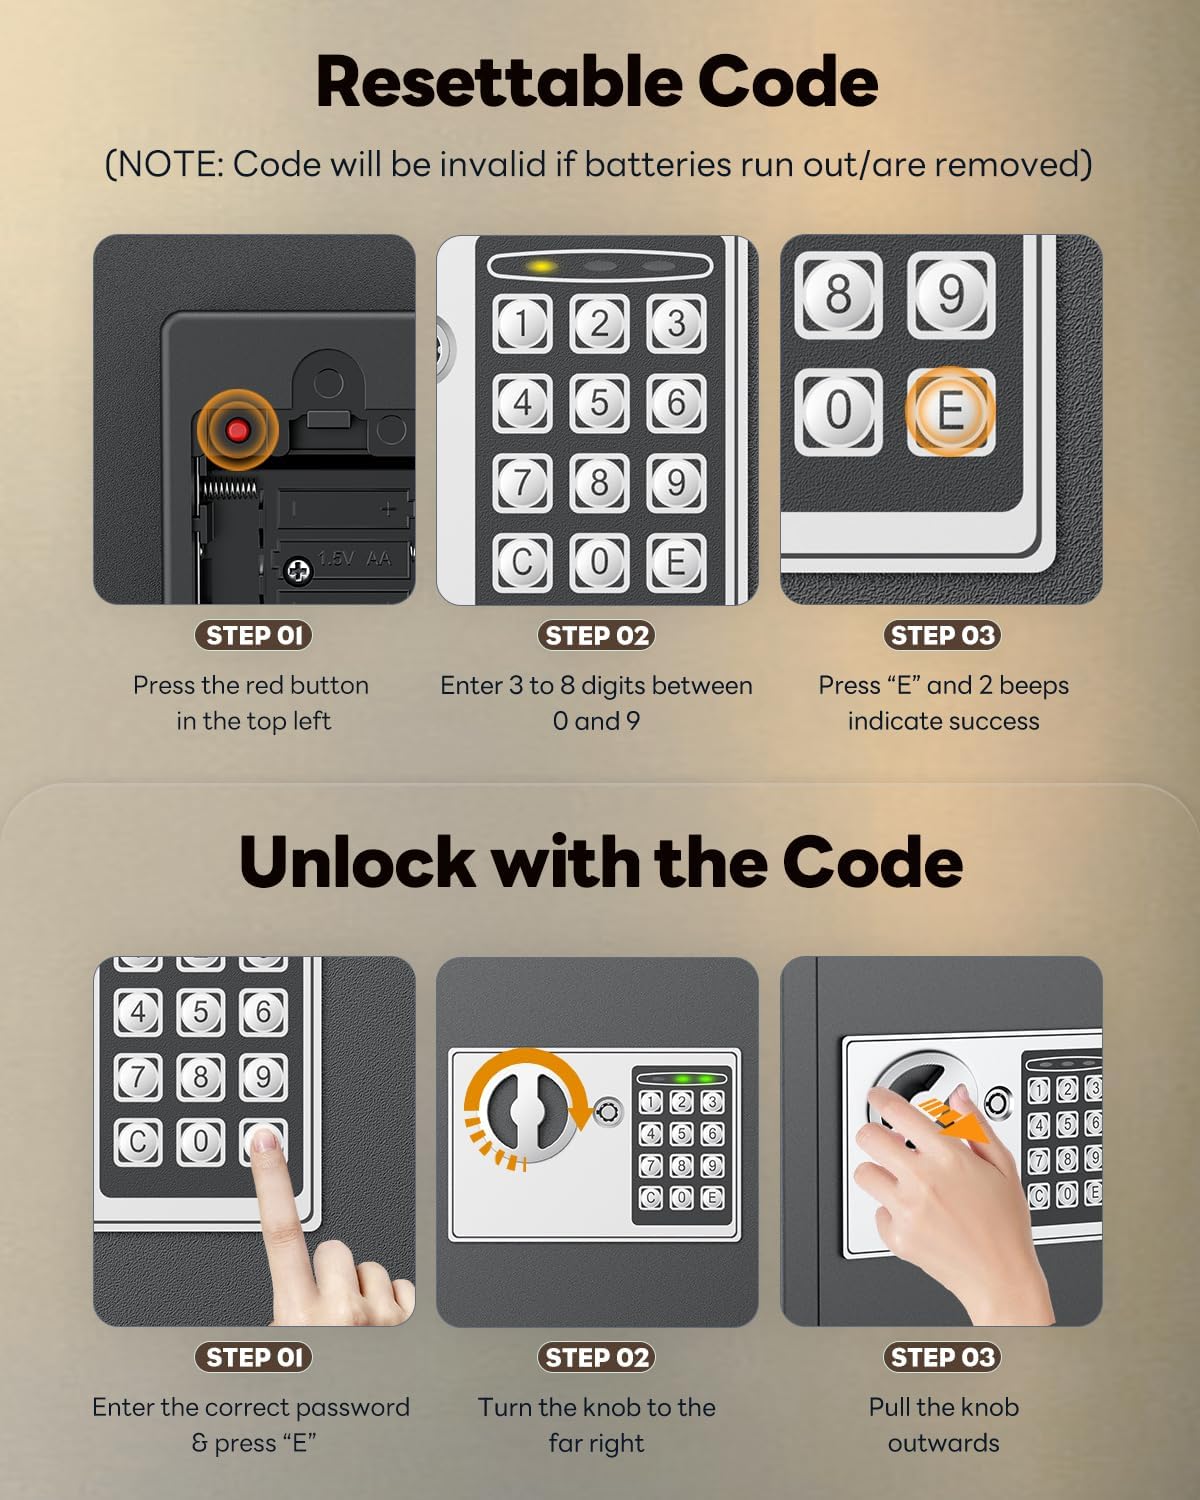
Image: A diagram illustrating the battery compartment location and the steps involved in resetting the digital code, starting with pressing a red button near the battery area.
2.3 Wall Mounting
The key cabinet is designed for wall mounting to ensure security and stability. It comes with preformed mounting holes and expansion bolts.
- Choose a suitable indoor location for mounting. Ensure the wall can support the weight of the cabinet and its contents.
- Hold the cabinet against the wall at the desired height and mark the positions of the four preformed mounting holes.
- Drill pilot holes at the marked positions. The size of the drill bit should match the expansion bolts provided.
- Insert the expansion bolts into the drilled holes.
- Align the cabinet's mounting holes with the expansion bolts and secure the cabinet firmly to the wall using the provided hardware.

Image: A visual guide demonstrating the preformed mounting holes on the back of the cabinet and the four expansion bolts used for secure wall installation.
2.4 Organizing Keys
The cabinet includes adjustable racks and various key tags to help you organize your keys efficiently.
- Adjustable Racks: The four sturdy metal racks can be flexibly adjusted for height. Snap them into the slots on the cabinet's interior sides.
- Key Tags: Use the 40 colorful rectangular key tags and 30 white slotted tags. Write key identification information on the blank paper labels using the permanent marker pen.
- Numbered Log Sheet: Utilize the numbered log sheet to record which key corresponds to which tag number, room, or purpose.

Image: A detailed view of the adjustable key racks, showing how they snap into place and the numbered stickers for quick key identification.

Image: A step-by-step guide on how to use the colorful rectangular key tags, including writing on the label and attaching keys.

Image: A visual demonstration of how to use the white slotted key tags, showing how they snap into slots and their frosted surface for writing.
3. Operating Instructions
3.1 Setting the Digital Code
To set or reset your personal 3 to 8 digit code:
- With the cabinet door open, locate and press the red reset button inside the battery compartment (top left). The first indicator light on the keypad will turn yellow.
- Enter your desired 3 to 8 digit code using the keypad (numbers 0-9).
- Press the 'E' button to confirm. Two beeps indicate successful code setting.
Remember your code. If batteries are removed or run out, the code will be reset to factory default or become invalid, requiring a new code setup.

Image: A four-step visual guide demonstrating how to reset the digital code, from pressing the red button to entering and confirming the new code.
3.2 Unlocking with the Digital Code
To open the cabinet using the digital code:
- Enter your correct 3 to 8 digit code on the keypad.
- Press the 'E' button. The last two indicator lights will turn green.
- Turn the knob to the far right and pull the door open.

Image: A four-step visual guide showing the process of unlocking the cabinet using the digital code, including entering the code, pressing 'E', and turning the knob.
3.3 Unlocking with the Key
In case of forgotten code, dead batteries, or preference, you can use the provided spare keys to open the cabinet:
- Align the key with the keyhole located on the keypad panel.
- Slightly press the key inwards into the keyhole.
- Turn the key to the far left.
- Turn the knob to the far right and pull the door open.

Image: A four-step visual guide demonstrating how to unlock the cabinet using the physical key, showing key insertion, turning the key, and then turning the knob.
4. Maintenance
4.1 General Care
- Clean the exterior of the cabinet with a soft, damp cloth. Avoid abrasive cleaners or solvents.
- Ensure the cabinet remains dry, as it is designed for indoor use and is not waterproof.
- The cabinet features anti-scratch, rustproof, and impact-resistant properties for durability.
4.2 Battery Replacement
Replace the 4 AA alkaline batteries when the low battery indicator appears or if the keypad becomes unresponsive. Refer to section 2.2 for battery installation instructions. Remember to reset your digital code after battery replacement.
5. Troubleshooting
| Problem | Possible Cause | Solution |
|---|---|---|
| Digital code does not work. | Incorrect code entered, batteries are low or dead, or batteries were removed. | Ensure correct code is entered. Replace batteries if low or dead. If batteries were removed, reset the code (refer to section 3.1). Use the spare key to open if necessary. |
| Keypad is unresponsive. | Dead or improperly installed batteries. | Check battery installation and replace with fresh AA alkaline batteries. |
| Door does not open smoothly after unlocking. | Obstruction or minor misalignment. | Ensure no items are obstructing the door. Check the rigid bolts for smooth operation. If wall-mounted, verify the cabinet is securely and levelly installed. |
| Key is difficult to insert or turn. | Key not aligned correctly, or minor debris in keyhole. | Ensure the key is aligned properly before insertion. Do not force the key. If persistent, contact customer support. |
6. Specifications
| Feature | Detail |
|---|---|
| Brand | Uniclife |
| Model Name | Uniclife-3542 (BG3542) |
| Product Dimensions | 4"D x 12"W x 14"H (10.16 cm D x 30.48 cm W x 35.56 cm H) |
| Size | 70 Position |
| Item Weight | 4.5 Pounds (2.04 kg) |
| Material Type | Alloy Steel |
| Lock Type | Electronic Digital Code Lock, Key Lock |
| Mounting Type | Wall Mount |
| Special Feature | Lockable, Anti-scratch, Rustproof, Impact-resistant |
| Power Source | 4 AA Alkaline Batteries (not included) |

Image: The Uniclife key cabinet highlighting its 70-key capacity and a close-up measurement showing the 3.2mm steel plate thickness, indicating robust construction.
7. Warranty and Support
For warranty information and customer support, please refer to the documentation provided at the time of purchase or contact the retailer/manufacturer directly. Keep your purchase receipt as proof of purchase.