
ELIVED YD1038
ELIVED Tilting TV Wall Mount (Model YD1038) Instruction Manual
For Most 37"-85" TVs Up to 132 lbs
Introduction
This manual provides detailed instructions for the safe and proper installation and operation of your ELIVED Tilting TV Wall Mount, Model YD1038. Please read all instructions carefully before beginning installation to ensure correct setup and to prevent damage or injury.
Safety Information
- Weight Capacity: Do not exceed the maximum weight capacity of 132 lbs (60 kg).
- TV Size: This mount is designed for TVs between 37 and 85 inches.
- Wall Type: This mount is intended for installation on wood studs (16"/18"/24" spacing) or solid concrete/brick walls. DO NOT mount on drywall alone.
- Professional Installation: If you are unsure about the installation process, consult a qualified professional.
- Cable Management: Ensure all cables are routed safely and do not interfere with the mount's movement or pose a tripping hazard.
- Regular Checks: Periodically check that the mount and all fasteners are secure.
Package Contents
Verify that all components are present and undamaged before installation. If any parts are missing or defective, contact ELIVED customer support.
- Wall Plate Assembly
- TV Brackets (2x)
- Hardware Kit (various screws, washers, spacers, anchors)
- Bubble Level
- Instruction Manual
Specifications
- Brand: ELIVED
- Model: YD1038
- Mounting Type: Wall Mount
- Movement Type: Tilt
- Material: Metal
- Color: Black
- Compatible TV Sizes: 37" to 85"
- Maximum Load Capacity: 132 lbs (60 kg)
- VESA Compatibility: 100x100mm to 600x400mm (Horizontal x Vertical)
- Wall Profile: 1.5 inches (3.8 cm) from wall
- Maximum Tilt Angle: 10 Degrees (downward)
- Wood Stud Spacing: Fits 16", 18", 24" wood studs
Compatibility Check
1. TV Size and Weight
Ensure your TV's screen size is between 37 and 85 inches and its weight does not exceed 132 lbs (60 kg).
2. VESA Pattern
Locate the four mounting holes on the back of your TV. Measure the horizontal and vertical distance between these holes (center to center). This is your TV's VESA pattern. This mount supports VESA patterns from 100x100mm to 600x400mm.

Image: Available VESA Patterns. This diagram illustrates how to measure the horizontal and vertical distances between the mounting holes on the back of your television to determine its VESA pattern, which must fall within the 100x100mm to 600x400mm range for compatibility with the mount.
3. Wall Type and Stud Spacing
This mount is compatible with wood studs (16", 18", or 24" spacing) and solid concrete/brick walls. Do not install into drywall alone. For wood stud installation, ensure the studs are centered and capable of supporting the TV's weight. For concrete/brick, appropriate anchors must be used.

Image: Wall Mount on Wood Studs. This image demonstrates the wall mount installed on wood studs, highlighting its compatibility with stud spacing up to a maximum of 24 inches, ensuring proper support for your television.
Setup and Installation
Before You Begin
- Read the entire manual.
- Ensure you have all necessary tools (e.g., drill, stud finder, level, screwdriver, wrench).
- Identify the exact mounting location on your wall.
- Have a helper available, as TV installation often requires two people.
Tools Required (Not Included)
- Pencil
- Stud Finder (for wood stud installation)
- Drill with appropriate drill bits
- Socket Wrench or Adjustable Wrench
- Phillips Head Screwdriver
- Tape Measure
Step-by-Step Installation
The following steps outline the general installation process. Refer to the included hardware kit for specific screw sizes and wall anchor types.
- Attach TV Brackets to TV: Carefully place your TV face down on a soft, clean surface. Align the TV brackets with the VESA mounting holes on the back of your TV. Select the correct screws, washers, and spacers from the hardware kit that fit your TV. Securely fasten the brackets to the TV.
- Mount Wall Plate to Wall: Using a stud finder, locate and mark the center of your wood studs. Position the wall plate at your desired height and use the included bubble level to ensure it is perfectly horizontal. Mark the pilot hole locations. Drill pilot holes into the studs or concrete wall (using appropriate drill bits and anchors for concrete). Secure the wall plate to the wall using the lag bolts provided.
- Hang TV onto Wall Plate: With the help of a second person, carefully lift the TV with the attached brackets and hook them onto the top edge of the wall plate. Ensure the TV brackets are fully seated on the wall plate.
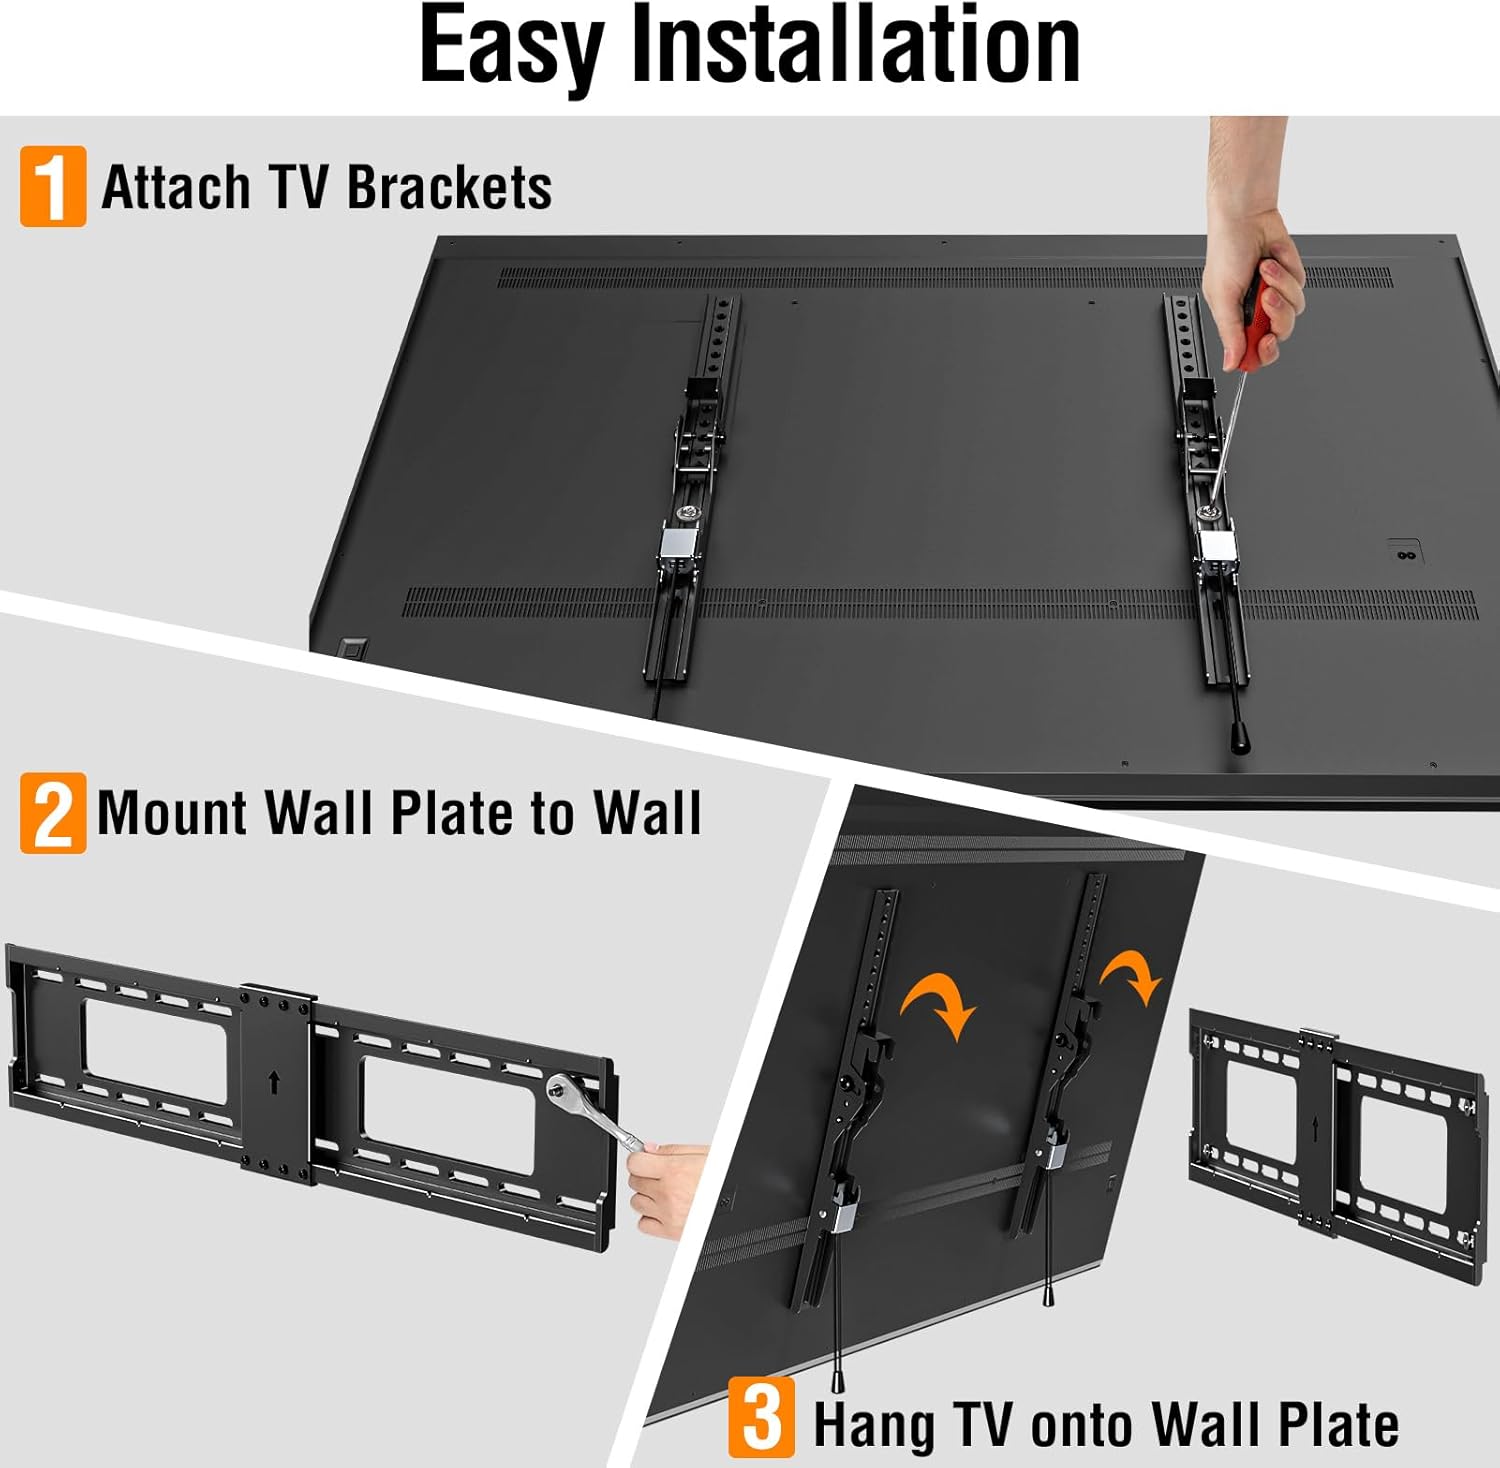
Image: Easy Installation Steps. This visual guide illustrates the three primary steps for installing the TV mount: attaching the brackets to the TV, mounting the wall plate to the wall, and finally, hanging the TV onto the secured wall plate.
Video: ELIVED Tilt TV Mount Flush to Wall YD1038. This video provides a visual overview of the ELIVED Tilt TV Mount, demonstrating its features and installation process, including how it sits flush against the wall.
Operating Instructions
Tilting Adjustment
This mount allows for a downward tilt of 0 to 10 degrees to reduce glare and optimize your viewing angle. To adjust the tilt, loosen the tilt adjustment knobs on the TV brackets, set the desired angle, and then securely tighten the knobs.

Image: Tilt to Reduce Glare. This image illustrates the TV mount's tilting capability, allowing the screen to be angled downwards by 0 to 10 degrees to minimize glare and improve viewing comfort.
Quick Lock and Release
The mount features a quick lock and release mechanism for easy removal or securing of the TV. Simply pull the straps located at the bottom of the TV brackets to either lock the TV in place or release it from the wall plate.

Image: Slim Profile and Quick Release. This image highlights the slim 1.5-inch profile of the TV mount against the wall and demonstrates the 'Pull Quick Release' straps for easy locking and unlocking of the television.
Maintenance
- Cleaning: Clean the mount with a soft, dry cloth. Avoid abrasive cleaners or solvents.
- Fastener Check: Periodically (e.g., every 6 months) check all screws and bolts to ensure they remain tight and secure.
- Damage Inspection: Inspect the mount for any signs of wear, corrosion, or damage. If damage is found, discontinue use and contact customer support.
Troubleshooting
- TV Not Level: Use the fine-tuning leveling screws on the TV brackets to make minor adjustments after installation. Ensure the wall plate was installed level initially.
- Difficulty Tilting: Ensure the tilt adjustment knobs are sufficiently loosened before attempting to change the angle. Do not force the tilt mechanism.
- TV Not Securing to Wall Plate: Verify that the TV brackets are correctly hooked onto the wall plate and that the quick lock/release straps are engaged.
- Missing Parts: Refer to the 'Package Contents' section. If parts are missing, contact ELIVED customer support immediately.
Warranty and Support
ELIVED products are manufactured with quality and durability in mind. For specific warranty details, please refer to the product packaging or contact ELIVED customer support directly. Our support team is available to assist with any questions or issues you may encounter during installation or use.
Contact Information: Please visit the official ELIVED website or refer to your purchase documentation for current customer support contact details.
Related documentsYD1038

Ask a question about this manual
Ask about setup, troubleshooting, compatibility, parts, safety, or missing instructions. Manuals+ will review the question and use this page’s manual context to help answer it.