
ATTACK SHARK AKS068PRO, AKS068
ATTACK SHARK Mechanical Keyboard User Manual
Models: AKS068PRO (Tri-Mode) & AKS068 (Wired)
1. Introduction
This manual provides detailed instructions for the setup, operation, and maintenance of your ATTACK SHARK AKS068PRO Tri-Mode and AKS068 Wired Mechanical Keyboards. Both models feature a 65% Alice layout, gasket mount structure, and hot-swappable switches, designed to provide a comfortable and responsive typing experience. Please read this manual thoroughly before using your keyboard.
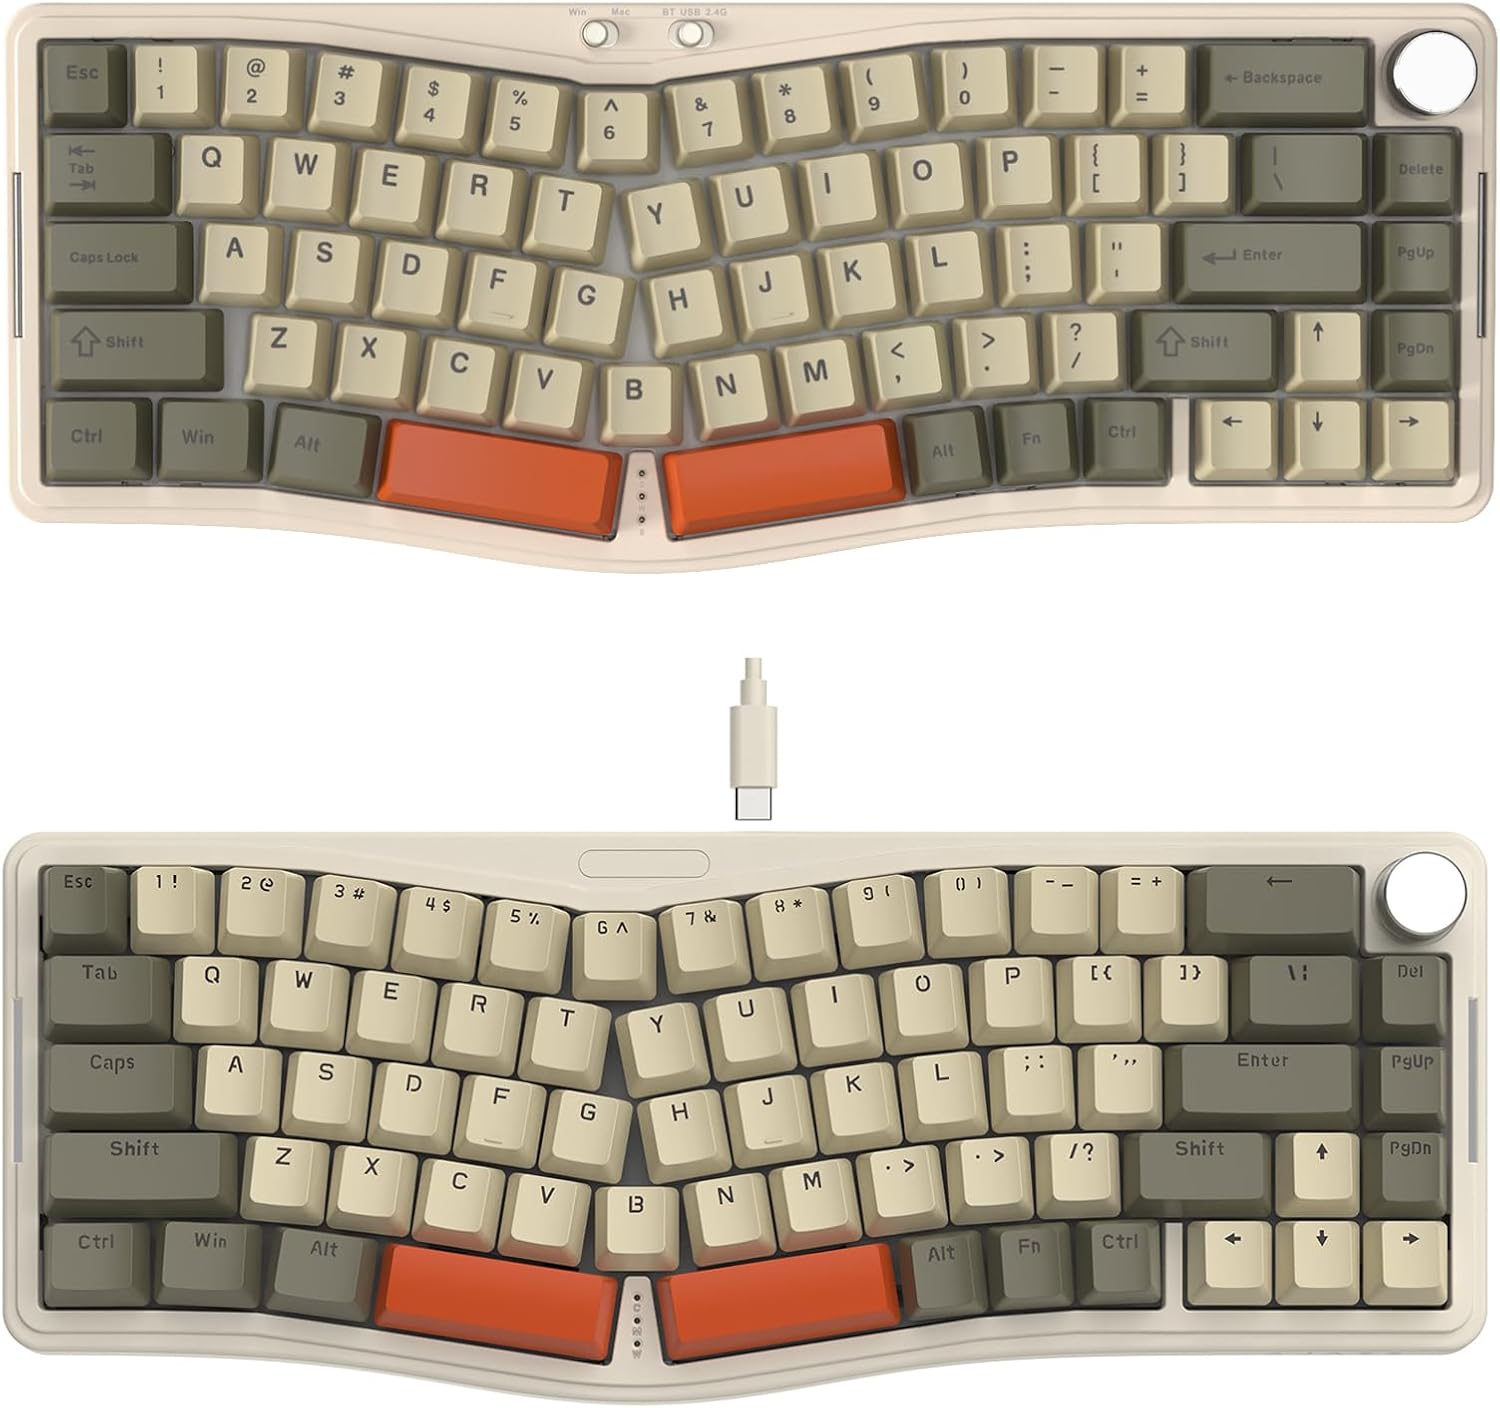
Image: Overview of the ATTACK SHARK AKS068PRO and AKS068 mechanical keyboards, showcasing their Alice layout and compact design.
2. Package Contents
Please verify that all items are present in your package:
- ATTACK SHARK AKS068PRO Keyboard Kit (for Tri-Mode version)
- ATTACK SHARK AKS068 Keyboard Kit (for Wired version)
- Pre-lubed Switches (Sea Salt Switches for AKS068PRO, Red Switches for AKS068)
- Keycaps (Tri-color themed)
- USB Type-C Cable
- 2.4Ghz Wireless Dongle (for AKS068PRO only)
- Switch Puller
- Keycap Puller
- User Manual (this document)
3. Product Overview
3.1. ATTACK SHARK AKS068PRO (Tri-Mode)
The AKS068PRO is a versatile 65% Alice layout mechanical keyboard featuring tri-mode connectivity (wired, 2.4Ghz wireless, Bluetooth 5.1). It comes with pre-lubed Sea Salt linear switches and a 3000mAh built-in battery for extended wireless use. The keyboard supports VIA programming for advanced customization.

Image: Detailed features of the AKS068PRO, including Alice design, tri-mode connection, hot-swappable PCB, South Facing RGB, Gasket Structure, CNC Metal Knob, VIA/QMK support, and Custom Sea Salt Switches.
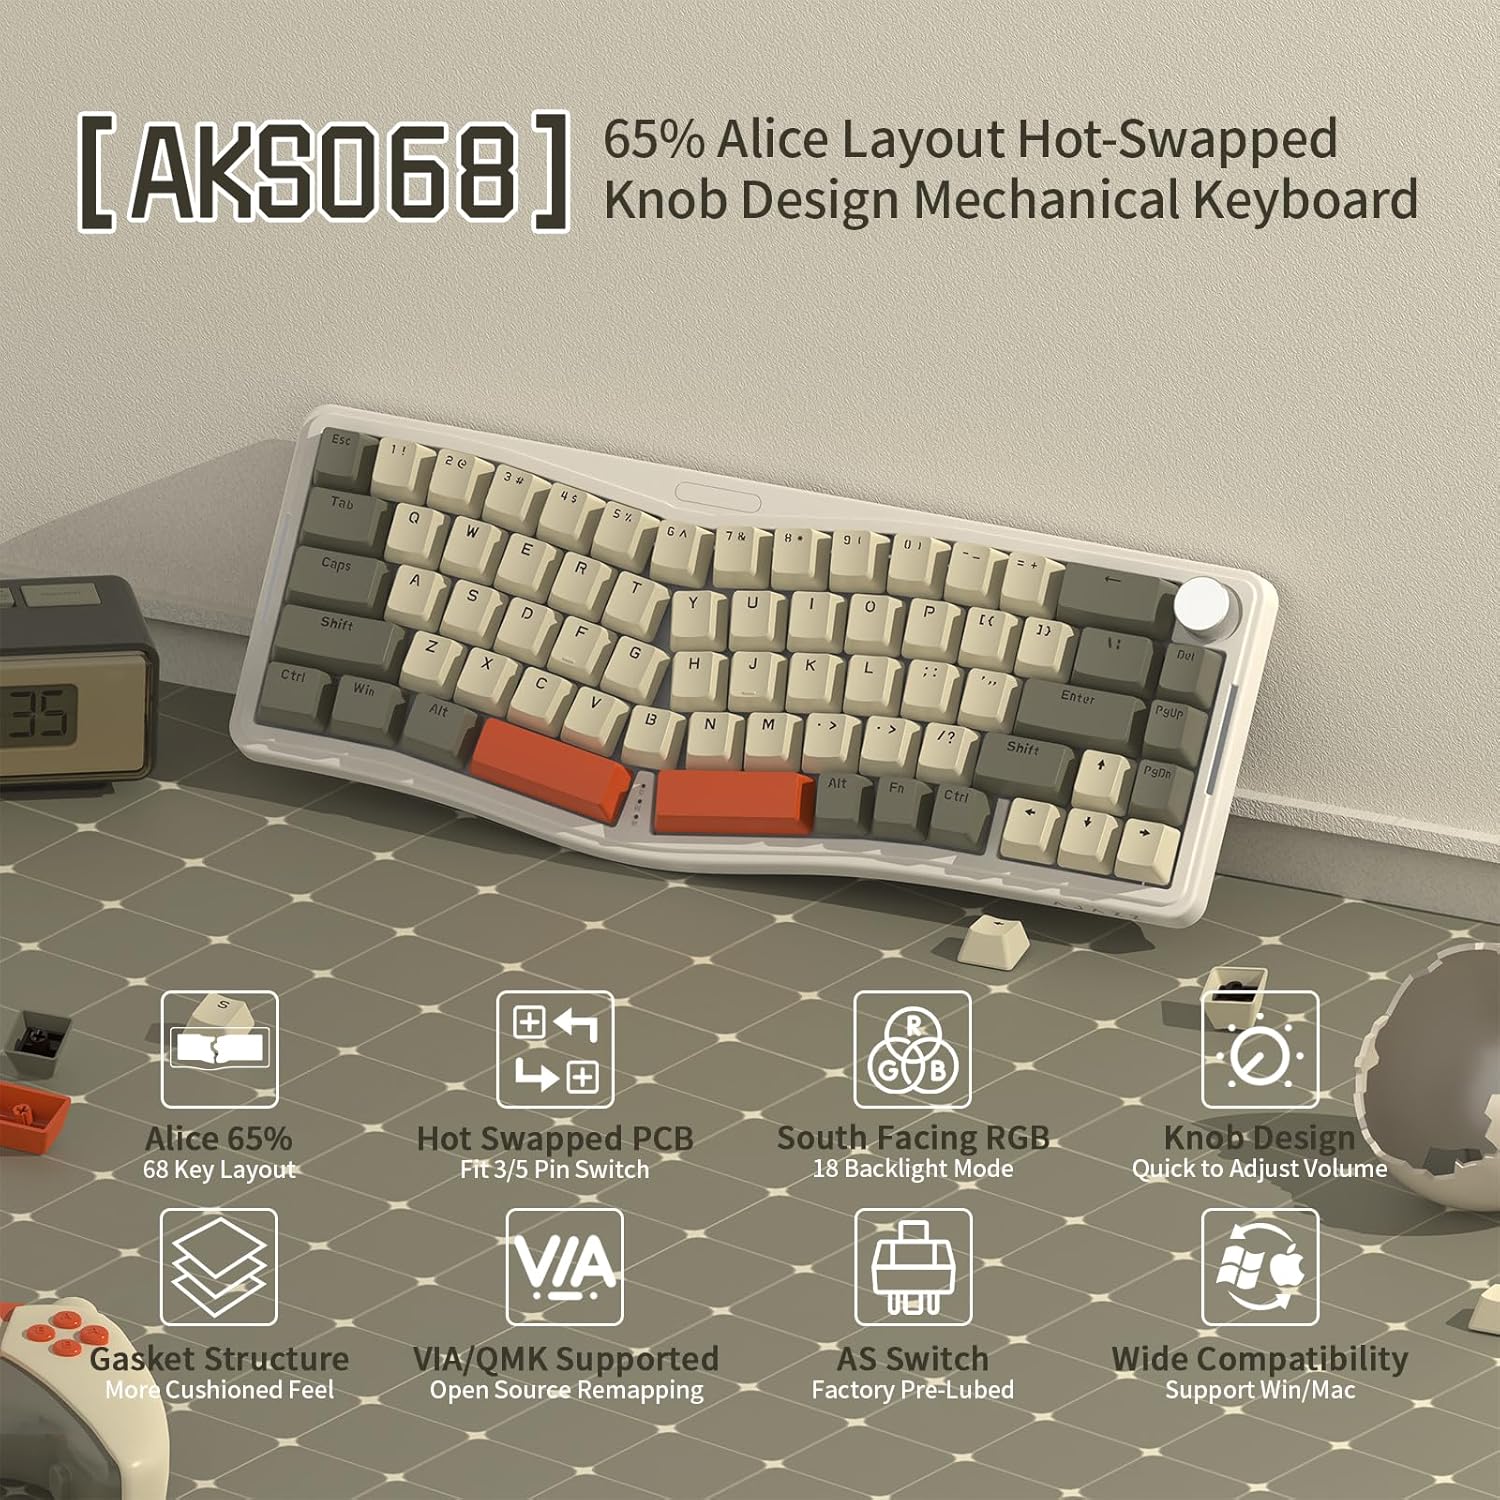
Image: Illustration of the AKS068PRO's 3000mAh battery capacity and estimated usage times: 10 hours for charging, 16.5 hours with backlight on, and 158 hours with backlight off.
3.2. ATTACK SHARK AKS068 (Wired)
The AKS068 is a 65% Alice layout mechanical keyboard designed for reliable wired connectivity via USB Type-C. It features pre-lubed Red linear switches and supports VIA programming. This model is ideal for users who prefer a stable, direct connection without the need for wireless functionality.

Image: Detailed features of the AKS068, including Alice 65% layout, hot-swapped PCB, South Facing RGB, Knob Design, Gasket Structure, VIA/QMK support, AS Switch Pre-Lubed, and Wide Compatibility.

Image: Features of the AKS068 wired gaming keyboard, highlighting its 68-key compact layout, double layer stand, tri-color ABS keycaps, Type-C port, and anti-slip mat.
3.3. Common Features
- 65% Alice Layout: Ergonomic design for comfortable typing.
- Gasket Mount Structure: Provides a cushioned typing feel and reduces noise.
- Hot-Swappable PCB: Compatible with 3-pin/5-pin switches, allowing for easy switch replacement without soldering.
- RGB Backlighting: Multiple lighting modes for customization.
- CNC Metal Knob: For volume control and other functions.
- VIA Programmable: Open-source software support for key remapping and macro creation.
- Full Key Anti-Ghosting: Ensures all key presses are registered accurately.
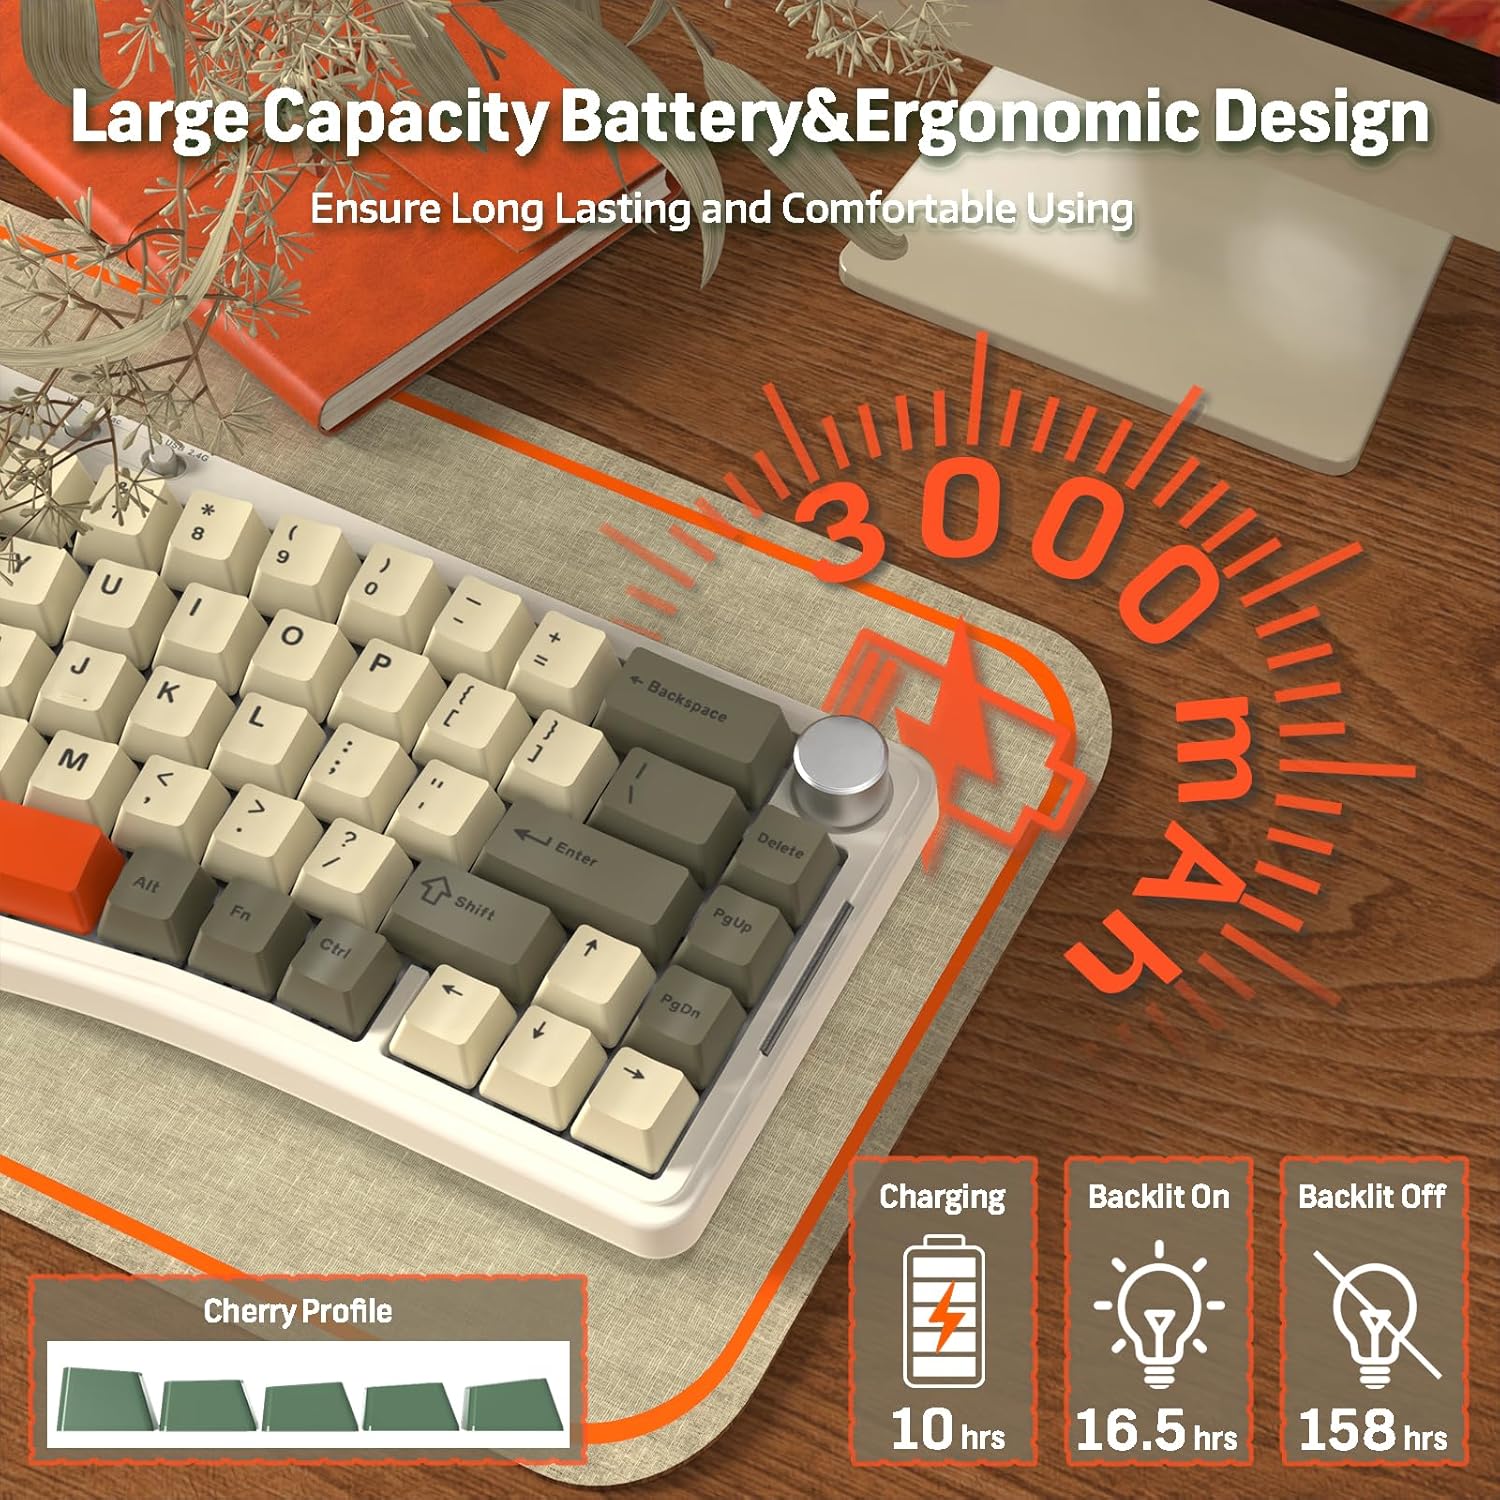
Image: Exploded view illustrating the gasket mounted structure of the keyboard, showing the layers of silent material and the cushioned feel it provides. Also highlights the CNC volume knob and high precision adjustment satellite switches.
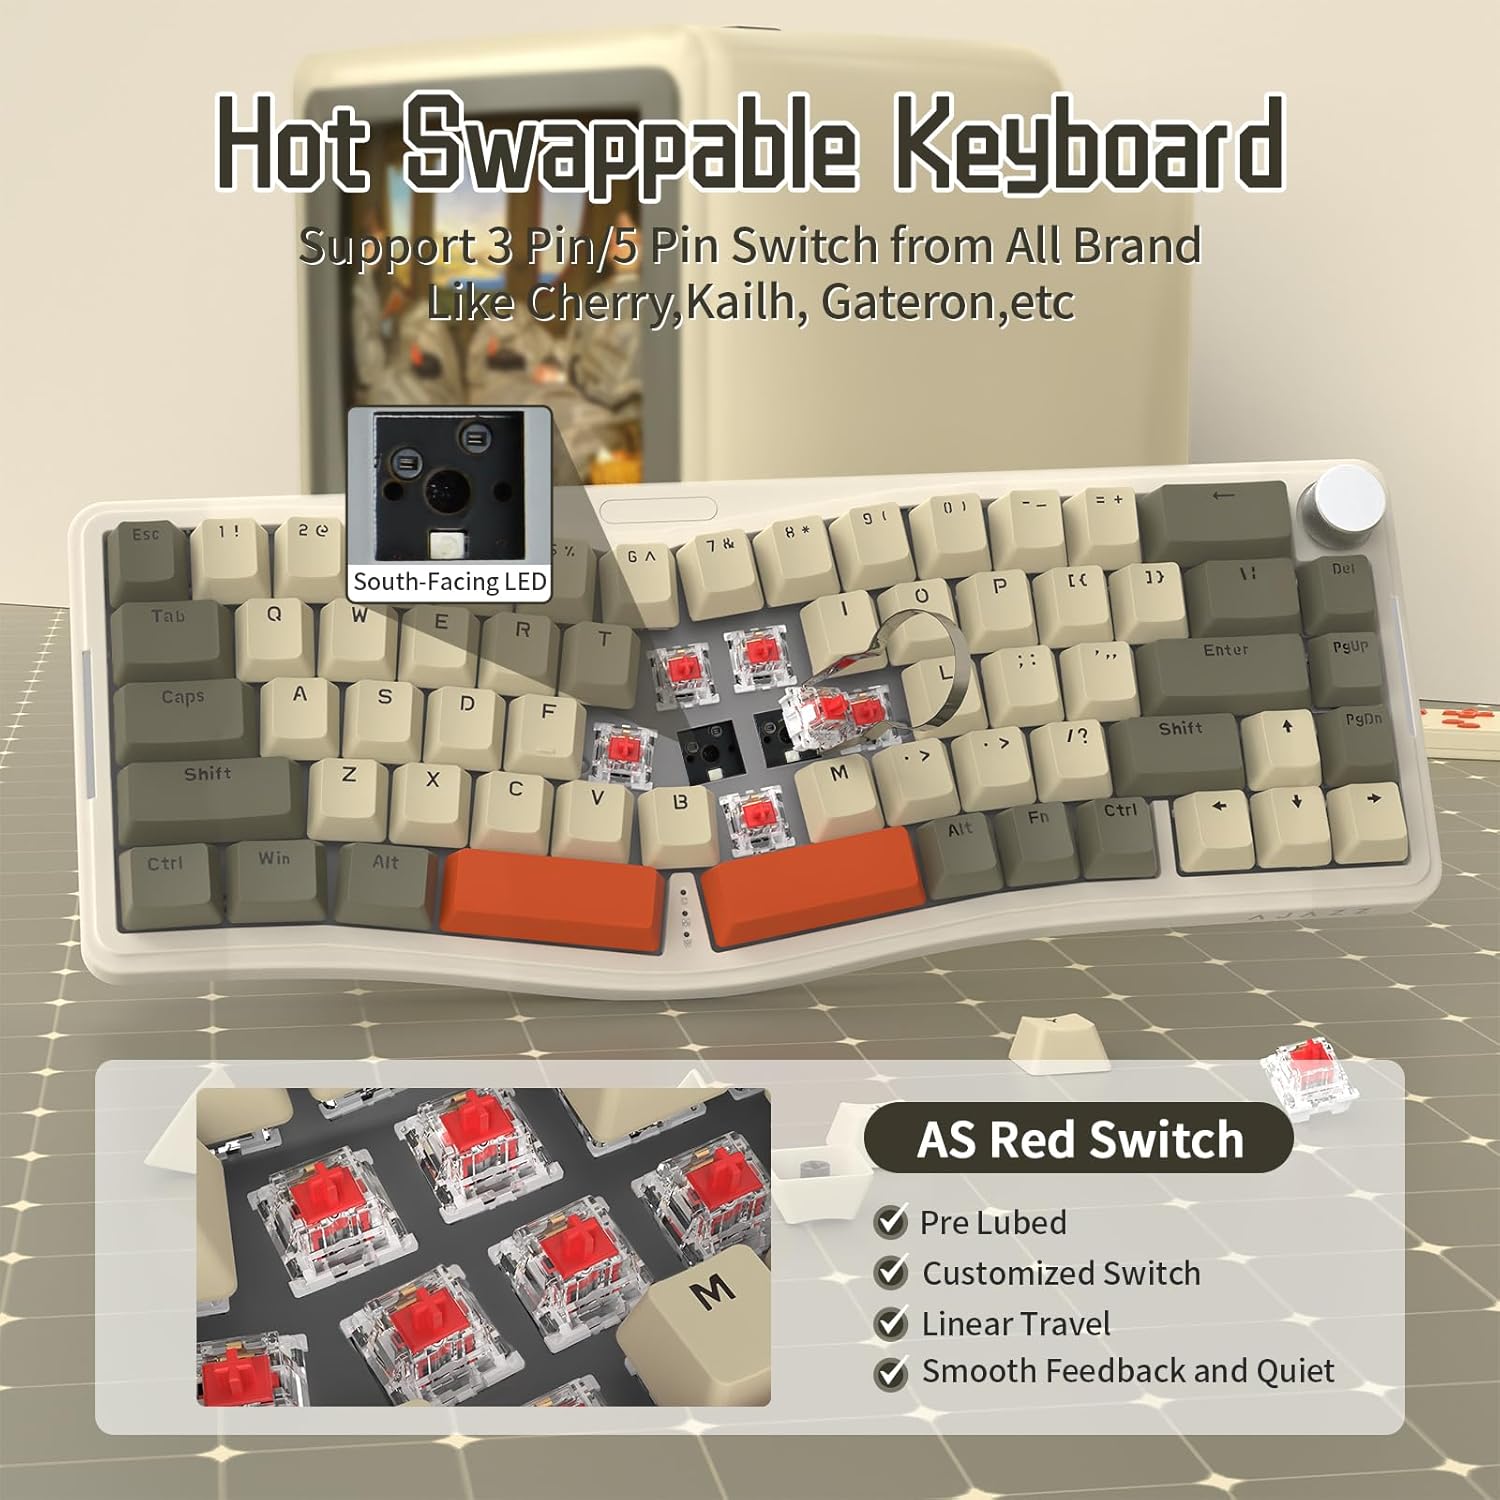
Image: Close-up of the hot-swappable PCB, demonstrating compatibility with 3-pin/5-pin switches from various brands. Also shows the pre-lubed AS Red Switches with their linear travel and smooth feedback.

Image: Details of the Custom Sea Salt Switch, including its linear smooth feel, total travel (3.5mm), actuation travel (2.0mm), actuation force (40g), and bottom-out force (45g). Also shows the hot-swapped slotted PCB compatible with 3-pin/5-pin switches.
4. Setup
4.1. Keyboard Assembly
Your keyboard comes as a kit, requiring the installation of switches and keycaps. Follow these steps:
- Carefully align each switch with the hot-swap sockets on the PCB. Ensure the pins are straight before pressing down.
- Gently push each switch until it clicks into place. Do not force switches, as bent pins can damage the socket.
- Once all switches are installed, use the keycap puller to place the keycaps onto the corresponding switches. Ensure they are firmly seated.
4.2. Connectivity (AKS068PRO Tri-Mode)
The AKS068PRO offers three connection modes:

Image: Diagram showing the triple mode connection options for the AKS068PRO: 2.4Ghz wireless via dongle, Bluetooth 5.0, and stable wired mode via Type-C cable. Also shows the switch for selecting connection mode/system.
4.2.1. Wired Mode
- Connect the provided USB Type-C cable to the keyboard's port and the other end to your computer's USB port.
- The keyboard will be automatically recognized.
4.2.2. 2.4Ghz Wireless Mode
- Locate the 2.4Ghz USB dongle.
- Plug the dongle into an available USB port on your computer.
- On the keyboard, switch the mode selector to '2.4G'. The keyboard should connect automatically.
4.2.3. Bluetooth 5.1 Mode
- On the keyboard, switch the mode selector to 'BT'.
- The keyboard supports up to 3 Bluetooth devices. To pair, press and hold 'FN' + '1', '2', or '3' until the indicator light flashes rapidly.
- On your device (computer, tablet, phone), enable Bluetooth and search for 'ATTACK SHARK AKS068PRO'.
- Select the keyboard to pair. Once paired, the indicator light will stop flashing.
- To switch between paired Bluetooth devices, press 'FN' + '1', '2', or '3' briefly.
4.3. Connectivity (AKS068 Wired)
The AKS068 connects via a wired USB Type-C connection:
- Connect the provided USB Type-C cable to the keyboard's port and the other end to your computer's USB port.
- The keyboard will be automatically recognized and ready for use.
5. Operating Instructions
5.1. FN Key Combinations
The keyboard features various FN key combinations for quick access to functions:
| Combination | Function |
|---|---|
| FN + Q/W/E | Switch Bluetooth Device (AKS068PRO only) |
| FN + R | Switch to 2.4Ghz Mode (AKS068PRO only) |
| FN + T | Switch to Wired Mode |
| FN + Backspace | Toggle RGB Backlight On/Off |
| FN + \| | Cycle RGB Lighting Modes |
| FN + [ { | Decrease RGB Brightness |
| FN + ] } | Increase RGB Brightness |
| FN + ; : | Decrease RGB Speed |
| FN + ' " | Increase RGB Speed |
| FN + Win | Lock/Unlock Windows Key |
| FN + Alt | Switch between Windows/Mac Layout |
5.2. Knob Functionality
The CNC metal knob located on the top right of the keyboard primarily controls volume:
- Rotate Clockwise: Increase Volume
- Rotate Counter-clockwise: Decrease Volume
- Press Down: Mute/Unmute Audio
5.3. VIA Programming
Both AKS068PRO and AKS068 keyboards support VIA software for advanced key remapping, macro creation, and lighting customization. To use VIA:
- Ensure your keyboard is connected to your computer (wired mode is recommended for initial setup).
- Go to the official VIA website (use the online version or download the desktop app).
- You will need to load the corresponding JSON file for your keyboard model. Download the correct JSON file from: bit.ly/4amBzF8. Select the 'tri mode version' for AKS068PRO or 'single mode version' for AKS068.
- In VIA, navigate to the 'DESIGN' tab and click 'LOAD' to import the JSON file.
- Once loaded, go to the 'CONFIGURE' tab. You can now remap keys, create macros, and adjust lighting settings. Changes are applied in real-time to the keyboard.
6. Maintenance
6.1. Cleaning
- Keycaps: Use the provided keycap puller to remove keycaps. Clean them with a mild soap solution and a soft cloth. Ensure they are completely dry before reattaching.
- Keyboard Body: Use a soft, dry cloth to wipe down the keyboard. For stubborn dirt, a slightly damp cloth can be used, but ensure no liquid enters the keyboard.
- Between Keys: Use compressed air to remove dust and debris from between the switches.
6.2. Switch Replacement
Thanks to the hot-swappable design, you can easily replace switches:
- Use the switch puller to gently grip the top and bottom clips of the switch you wish to remove.
- Pull the switch straight up until it detaches from the PCB.
- Align the pins of the new switch with the hot-swap sockets on the PCB.
- Gently push the new switch down until it clicks into place. Ensure the pins are not bent during installation.
7. Troubleshooting
| Issue | Possible Solution |
|---|---|
| Keyboard not responding (Wired) | Check USB cable connection. Try a different USB port or cable. Restart your computer. |
| Keyboard not connecting (2.4Ghz) | Ensure dongle is securely plugged in. Switch keyboard mode to '2.4G'. Try a different USB port for the dongle. |
| Keyboard not connecting (Bluetooth) | Ensure keyboard mode is 'BT'. Press FN + 1/2/3 to select a channel. Ensure Bluetooth is enabled on your device. Forget and re-pair the device. Ensure keyboard battery is charged. |
| Keys not registering or double-typing | Ensure switches are fully seated. Try replacing the problematic switch with a spare. Clean under the keycap. |
| RGB backlight not working | Press FN + Backspace to toggle RGB. Check brightness settings (FN + [ { / ] }). Ensure keyboard battery is charged (for wireless mode). |
| VIA software not detecting keyboard | Ensure keyboard is connected via USB cable. Make sure the correct JSON file is loaded in VIA. Restart VIA software. |
| Knob not functioning | Ensure the knob is securely attached. Check if any software (e.g., VIA) has remapped its function. |
8. Specifications
| Feature | ATTACK SHARK AKS068PRO | ATTACK SHARK AKS068 |
|---|---|---|
| Layout | 65% Alice Layout (68 Keys) | |
| Mounting Style | Gasket Mount | |
| Switch Type | Sea Salt Linear Switch (Pre-lubed) | Red Linear Switch (Pre-lubed) |
| Hot-Swappable | Yes (3-pin/5-pin compatible) | |
| Connectivity | Wired (USB-C), 2.4Ghz Wireless, Bluetooth 5.1 | Wired (USB-C) |
| Battery Capacity | 3000mAh | N/A |
| RGB Backlight | Yes (18 Backlight Modes, South-Facing RGB) | |
| Programmability | VIA/QMK Supported | |
| Anti-Ghosting | Full Key Anti-Ghosting (NKRO) | |
| Knob | CNC Metal Volume Knob | |
| Compatibility | Windows, macOS | |
9. Warranty and Support
ATTACK SHARK products are designed for quality and durability. For warranty information, technical support, or service inquiries, please refer to the warranty card included with your product or visit the official ATTACK SHARK website. Please retain your proof of purchase for any warranty claims.
Related documentsAKS068PRO, AKS068


Ask a question about this manual
Ask about setup, troubleshooting, compatibility, parts, safety, or missing instructions. Manuals+ will review the question and use this page’s manual context to help answer it.